

That summer watermelon craving hits hard, but wrestling with a 20-pound melon often leaves countertops dripping and fingers sticky. Instead of struggling with knives and mismatched utensils, how to use a watermelon cutter transforms this messy chore into a 5-minute masterpiece. These specialized tools combine slicing precision with serving convenience, letting you create uniform pieces without switching implements. Whether you’re prepping for a pool party or weekday snacks, mastering this simple device means perfectly portioned fruit every time—no slippery rinds or wasted juice.
The right watermelon cutter eliminates the frustration of traditional methods. No more uneven chunks, crushed fruit, or sticky cleanup. Instead, you’ll glide through flesh with surgical precision while the integrated fork lifts pieces cleanly. In this guide, you’ll discover professional techniques for flawless cubes, elegant wedges, and even decorative shapes—all while avoiding common pitfalls that turn watermelon prep into a sticky disaster. Let’s unlock the full potential of your tool.
Choose the Right Watermelon Cutter for Your Needs

Stainless steel 2-in-1 fork slicers dominate the market for good reason. These compact tools feature razor-sharp cutting edges on one side and sturdy fork tines on the other, enabling seamless transition from slicing to serving. Unlike flimsy plastic alternatives, stainless steel resists rust and maintains edge integrity through hundreds of uses.
Critical buying considerations:
– Blade length: Opt for 6-8 inches to handle standard watermelons without excessive force
– Ergonomic grip: Rubberized or contoured handles prevent hand fatigue during bulk prep
– Weight balance: Test for heft that feels substantial (not heavy) in your palm
– Dishwasher safety: Confirm top-rack compatibility for effortless cleanup
Avoid models with loose joints between the blade and fork—these compromise cutting control and create bacterial traps in crevices. Premium options ($15-$30) justify their cost through balanced weight distribution and professional-grade steel that stays sharp longer.
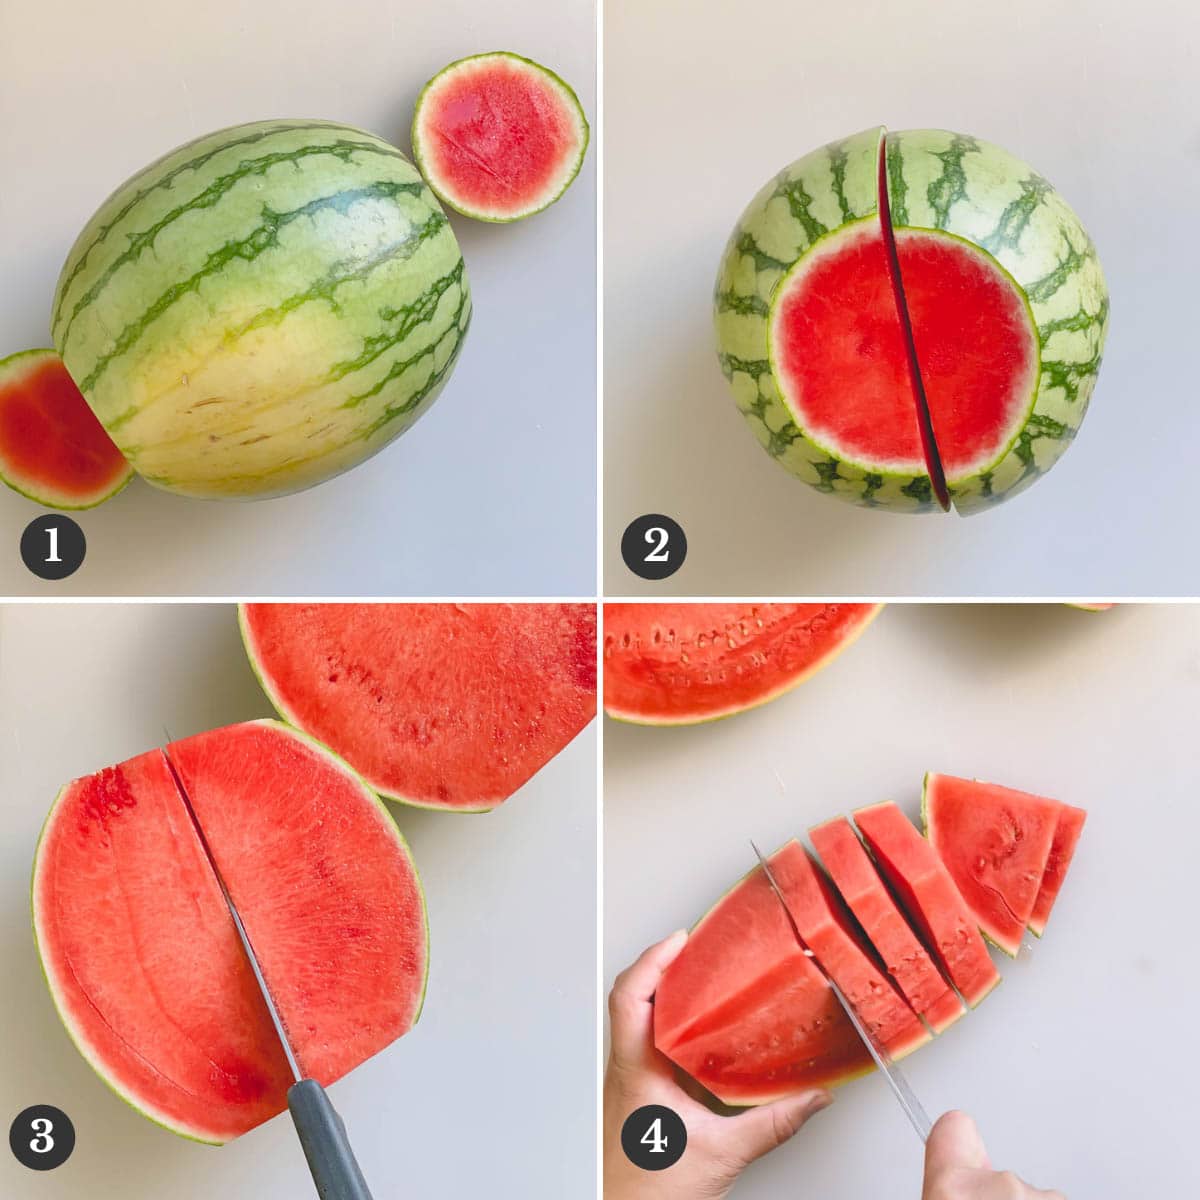
Prep Your Watermelon for Flawless Cutting
Start with a stable foundation: Place your melon on a non-slip cutting board with deep juice grooves. Wash the entire rind under running water, scrubbing gently with a vegetable brush. This critical step removes surface bacteria that could transfer to flesh when cutting through the rind.
Create workable sections: Using a chef’s knife, slice the watermelon crosswise into halves. Place one half cut-side down on your board—this flat base prevents dangerous rolling. For easier handling, quarter each half, then position a section with the curved rind facing outward. Never skip this stabilization step—unstable melons cause uneven cuts and increase slip risks.
Execute Perfect Slices with Proper Technique
The 45-degree angle method: Position the cutter where red flesh meets white rind. Insert the blade at a 45-degree angle and apply steady downward pressure—no sawing motions. The sharp edge should glide through with minimal resistance, preserving fruit integrity. Maintain 1-2 inch spacing between cuts for uniform slices.
Pro tip for clean separation: Rinse the blade under cool water between cuts if flesh sticks. A slightly damp surface reduces friction and prevents crushing delicate pieces. For thicker rinds, pause halfway through the cut, gently twist the blade to create separation, then complete the motion.
Create Uniform Cubes in Seconds
Master the grid technique: After making parallel vertical cuts, rotate your watermelon section 90 degrees. Repeat the cutting motion perpendicular to your first set of slices. This creates a perfect grid pattern ready for cubing. Key visual cue: Your grid lines should form even squares—adjust spacing if cubes appear misshapen.
Lifting without damage: Flip the cutter to use the fork tines. Slide them horizontally under the grid section, then lift straight up. This motion separates cubes cleanly from the rind without breaking them apart. For stubborn pieces, gently wiggle the fork side-to-side while lifting.
Serve Like a Professional Caterer
The fork function advantage: Unlike regular forks that crush watermelon, the integrated tines lift pieces intact. Slide them under cut sections and lift vertically—never sideways—to prevent juice loss. Arrange slices in overlapping concentric circles on platters for maximum visual appeal.
Party-speed serving: For large gatherings, pre-cut multiple watermelon sections, then use the fork to transfer pieces directly into chilled bowls. This “cut-and-go” method eliminates double-handling and keeps fruit cold. Warning: Never use the cutter’s fork on hard surfaces—it can bend the tines.
Fix Common Cutting Problems Immediately
When the blade won’t penetrate: Cold watermelon resists cutting. Let refrigerated melons sit at room temperature for 20 minutes before slicing. If the blade feels dull, professional sharpening is essential—forcing a dull cutter creates dangerous pressure points.
Sticking fruit solution: Lightly coat the blade with cooking spray before starting. Alternatively, chill the melon for just 15 minutes—enough to reduce stickiness without making cutting difficult. Never oil the entire melon—this creates slippery handling hazards.
Clean and Maintain Your Tool for Longevity
Post-use ritual: Rinse immediately under warm water to prevent sugar crystallization. Use a soft sponge with mild soap, focusing on the blade-fork junction where pulp hides. Critical step: Disassemble if possible (check manufacturer instructions) to clean hidden crevices.
Monthly maintenance: Dry thoroughly with a microfiber towel, then apply a drop of food-grade mineral oil to metal components. Store vertically in a blade guard—never loose in drawers where contact with other utensils dulls edges. Replace if rust penetrates below the surface.
Craft Advanced Presentation Patterns
Restaurant-style wedges: Quarter your watermelon half lengthwise. Starting from the center, cut outward at 45-degree angles to create 1.5-inch-thick triangular wedges. Perfect for handheld eating at cookouts without juice drips.
Melon ball artistry: If your cutter includes a baller attachment, scoop in smooth circular motions. For uniform spheres, rotate your wrist steadily while applying even pressure. Alternate small and large balls in skewers with mint leaves for stunning appetizers.
Prioritize Safety at Every Stage
Non-negotiable rules:
– Always place a damp towel under cutting boards to prevent sliding
– Keep fingers curled under your knuckles while cutting
– Use the full blade length in one motion—choppy cuts increase slip risks
– Store with protective covers to prevent drawer-drawer accidents
Replace immediately if: Tines bend more than 5 degrees, handles develop cracks, or rust appears beneath the surface. Damaged tools require excessive force that compromises control.
Store for Optimal Accessibility and Safety
Kitchen organization: Dedicate a vertical slot in your utensil drawer with the blade guard secured. This prevents edge contact with other metals and makes grabbing the tool instinctive during summer prep. For frequent users, magnetic knife strips keep it visible and protected.
Outdoor event protocol: Choose models with hard-shell cases for beach trips. Pack cooling packs beneath serving bowls—not directly against cut fruit—to maintain crispness without waterlogging. Always transport in separate containers from sharp knives.
Maximize Nutritional Value Through Proper Handling
Vitamin preservation secrets: Sharp blades minimize cellular damage, slowing oxidation. Cut watermelon within 30 minutes of serving to retain maximum vitamin C. Store leftovers in airtight containers with minimal air space—glass jars work best.
Creative nutrient boosts: Cube and freeze watermelon using your cutter for smoothie bases. The fork function creates perfect shapes for protein-packed skewers: alternate cubes with cottage cheese and chia seeds for a balanced snack.
Master Bulk Processing for Large Gatherings
Efficient party workflow: Set up a three-station assembly line:
1. Station 1: Halves watermelons with a chef’s knife
2. Station 2: Quarters sections and stabilizes for cutting
3. Station 3: Uses cutters to create uniform pieces
Pro time-saver: Invest in two identical cutters. Experienced teams can process a 20-pound melon in under 4 minutes—cutting time drops by 40% compared to single-tool use. Pre-label containers with serving times to ensure freshness.
Troubleshoot Like a Seasoned Pro
Ragged edge solution: Check your cutting angle—too shallow (less than 30 degrees) tears flesh. Reset to 45 degrees and apply consistent pressure. If edges remain ragged, professional sharpening is needed.
Juice containment hack: Work over a rimmed baking sheet lined with paper towels. The sheet catches runoff while towels absorb excess moisture, keeping your counter spotless. Replace towels every 2-3 melons during bulk prep.
Transforming watermelon from intimidating giant to perfect party fare becomes effortless with these techniques. Start with basic slices to build confidence, then progress to decorative patterns as your skills grow. Remember: the best watermelon cutter is the one that feels like an extension of your hand—keep it sharp, store it safely, and you’ll enjoy mess-free summer refreshment for years. When your guests effortlessly grab perfect cubes without sticky fingers, you’ll know you’ve mastered how to use a watermelon cutter like a true pro.


