
Fresh pineapple is one of summer’s greatest pleasures, yet preparing it traditionally leaves most home cooks frustrated with uneven chunks, wasted fruit, and sore hands from wrestling with that tough exterior. You’ve likely hacked away with a chef’s knife, discarded half the edible flesh, and still ended up with core pieces that are too tough to enjoy. Enter the pineapple cutter—a simple kitchen tool that transforms this intimidating process into a 60-second task yielding perfect rings every time.
Whether you just unpacked your first pineapple corer or have one gathering dust in your utensil drawer, mastering this tool will make fresh pineapple a regular part of your fruit rotation. This guide delivers the straightforward, step-by-step approach you need to efficiently turn that spiky orb into Instagram-worthy rings, perfect chunks, or elegant serving vessels—without the mess or wasted fruit.
Select the Ideal Pineapple for Cutting
Look for visual ripeness indicators before attempting to use your cutter. A properly ripe pineapple will have a golden-yellow base that gradually transitions to green at the top. The fruit should yield slightly when gently pressed and emit a sweet aroma at the stem end. Avoid fruits with brown spots, soft areas, or a fermented smell, as these will compromise your cutting results.
Clean the exterior thoroughly to remove surface contaminants. Run the pineapple under cool water while scrubbing the tough skin with a produce brush. Even conventionally grown pineapples carry pesticide residues that concentrate on the exterior, which your cutter will contact directly during the coring process.
Dry completely before cutting to maintain control during the coring process. A damp pineapple becomes dangerously slippery when you apply downward pressure with your cutter. Pat the fruit dry with a clean kitchen towel, paying special attention to the areas where your hands will grip the fruit during the cutting process.
Prepare Your Workspace for Success
Gather necessary tools before starting to maintain workflow momentum. Position your pineapple cutter, a sharp chef’s knife, stable cutting board, and collection bowl within easy reach. Having everything prepared prevents awkward movements while your hands are occupied with the pineapple, reducing accident risks.
Create a non-slip cutting surface to prevent dangerous shifting during the coring motion. Place a damp kitchen towel beneath your cutting board or use a board with non-slip feet. The significant downward pressure required for effective coring can cause unstable boards to slide unexpectedly.
Ensure adequate lighting so you can clearly see the pineapple’s structure. Proper illumination helps you identify the natural segmentation of the fruit, which guides optimal cutter placement for clean ring separation without damaging the edible flesh.
Execute the Perfect Core-and-Slice Motion
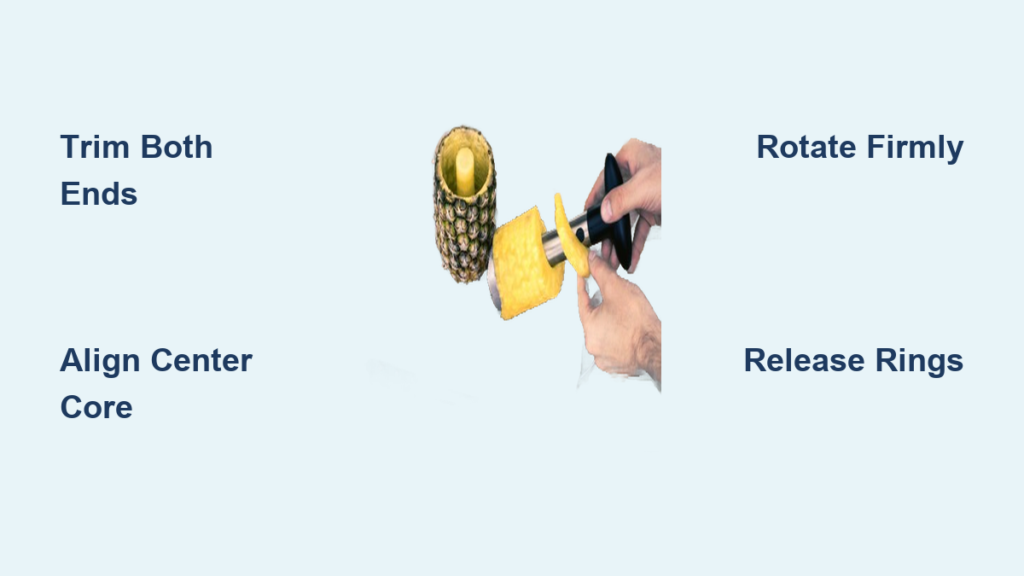
Trim both ends for stability before coring begins. Remove approximately ½ inch from the leafy crown and a thin slice from the bottom to create two flat surfaces. This critical step provides the stable base your cutter needs to remain centered during the coring process.
Position the cutter precisely over the center by aligning with the pineapple’s natural segmentation. Most pineapples display hexagonal patterns on their surface that indicate where the internal segments meet—your ideal cutting path between the tough core and edible flesh.
Apply firm, consistent pressure while rotating through the entire fruit. Unlike traditional corers that require multiple plunges, effective pineapple cutters work through the entire fruit in one continuous motion. Maintain steady downward force while twisting clockwise for complete, clean separation.
Complete the full rotation until you feel the cutter reach the opposite end. Stopping prematurely leaves the core partially attached, resulting in incomplete rings that tear when separated. The entire process should take 5-7 seconds of continuous motion for optimal results.
Separate and Process Your Perfect Rings
Release rings from the coring tube using your specific model’s mechanism. Most cutters feature either a plunger system or release lever that pushes the pineapple rings off the central tube. Consult your model’s instructions if unsure, as forcing rings off can damage both the fruit and your tool.
Inspect rings for completeness before further processing. Perfectly cut rings should maintain their circular shape without tears or missing sections. If rings appear ragged, your cutter may need sharpening or your technique requires adjustment in pressure application.
Process rings into desired forms immediately while fruit is fresh. Stack rings for efficient chopping into uniform chunks, or leave whole for attractive fruit platters. Freshly cut pineapple begins losing texture within minutes, so having your intended use prepared beforehand maximizes quality.
Troubleshoot Common Cutting Challenges

Address stuck cutters with technique adjustments rather than force. If your cutter stops mid-process, gently twist back and forth while maintaining pressure. Forcing can damage the tool or create dangerous slippage. Alternatively, try cutting from the opposite end if the pineapple’s density varies.
Fix uneven ring production by checking your alignment technique. Misaligned cutters produce rings with one thick side and one thin side. Practice finding the pineapple’s natural center by examining the leaf pattern at the crown—this often indicates the core’s position.
Prevent fruit waste by understanding how deep to cut. Many beginners cut too shallow, leaving edible flesh attached to the shell. Your cutter should remove only the tough inner core while preserving maximum edible fruit. The ideal cut leaves approximately ¼ inch of flesh surrounding the core.
Maintain Your Cutter for Longevity

Clean immediately after use to prevent sugar buildup on blades. Soak your cutter in warm, soapy water for 2-3 minutes before gently scrubbing with a soft brush. Dried pineapple residue quickly hardens and dulls blades, compromising future performance.
Dry thoroughly before storage to prevent rust and corrosion. Use a clean towel to remove all moisture, especially from blade edges and mechanical joints. Store in a dry place with blades protected—many models include sheaths or storage cases for this purpose.
Sharpen when performance declines rather than replacing the entire tool. Most pineapple cutters feature replaceable blades or can be sharpened with specialized tools. Dull blades require excessive force, increasing accident risk and producing poor-quality cuts.
Creative Applications Beyond Basic Rings
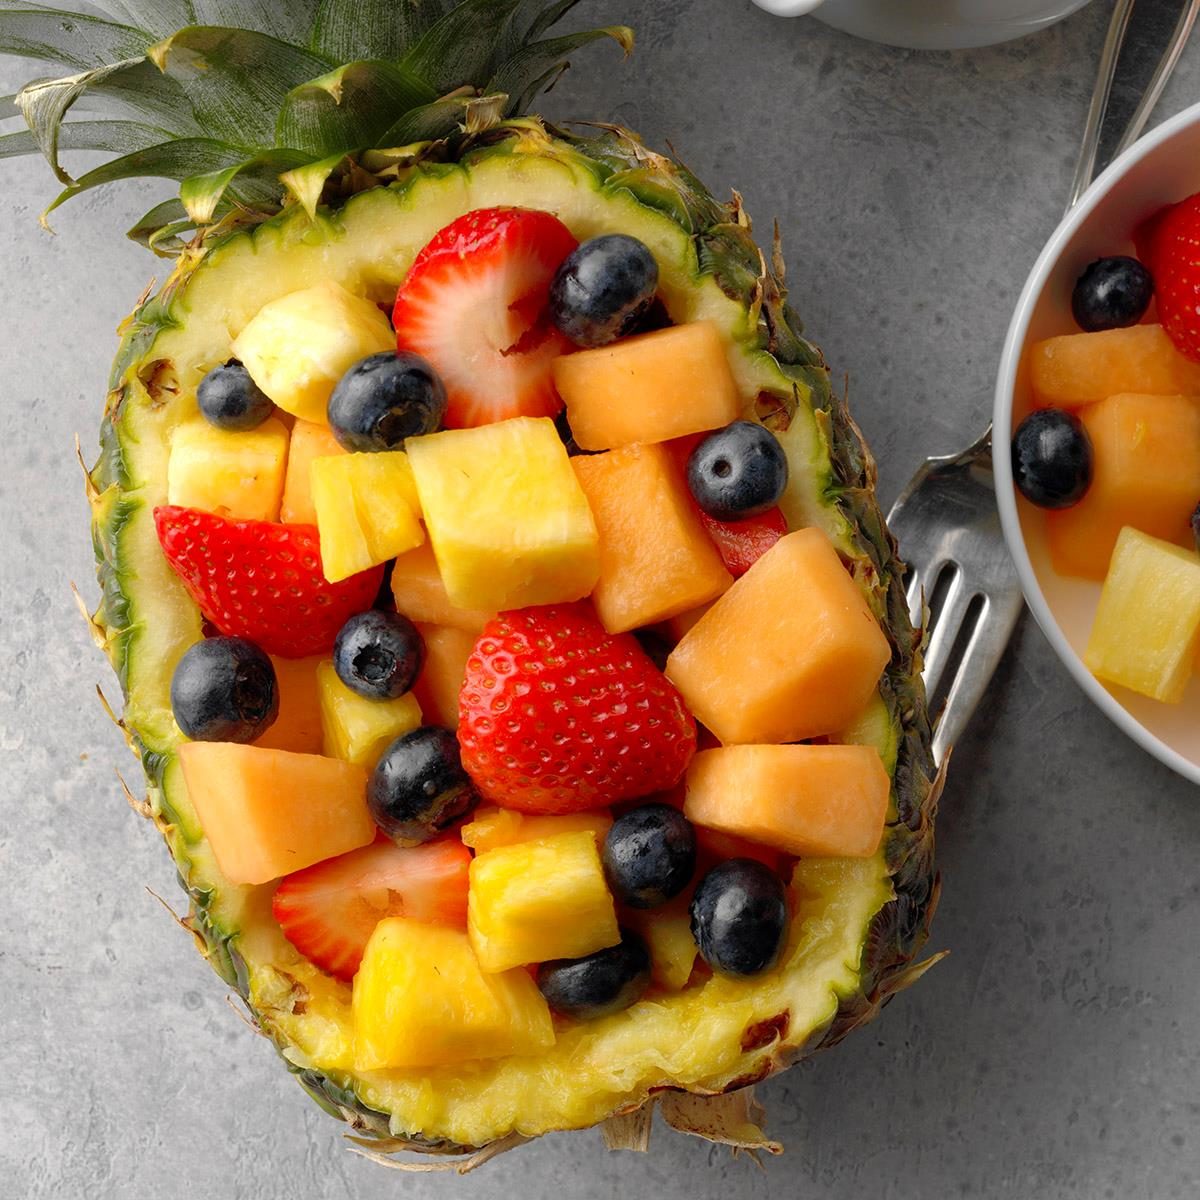
Transform shells into serving vessels for maximum presentation impact. Hollow pineapple shells make stunning containers for fruit salads, tropical drinks, or even savory dishes like fried rice. Simply scoop out any remaining flesh with a spoon after coring.
Prepare pineapple for grilling by cutting rings slightly thicker than usual. The natural sugars caramelize beautifully on the grill, creating a dessert-like treat with minimal added sugar. Brush with lime juice before grilling to prevent over-browning.
Create decorative fruit arrangements by leaving rings intact and inserting cocktail picks with complementary fruits. This technique works especially well for entertaining, transforming simple pineapple rings into elegant edible centerpieces.
Safety Practices Every User Should Know
Keep fingers clear of blade paths during all cutting operations. The circular blades on most pineapple cutters are extremely sharp and can cause serious injury if fingers slip during the coring motion. Always position hands away from the cutting zone.
Use appropriate force levels for your specific pineapple’s ripeness. Overripe pineapples require less pressure than firm ones, and applying excessive force can cause the cutter to slip unexpectedly. Let the tool do the work rather than forcing it through the fruit.
Store safely when not in use with blades protected. Many pineapple cutter injuries occur during storage when reaching into utensil drawers. Keep your cutter in its original case or use a blade guard to prevent accidental contact with sharp edges.
Build Confidence Through Practice
Start with medium-sized pineapples for optimal learning. Oversized fruits can be unwieldy for beginners, while very small ones don’t provide enough stability during cutting. Pineapples weighing 2-3 pounds offer the ideal balance for developing proper technique.
Track your time improvements as you gain experience. Most users cut their processing time in half after just three pineapples. Time yourself to see tangible progress—many experienced users consistently core and slice pineapples in under 90 seconds.
Experiment with different varieties to understand how ripeness affects cutting. Golden pineapples typically cut more easily than traditional varieties due to their softer texture, while red Spanish pineapples may require slightly more pressure. This knowledge helps you adjust technique based on the specific fruit.
Mastering your pineapple cutter transforms what was once a dreaded kitchen task into a satisfying, efficient process that makes fresh pineapple a practical everyday treat. Properly stored in an airtight container, your freshly cut pineapple remains perfect for snacking, smoothies, or recipes for up to five days. The more you practice, the more you’ll appreciate how this simple tool preserves maximum fruit while eliminating the mess and frustration of traditional cutting methods—making tropical flavors accessible whenever the craving strikes.


