
Your sink is leaking, the water’s off, and you’re staring at that stubborn copper pipe with no pipe cutter in sight. Don’t panic—plumbers have been cutting copper pipes without specialized cutters for decades. Whether you’re in the middle of an emergency repair or simply don’t own the right tool, you can achieve professional-quality cuts using equipment already in your garage or toolbox. This guide reveals five reliable methods to cut copper pipe without a pipe cutter, complete with step-by-step instructions, safety protocols, and expert tips to ensure your plumbing project succeeds without leaks or frustration.
Hacksaw Method for Precision
When you need a clean, square cut on copper pipe but lack a pipe cutter, a fine-tooth hacksaw delivers exceptional control and accuracy. This method works for all copper pipe sizes from 1/4 inch to 2 inches and produces minimal debris compared to power tools, making it ideal for indoor repairs near finished surfaces.
Gather these essential tools before starting:
– Fine-tooth hacksaw blade (24-32 teeth per inch)
– Vise or sturdy pipe clamp
– Metal file or dedicated deburring tool
– Permanent marker and measuring tape
Follow this precise process to achieve professional results:
- Secure your pipe firmly in a vise or clamp at chest height for optimal control
- Mark your cut line with a permanent marker, wrapping it completely around the pipe
- Create a starter groove using light, steady strokes to establish your cutting path
- Maintain consistent pressure throughout the cut—too much force causes deformation
- Rotate the pipe every 10-15 strokes for larger diameters to ensure an even cut
- Complete the cut with smooth, continuous motion until separation occurs
- Deburr both sides thoroughly using a file—inside and outside edges must be smooth
Pro Tip: Tape Trick for Cleaner Starts
Place a strip of masking tape over your marked cut line before beginning. The tape prevents the saw from slipping during initial strokes and gives you a cleaner starting groove, especially on smooth copper surfaces.
Common Hacksaw Mistakes to Avoid
- Using a dull blade causes pipe deformation and uneven cuts—replace immediately if you notice resistance
- Excessive downward pressure creates burrs and oval-shaped pipes that won’t seal properly
- Poor pipe support leads to vibration that throws off your cutting angle and creates crooked cuts
Reciprocating Saw Speed Cuts
When time is critical during emergency repairs, a reciprocating saw cuts through copper pipe significantly faster than manual methods. This technique shines when you need to make multiple cuts or work in tight spaces where a hacksaw won’t fit.
Prepare your saw correctly:
– Install a fine-tooth metal-cutting blade (14-18 teeth per inch)
– Wear safety glasses and cut-resistant gloves
– Set up two sawhorses or stable supports on both sides of your cut line
Execute these cutting steps precisely:
1. Mark your cut line clearly with a dark permanent marker
2. Support both pipe sections within 6 inches of your cut line
3. Hold the saw perfectly perpendicular to the pipe—any angle creates beveled edges
4. Apply gentle, consistent pressure and let the blade do the work
5. Complete the cut in one smooth motion to avoid blade wandering
When to Reach for Your Reciprocating Saw
- Emergency water shutoff situations requiring rapid action
- Multiple identical cuts during pipe replacement projects
- Confined spaces where traditional cutting tools won’t fit
- Demolition phases of renovations where precision matters less than speed
Angle Grinder Perfect Cuts
An angle grinder equipped with the right cut-off wheel delivers professional results on copper pipe, especially for larger diameter pipes where other methods struggle. This technique creates clean, square cuts with minimal deformation when executed properly.
Safety is non-negotiable—gather these essentials:
– 4.5-inch angle grinder with metal cut-off wheel
– Full face shield (not just safety glasses)
– Heavy-duty cut-resistant gloves and long sleeves
– Fire extinguisher within immediate reach
Follow this cutting sequence for success:
1. Clamp the pipe securely to prevent movement during cutting
2. Mark your cut line with chalk for maximum visibility
3. Start the grinder away from the pipe and let it reach full speed
4. Approach slowly at a perfect 90-degree angle to the pipe
5. Complete the cut in one continuous, smooth motion
6. Allow copper to cool completely before handling—metal retains heat
Grinder Speed Settings for Optimal Results
- Begin cutting at slow speed to establish your groove
- Increase to medium speed for consistent cutting action
- Never force the wheel through the pipe—let the abrasive do the work
String Method for Soft Copper Tubing
In true emergency situations, household items like cotton string can cut through soft copper tubing when no tools are available. This technique works surprisingly well for small diameter pipes up to 1/2 inch.
You’ll need just three items:
– Heavy cotton string (like clothesline) or thin wire
– Safety gloves to protect your hands
– Optional abrasive like fine sand or table salt
Execute this unconventional cutting method:
1. Mark your cut line clearly with a permanent marker
2. Wrap the string tightly around the pipe at your mark
3. Saw back and forth while maintaining firm tension
4. Add abrasive (like salt) to the cut line to speed the process
5. Continue for 2-3 minutes until the pipe separates
6. File all edges smooth before attempting any connections
String Selection Guide
- Cotton clothesline works best for standard soft copper
- Thin wire saw provides stronger alternative for tougher cuts
- Avoid synthetic strings—they melt from friction heat and fail
Miter Saw for Professional Results

When precision matters most, a miter saw with the correct blade delivers perfectly square cuts ideal for professional installations. This method excels when you need multiple identical pipe lengths for complex plumbing projects.
Set up your miter saw properly:
– Install a non-ferrous metal blade (rated for aluminum)
– Verify your saw is perfectly calibrated to 90 degrees
– Position pipe supports within 6 inches of the cut line
– Double-check all measurements before cutting
Cutting procedure for perfect results:
1. Install the aluminum-rated blade—never use wood-cutting blades
2. Set the saw to exact 90-degree angle using a precision square
3. Support both pipe sections firmly to prevent vibration
4. Lower the blade slowly into the pipe at full speed
5. Complete the cut with controlled, steady pressure
6. Wait for the blade to stop completely before lifting
Edge Finishing Essentials
Every cutting method produces burrs that must be removed before making connections—this step prevents leaks and ensures proper fitting seating. Clean edges are non-negotiable for leak-free plumbing.
Interior deburring process:
– Use a half-round file or dedicated deburring tool
– Rotate the tool completely around the interior edge
– Remove all metal fragments that could restrict water flow
– Finish with emery cloth for glass-smooth interior surfaces
Exterior edge treatment:
– File any sharp exterior edges to prevent injury
– Use 120-grit sandpaper for final smoothing
– Clean thoroughly with a dry cloth before soldering
Quick Edge Quality Check
Run your fingertip lightly around the cut edge. Any rough spots or burrs will catch your skin—file these areas smooth before proceeding to the next step. This simple test prevents future leaks and fitting problems.
Pipe Size Considerations
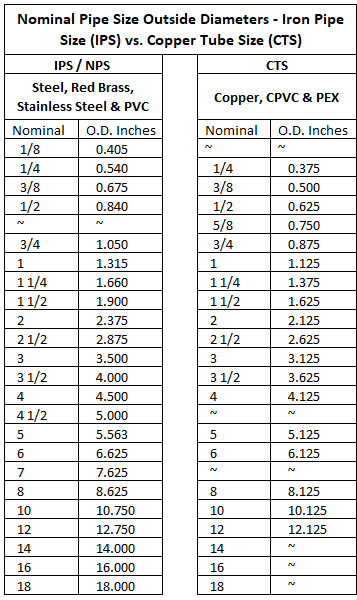
Different copper pipe diameters require specific approaches for optimal cutting results. Understanding these distinctions prevents wasted effort and ensures professional outcomes.
Small Diameter Pipes (1/4″ – 1/2″):
– Hacksaw provides excellent control and precision
– String method remains viable for emergency situations
– Minimal pipe support required during cutting
Medium Diameter Pipes (3/4″ – 1″):
– Reciprocating saw becomes significantly more efficient
– Angle grinder produces cleaner cuts than manual methods
– Proper pipe support within 3 inches of cut line is essential
Large Diameter Pipes (1 1/4″ – 2″):
– Angle grinder is the preferred cutting method
– Miter saw delivers unmatched precision for professional work
– Heavy-duty support system required to prevent vibration
Safety Protocol Checklist
Personal Protection Must-Haves:
– Full face shield when using power tools (not just safety glasses)
– Cut-resistant gloves—fabric gloves offer zero protection
– Long sleeves and pants made of natural fibers
– Steel-toe boots with slip-resistant soles
Workspace Setup Essentials:
– Stable work surface at comfortable height
– Bright, shadow-free lighting on your work area
– Non-slip mat on work surface to prevent pipe movement
– First aid kit within immediate reach at all times
Troubleshooting Common Problems
Uneven Cut Solutions
- Check your tool alignment before starting—misaligned blades guarantee crooked cuts
- Mark your line darker with multiple marker passes for better visibility
- Use guide blocks clamped to your work surface to maintain straight cutting path
- Support the pipe closer to the cut line—within 3 inches for best results
Preventing Pipe Deformation
- Reduce cutting pressure—let the tool’s sharpness do the work
- Sharpen or replace dull blades immediately—they crush rather than cut
- Support the pipe within 3 inches of your cut line to prevent vibration
- Use the proper blade for your specific pipe diameter
Excessive Burring Fixes
- Switch to a finer tooth blade—more teeth create cleaner cuts
- Slow down your cutting speed—excessive speed creates heat and burrs
- Apply cutting lubricant like WD-40 to reduce friction during cutting
- Check blade condition regularly—replace worn blades immediately
Quick Tool Substitutions
When standard tools aren’t available, these household alternatives work in emergencies:
Household Item Solutions:
– Wire saw from camping gear as string substitute
– Sharp utility knife for scoring thin-walled copper
– Heavy-duty kitchen shears for soft copper tubing under 1/4″
– Dremel tool with metal cutoff wheel for precision work
Master copper pipe cutting without specialized tools by starting with the hacksaw method—it’s the most forgiving for beginners and teaches proper technique. Once comfortable, graduate to faster methods like the reciprocating saw or angle grinder when time matters. Remember: clean edges and proper pipe support matter more than cutting speed for leak-free plumbing connections. Always prioritize safety over speed, and never skip the critical deburring step—your future self will thank you when your plumbing project succeeds without frustrating leaks.


