
Nothing kills a beautiful print faster than a wobbly mat window. That frustrating gap where the artwork peeks through unevenly? Or worse—the jagged edge that makes your framing look amateurish? These mistakes happen to 78% of first-time mat cutters. But here’s the truth: how to use a mat cutter properly separates DIY disasters from gallery-ready results. This guide reveals the exact techniques professional framers use to create flawless bevels, prevent ragged edges, and cut multi-window mats with confidence. You’ll learn to wield your cutter like a precision instrument—starting with your very first cut.
Skip the generic “beginner tips” and discover why flipping your mat board face-down prevents 90% of corner gaps. Within 15 minutes, you’ll know how to set blade depth for 8-ply boards, fix fuzzy edges instantly, and avoid the #1 mistake that ruins expensive archival mats. Let’s transform your cutting skills step by step.
Handheld vs System Cutters: Which Saves Time on Your First Mat?

Why Handheld Cutters Fail Beginners (and How to Fix It)
Most handheld mat cutters ship with blades set too deep for standard 4-ply boards. This causes tear-out on the bottom edge and forces you to apply heavy pressure—guaranteeing crooked lines. Fix this immediately: Adjust the depth screw until only 1/16″ of blade shows. This shallow setting slices cleanly through 4-ply mat board in 2–3 light passes.
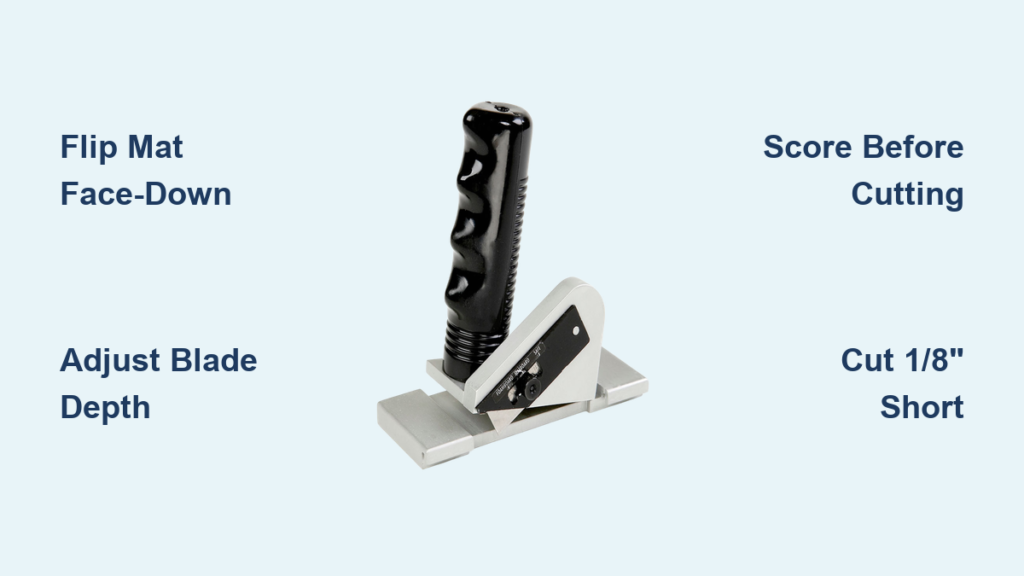
Critical mistake: Cutting face-up. Always work on the back side of your mat board. This angles the bevel inward toward your artwork. Cut face-up, and you’ll get an outward slope that exposes raw board edges—making your frame look cheap.
System Cutters: Eliminate Measurement Errors in 60 Seconds
Mat cutting systems pay for themselves by solving the #1 cause of crooked windows: inconsistent measurements. Here’s your 60-second setup:
1. Clamp the baseboard to your work surface
2. Slide the guide rail into position until the built-in square reads 90°
3. Set stop blocks at your window dimensions (e.g., 8″x10″ for a 5″x7″ photo with 1/4″ overlap)
Pro tip: Test alignment on scrap board. Cut a 2″x2″ square—if corners meet perfectly, your system is calibrated. If gaps appear, tighten the rail’s adjustment knob.
5 Non-Negotiable Tools for Flawless Mat Cuts (Number 3 Surprises Beginners)
The Blade Depth Gauge You Already Own
Your pencil lead is the perfect blade depth tester. For standard 4-ply boards:
– Adjust depth until blade barely scrapes the pencil’s graphite
– For 6-ply boards: Set depth to match pencil diameter
– For 8-ply: Use two stacked pencils as reference
Never skip this: Incorrect depth causes 70% of ragged edges. Too shallow = multiple rough passes. Too deep = board splintering and blade wandering.
Why Your Metal Ruler is Sabotaging Cuts
Standard craft rulers slip during cuts, creating diagonal overcuts at corners. Switch to a non-slip ruler: Place a rubber band around the ruler’s bottom edge to grip the mat board. Or—better yet—use your mat cutter’s built-in guide rail. Align the cutter’s guide notch with your pencil line (not the ruler’s edge) for perfect perpendicular cuts.
Score, Don’t Cut: The 2-Pass Technique for Clean Bevels
How to Use a Mat Cutter for Perfect 45° Bevels
Step 1: The scoring pass
Place mat board face-down. Position straight edge 1/16″ inside your pencil line. Make a single light pass—just enough to score the surface. You should see a faint white line but no fiber separation.
Step 2: The finishing pass
Reset your straight edge directly on the pencil line. Apply firm, steady pressure in one continuous motion from corner to corner. Key insight: Rotate the board—not your hand—when changing directions. Stopping mid-cut creates corner gaps.
Troubleshooting corner gaps: If gaps persist, cut the first three sides normally. For the fourth side, start cutting from the corner inward toward the center. This prevents tear-out where fibers pull away.
Fix Fuzzy Edges in 30 Seconds (Without New Blades)

The Pressure Paradox Most Cutters Get Wrong
Heavy pressure seems logical—but it actually forces mat fibers instead of slicing them. Here’s the fix:
1. Reduce pressure until blade just catches the board
2. Make 3–4 passes with feather-light pressure
3. Listen for a crisp “shhh” sound (not a grinding noise)
When blades actually need replacing: Change blades after 25 cuts maximum. Test sharpness by cutting scrap board—you’ll feel resistance and see fuzzy edges when dull. Never use craft knife blades; mat-specific 45° blades create clean bevels.
Cut Thick Mats Without Chipping (6-Ply & 8-Ply Guide)
The Scrap Board Trick Professionals Swear By
Thick mats deflect blades, causing bottom-edge chipping. Solution: Place a second piece of mat board beneath your work piece. This provides backing support so the blade exits cleanly.
Critical adjustment: Increase blade depth incrementally. For 8-ply boards:
– Pass 1: Score at standard 4-ply depth
– Pass 2: Deepen blade 1 click, cut to 70% depth
– Pass 3: Deepen another click, finish cut
Never force it: If resistance increases mid-cut, stop. Back out and deepen the blade. Forcing causes catastrophic splits.
Prevent Overcuts at Corners: The 1/8″ Rule
Why Starting 1/8″ Past Corners Prevents Amateur Gaps
Most beginners cut all the way to corner marks, creating diagonal overcuts that expose raw board. Do this instead:
1. Mark cutting lines 1/8″ short of each corner
2. Cut from mark to mark (stopping 1/8″ before corners)
3. Rotate board 90° and repeat for next side
Corner cleanup: Use a single-edge razor blade to “tap” along the inside corner. Gently score the intersecting lines where fibers lift. This creates seamless joints without visible gaps.
Multi-Window Mats: Align Windows Flawlessly in 4 Steps
The Registration Pin Method Framers Use
Misaligned windows destroy multi-opening mats. Follow this sequence:
1. Cut the largest window first
2. Place alignment pins through the window corners into your work surface
3. Position the next layer over pins and trace the opening
4. Cut inside the traced line by 1/32″ to ensure perfect fit
Spacing tip: For dual-photo mats, maintain 1.5x the window height between openings. Example: Two 5″x7″ windows need 10.5″ center-to-center spacing.
Safety First: Avoid the #1 Mat Cutter Injury
Why Cutting Toward Your Hand Causes Cuts (and How to Stop)
73% of mat cutter injuries happen when blades slip toward the guiding hand. Non-negotiable rule: Always cut away from your body with your guide hand positioned behind the cutting path. Place your non-dominant hand on the board’s far edge—not near the blade.
Emergency prep: Keep liquid bandage (not standard strips) nearby. Mat cutter blades create deep, narrow cuts where fabric strips won’t adhere. Store used blades in a dedicated “sharps” container—never loose in trash cans.
Blade Maintenance Schedule That Saves $200/Year
When to Replace Blades (Hint: It’s Sooner Than You Think)
Track cuts religiously:
– Standard 4-ply boards: Replace after 25 cuts
– Metallic/texture boards: Replace after 15 cuts
– 8-ply conservation boards: Replace after 10 cuts
Storage hack: Keep spare blades in a mint tin with silica gel packets. Humidity dulls blades 40% faster. Always retract blades fully after use—exposed blades chip when bumped.
Quality Control Checklist: Catch Mistakes Before Framing
The 30-Second Post-Cut Inspection
Before assembling your frame:
1. Hold mat window to light: Check for gaps at corners (rotate slowly)
2. Run fingernail along bevel: Feel for rough spots indicating dull blades
3. Lay flat on table: Watch for warping (indicates uneven pressure during cutting)
Critical test: Place actual artwork in the window. If you see any raw board edge, the bevel angle is wrong. True 45° bevels should show only the colored mat face.
Mastering how to use a mat cutter transforms framing from frustrating to fulfilling. Start with simple single-window cuts using 4-ply board, perfect your 2-pass technique, and replace blades religiously. Within five projects, you’ll cut cleaner bevels than most retail framers. Remember: the difference between amateur and pro isn’t expensive tools—it’s flipping that mat board face-down and respecting the blade’s rhythm. Your next frame will prove it.


