

Nothing ruins a tile installation faster than poorly cut edges that don’t align properly or chips that reveal your amateur status. Whether you’re tackling a kitchen backsplash or bathroom renovation, knowing how to use a ceramic tile cutter properly transforms your project from “almost professional” to genuinely impressive. This guide delivers the exact steps professionals use to achieve clean, precise cuts every time—saving you money on replacement tiles and preventing the frustration of botched installations. You’ll discover which cutter works best for your specific project, how to avoid the most common cutting mistakes, and techniques for handling tricky cuts around pipes and outlets.
Select Your Ceramic Tile Cutter Based on Project Needs
Choose Manual Cutters for Straight Cuts on Standard Ceramic Tiles
Manual score-and-snap cutters remain the workhorse for most DIY tile projects because they’re fast, quiet, and require no electricity. These tools feature a tungsten carbide scoring wheel that creates a precise groove across your tile’s surface, followed by a breaking mechanism that snaps the tile cleanly along that line. They work best on standard ceramic tiles up to 24 inches wide but struggle with harder porcelain tiles or complex shapes. When selecting a manual cutter, choose one with capacity for your largest tile—better to have extra capacity than discover your cutter can’t handle your 18-inch tiles mid-project.
Deploy Wet Saws for Harder Tiles and Complex Cuts
Porcelain tiles, stone, and intricate cuts demand a wet saw with its diamond-encrusted blade cooled by continuous water flow. The water prevents overheating that causes cracks while eliminating dangerous silica dust. Wet saws handle diagonal cuts, curves, and notches that manual cutters simply can’t achieve. Before operation, fill the reservoir to manufacturer specifications and check that the pump keeps the blade properly cooled. Always make test cuts on scrap tile to verify fence alignment—this single step prevents dozens of ruined tiles during your actual installation.
Keep Tile Nippers for Precision Detail Work
Tile nippers function like specialized pliers with carbide-tipped jaws designed for nibbling away small sections of tile. These handheld tools become essential when cutting around pipes, electrical boxes, or creating irregular shapes. While not suitable for long straight cuts, they excel at refining edges after primary cuts and removing small sections. Hold nippers at a 45-degree angle to the tile surface and apply firm, controlled pressure—too much force shatters the tile while too little creates jagged edges.
Prepare Your Workspace for Flawless Tile Cuts
Create a Stable, Well-Lit Cutting Station
Your workspace directly impacts cutting accuracy—set up at waist height to prevent back strain and ensure your surface is perfectly level and rigid. Inadequate lighting causes scoring mistakes, so position bright task lighting directly over your cutting area. Cover the surface with foam padding when working with finished tiles to prevent scratching delicate surfaces. A wobbly table means wobbly cuts, so test your setup by placing a level on the surface before making your first score.
Inspect and Prepare Tiles Before Cutting
Never skip tile inspection—hold each piece up to light, checking for hairline cracks or chips that could cause breakage during cutting. Clean tiles thoroughly with a damp cloth since dust and debris interfere with accurate scoring. Let cold tiles warm to room temperature for 30 minutes before cutting to prevent thermal shock that causes unexpected cracking. For dark tiles where pencil marks disappear, use a felt-tip marker that provides visible contrast against the surface.
Execute Perfect Straight Cuts with Manual Tile Cutters
Score Tiles with Consistent Pressure in One Smooth Motion
Place your tile glazed-side-up against the guide rail, aligning your mark precisely with the scoring wheel. Apply firm, consistent pressure while pushing the wheel away from your body in a single uninterrupted motion—hesitation creates weak spots in your score line. You should hear a light scratching sound and see a visible line without grinding or skipping. Too much pressure causes micro-cracks; too little results in incomplete scores and uneven breaks. The perfect score creates a clean fracture path without damaging the tile structure.
Snap Tiles with Even Pressure for Clean Breaks
After scoring, position the tile so your score line aligns perfectly with the breaking mechanism. Apply steady, even pressure until you hear the distinctive snap—rushing this step causes off-line breaks. Support both tile pieces immediately after breaking to prevent them from falling and chipping. For large tiles, have a helper support overhanging sections during the break. If the tile doesn’t snap cleanly, don’t force it—re-score the line with slightly more pressure and try again. Never attempt to snap a tile that shows signs of stress cracks developing away from your score line.
Make Complex Cuts Without Professional Experience
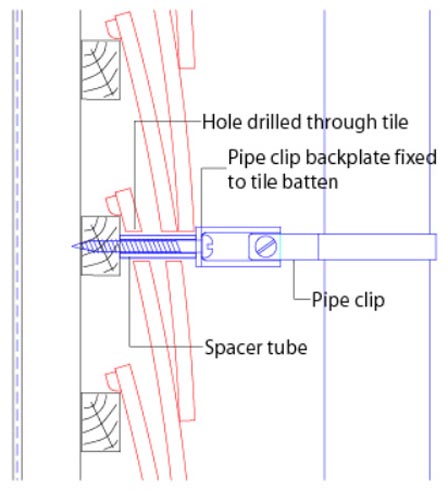
Cut Around Pipes with Hole-Drilling Technique
Measure pipe locations precisely, accounting for the pipe’s center point. Mark cutout areas on your tile, then drill pilot holes at each corner using ceramic drill bits. Connect these holes using your wet saw or nippers, creating clean openings that fit snugly around pipes. Start with small holes and gradually enlarge them—this prevents the tile from cracking outward from your cut line. For electrical outlets, create paper templates of outlet boxes for accurate pattern transfers that eliminate guesswork.
Create Perfect Diagonal Cuts with Miter Gauge Adjustment
Mark diagonal lines from corner to corner using a straight edge, then adjust your wet saw’s miter gauge to match the angle. Manual cutters handle diagonals by rotating the tile position—score lightly at first to establish the line, then deepen the score with a second pass. Support the tile evenly during breaking to prevent off-line snaps that waste expensive material. Diagonal cuts require extra care because the breaking force isn’t distributed evenly across the tile.
Troubleshoot Common Tile Cutting Problems Immediately
Fix Chipping at Cut Edges Before Installation

Chipping at edges usually indicates dull blades or excessive cutting speed. For manual cutters, replace the scoring wheel when it stops creating clean scores. With wet saws, reduce your feed rate and ensure adequate water flow to cool the blade. If chipping occurs on the tile’s top surface, flip the tile and cut from the back side—this often produces cleaner visible edges. For minor chips on finished edges, use a tile file working in one direction only to smooth rough areas without creating more damage.
Prevent Thin Strips from Shattering During Cutting
Narrow strips under 1 inch require special handling to prevent breakage. Use wet saws for better control, supporting the strip throughout the entire cut with your free hand. For manual cutters, score normally but support the narrow strip with scrap tile to distribute breaking pressure evenly. Never attempt thin strips without proper support—these pieces break easily, wasting both time and materials. When cutting multiple thin strips, work from largest to smallest to maximize stability during the process.
Maintain Strict Safety Protocols During Cutting
Tile fragments fly farther than you expect—always wear safety glasses even for quick cuts. Sharp tile edges cause serious lacerations, making work gloves essential when handling cut pieces. Silica dust from dry cutting creates long-term respiratory problems, so use wet methods whenever possible or wear a properly rated dust mask. Keep your work area clean—tile fragments cause slips and falls that lead to serious injuries. Never force tiles through cutters; let the tools do the work at their natural pace.
Store Equipment Properly for Long-Term Reliability
Clean manual cutters thoroughly after each use to remove tile dust that interferes with smooth operation. Lubricate moving parts with light machine oil monthly and store cutters in dry locations to prevent rust. Wet saws require complete water reservoir drainage and cleaning after each use—accumulated tile dust quickly clogs pumps and water channels. Store cut tiles with protective padding between pieces to prevent chipping, and label each piece with its intended location to avoid confusion during installation.
Mastering ceramic tile cutting transforms intimidating renovation projects into manageable DIY achievements. Start with straight cuts on scrap tiles to build confidence before working on your actual project. Remember that every expert tile setter began exactly where you are now—with the first cut. Take your time, measure carefully, and let the tools do the work. Your patience and attention to detail will reward you with professional-quality results that enhance your home’s value and your personal satisfaction. With these techniques in your toolkit, you’ll approach your next tiling project with the confidence of a seasoned professional.


