
Nothing derails a tile installation project faster than a poorly cut piece that won’t fit properly. Learning how to use a tile cutter properly transforms what seems like a complex task into a straightforward process that produces professional results. Unlike messy wet saws that require electricity and water management, manual tile cutters deliver clean, precise straight cuts with minimal setup or cleanup. Whether you’re tackling a kitchen backsplash or bathroom renovation, mastering this essential tool saves time, money, and frustration while ensuring your tiles fit perfectly every time.
This comprehensive guide reveals the exact techniques professionals use to achieve flawless cuts on ceramic and porcelain tiles. You’ll discover critical safety precautions, step-by-step cutting procedures, and advanced methods that prevent common mistakes beginners make. By the end, you’ll confidently handle any straight-cut tile installation project without wasting expensive materials.
Essential Safety Gear Requirements
Protecting yourself during tile cutting isn’t optional—it’s mandatory for preventing serious injuries. Safety glasses form your first line of defense against microscopic tile shards that can cause permanent eye damage. These fragments fly at high speed during the snapping process, making quality ANSI-approved safety glasses non-negotiable for every cutting session.
Cut-resistant gloves specifically designed for tile work protect your hands from razor-sharp edges while providing the grip needed for precise scoring and snapping motions. Standard work gloves won’t cut it—look for gloves rated cut level 3 or higher that maintain dexterity. A quality N95 dust mask prevents inhalation of silica particles released during cutting, protecting your lungs from long-term damage even though manual cutters produce less dust than power tools.
Workspace Safety Setup
Position your tile cutter on a completely stable, level surface that won’t shift during operation—kitchen counters or heavy-duty workbenches work perfectly. Ensure bright, direct lighting on your work area so you can clearly see scoring lines and wheel positioning. Keep your workspace organized with tiles arranged in cutting sequence to minimize handling and prevent accidental drops that waste materials.
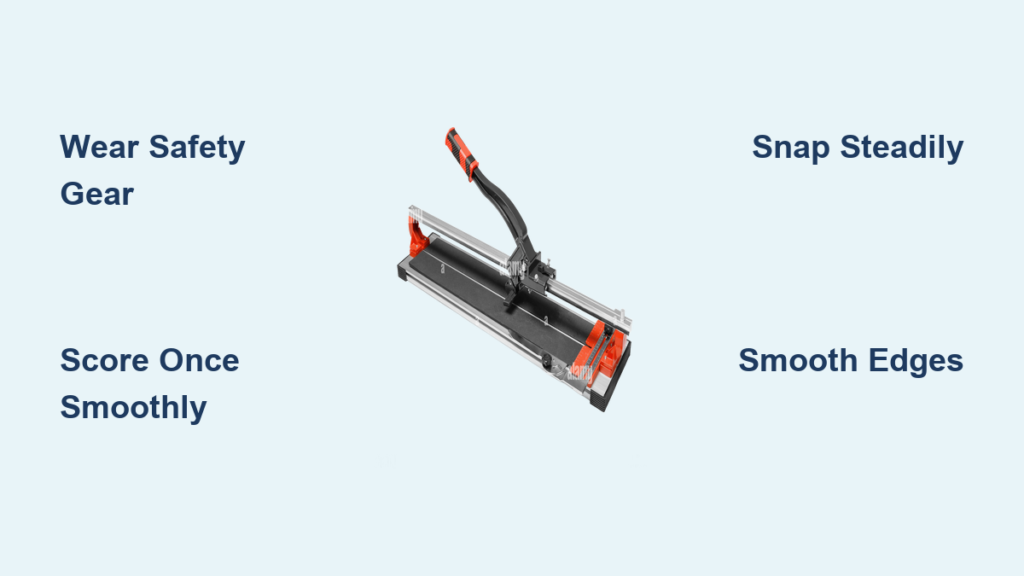
Manual Tile Cutter Components

Understanding each part of your tile cutter ensures proper operation and troubleshooting when problems arise. The base platform provides stable support for tiles during cutting operations and features rubber feet to prevent sliding. Quality bases incorporate precise measurement guides that eliminate guesswork when aligning your tiles for accurate cuts.
Scoring Wheel
The tungsten carbide scoring wheel creates the initial fracture line that determines your cut’s success. Sharp wheels produce clean, consistent scores with minimal pressure, while dull wheels require excessive force and create uneven breaks that waste tiles. Check your wheel regularly for nicks or wear—replace it immediately when cuts become inconsistent.
Snapping Mechanism
The breaker foot applies concentrated pressure to complete the fracture along your scored line. This small metal component sits behind the scoring wheel and delivers the precise force needed for clean breaks. Proper alignment between the scoring wheel and breaker foot ensures your tile snaps exactly where intended.
Project Suitability Checklist
Ideal Applications
Manual tile cutters excel with ceramic tiles up to 12×12 inches and porcelain tiles under 3/8-inch thickness. They’re perfect for straight cuts including diagonal patterns when you rotate the tile 45 degrees on the base. Small to medium projects under 200 square feet represent the sweet spot where manual cutters outperform wet saws in convenience and speed.
Avoid These Materials
Never attempt to cut granite, marble, or other natural stones with a manual tile cutter—they exceed the tool’s breaking force capacity. Curved or intricate cuts are impossible with straight-line mechanisms, requiring a wet saw instead. Thick porcelain tiles over 1/2-inch may crack unpredictably, wasting expensive materials.
Pre-Cut Preparation Steps
Marking Guidelines
Use a pencil and metal straightedge to mark cutting lines on the glazed surface of each tile—never the unglazed back. Double-check measurements before marking since manual cutters cannot correct errors. Maintain a 3/4 inch minimum between tile edge and cut line to ensure successful snapping—closer cuts often cause unintended breaks.
Tile Positioning
Place your tile on the cutter base with the glazed side facing up. Align your marked line directly beneath the scoring wheel, verifying the tile lies completely flat against the base. Any rocking indicates uneven placement that will ruin your cut—adjust until the tile sits perfectly flush.
Scoring Technique Mastery
Single Pass Method
Apply steady, moderate pressure while pushing the scoring wheel across the tile in one smooth motion. You should hear a consistent scratching sound as the wheel creates the score. Never make multiple passes—this weakens the tile structure and causes unpredictable breaks that waste materials.
Pressure Control
Start with light pressure at the beginning of your score, increase slightly through the middle, then reduce pressure at the end. This technique prevents the wheel from skipping or creating uneven scores that result in jagged breaks. Never force the wheel—let the sharp tungsten carbide do the work with controlled pressure.
Snapping Process Execution
Handle Positioning
After scoring, lift the handle slightly to position the breaker foot on the tile’s surface. The breaker should rest approximately 1/2 inch behind the scored line on the waste side of your cut. Proper positioning ensures the break follows your scored line precisely.
Controlled Snapping Motion
Press down slowly and steadily on the handle until you feel the tile begin to give. Continue applying pressure until you hear the clean snap sound. Avoid jerky motions—rapid pressure application often causes breaks to extend beyond the scored line, ruining your tile piece.
Edge Finishing Techniques
Smoothing Rough Edges
Inspect both cut pieces immediately after snapping. Use a tile polishing stone or 120-grit sandpaper to smooth any sharp edges, focusing particularly on the cut edge that will remain visible. This simple step enhances both safety and professional appearance.
Edge Quality Assessment
Quality cuts show clean, straight breaks with minimal chipping. Minor chips along the glazed surface are normal and will be hidden by grout lines. Major chips or diagonal breaks indicate scoring pressure issues that require technique adjustment.
Common Mistake Prevention
Measurement Errors
Follow the “measure twice, cut once” principle religiously—manual cutters cannot make cuts extremely close to tile edges. Account for standard 1/8-inch grout lines in your measurements to avoid gaps in your installation that compromise aesthetics.
Equipment Issues
Replace dull scoring wheels immediately when cuts become inconsistent or require excessive pressure. Test wheel sharpness on a scrap tile before starting important cuts—this small investment prevents costly material waste.
Technique Problems
Apply the “score once, snap once” rule without exception. Multiple scoring passes weaken tile structure and increase failure rates. Maintain a firm, controlled grip throughout both operations to prevent alignment shifts that ruin precision.
Maintenance Best Practices
Daily Inspection
Check scoring wheel sharpness before each work session and clean tile debris from the base and scoring track to prevent alignment issues. Lubricate moving parts monthly with light machine oil to ensure smooth operation and extend your tool’s lifespan.
Storage Guidelines
Store your cutter in a dry location to prevent rust formation on metal components. Keep the handle in the lowered position to maintain spring tension, and protect the scoring wheel from damage by covering it during storage.
Troubleshooting Guide

Problem: Uneven Breaks
Cause: Dull scoring wheel or inconsistent pressure
Solution: Replace wheel immediately and practice consistent scoring pressure on scrap tiles
Problem: Tile Cracks During Snapping
Cause: Score too close to tile edge or excessive snapping force
Solution: Maintain 3/4-inch minimum from edge and apply steady, controlled pressure
Problem: Chipped Glaze Surface
Cause: Scoring wheel too sharp or excessive pressure
Solution: Reduce scoring pressure and check wheel for damage
Mastering how to use a tile cutter transforms complex tile projects into achievable weekend tasks. Focus on consistent technique rather than speed—precision beats haste every time. Start with scrap tiles to perfect your scoring pressure and snapping motion before cutting expensive materials. With proper safety gear, accurate measurements, and controlled technique, you’ll achieve professional results that enhance your home’s beauty and value while saving significant money on installation costs. Remember that practice builds confidence—each successful cut makes you more proficient with this essential tile installation tool.


