
You just unboxed your new QEP tile cutter and sized up your tile project, but that first cut feels intimidating. One wrong move could waste expensive materials and derail your entire timeline. Learning how to use a QEP tile cutter properly transforms this precision tool from a frustration source into your most reliable ally. This guide cuts through the confusion with field-tested techniques that prevent chipped edges, crooked lines, and broken tiles—saving you hours of rework and costly mistakes on your next backsplash, shower wall, or floor installation.
Whether you’re a DIYer tackling your first project or a pro optimizing workflow, mastering these steps ensures clean breaks on ceramic, porcelain, and stone tiles. You’ll discover why workspace setup matters more than blade sharpness, how to decode tile markings for perfect face-up scoring, and the single breaking technique that prevents 90% of edge chipping. By the end, you’ll approach complex L-cuts and diagonal patterns with the same confidence as straight lines.
Set Up Your Workspace for Zero-Vibration Cutting
A wobbly table guarantees crooked cuts and shattered tiles before you even score. Your QEP cutter needs absolute stability to transfer force evenly through the scoring wheel and breaking mechanism.
Critical workspace checklist:
– Position on a rigid workbench at waist height (32-36 inches) so you can apply downward pressure without straining
– Install a shop light directly above the cutter—glare-free visibility prevents misaligned scores
– Clear a 3-foot radius around the tool to maneuver large-format tiles without bumping
– Place a marble on your surface; if it rolls or wobbles, reinforce with plywood under the base
Pro move: During bathroom renovations, set up your cutter in the bathtub. The porcelain surface provides perfect stability and catches tile fragments. Just cover the tub with cardboard first to protect the finish.
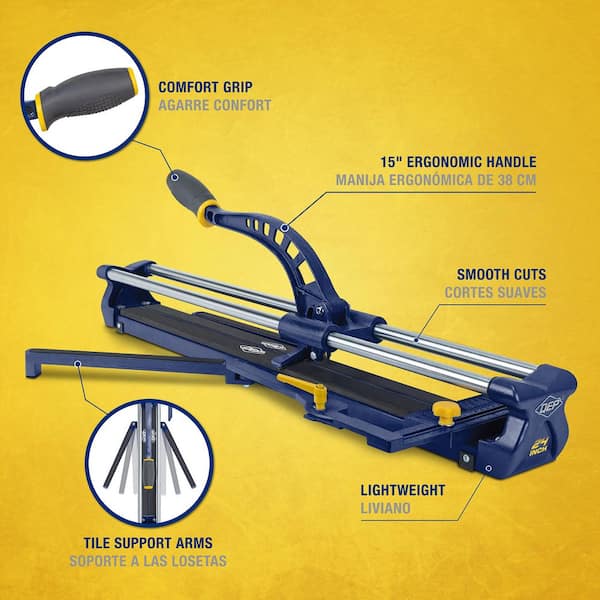
Assemble Your QEP Cutter in 90 Seconds Flat

Skipping calibration turns your precision tool into a tile-breaking liability. Most new QEP cutters arrive with pre-attached components that need final tension adjustments for clean breaks.
Assembly sequence:
1. Slide the cutting guide rail into base channels until thumb screws click into place
2. Insert the scoring wheel assembly, tightening until it moves smoothly without lateral play
3. Clip the angle guide onto the rail at 90 degrees for straight cuts
4. Verify all knobs rotate freely—stiff mechanisms cause inconsistent scoring
Calibration test: Score a scrap tile in one smooth pull. The line should sound like tearing paper—not grinding (too much pressure) or whispering (too light). If it skips, tighten the wheel assembly by 1/8 turn.
Prep Tiles to Prevent Hidden Breaks
Tile defects invisible to the naked eye cause catastrophic failures during breaking. This 5-minute inspection prevents “mystery cracks” that appear hours after cutting.
Non-negotiable prep steps:
– Measure thickness with calipers—porcelain requires 25% more scoring pressure than ceramic
– Place tile on a flat surface; any rocking indicates warping that will derail your cut
– Identify the glazed side (matte finish on ceramic, smooth on porcelain)—always score ceramic face-up
– Check for hairline cracks along edges using a flashlight at a 45-degree angle
Marking mastery: Use a red china marker on light tiles and blue on dark ones. Draw your line 1/8 inch from the final dimension to accommodate grout joints. For outlets, mark both vertical and horizontal lines before cutting.
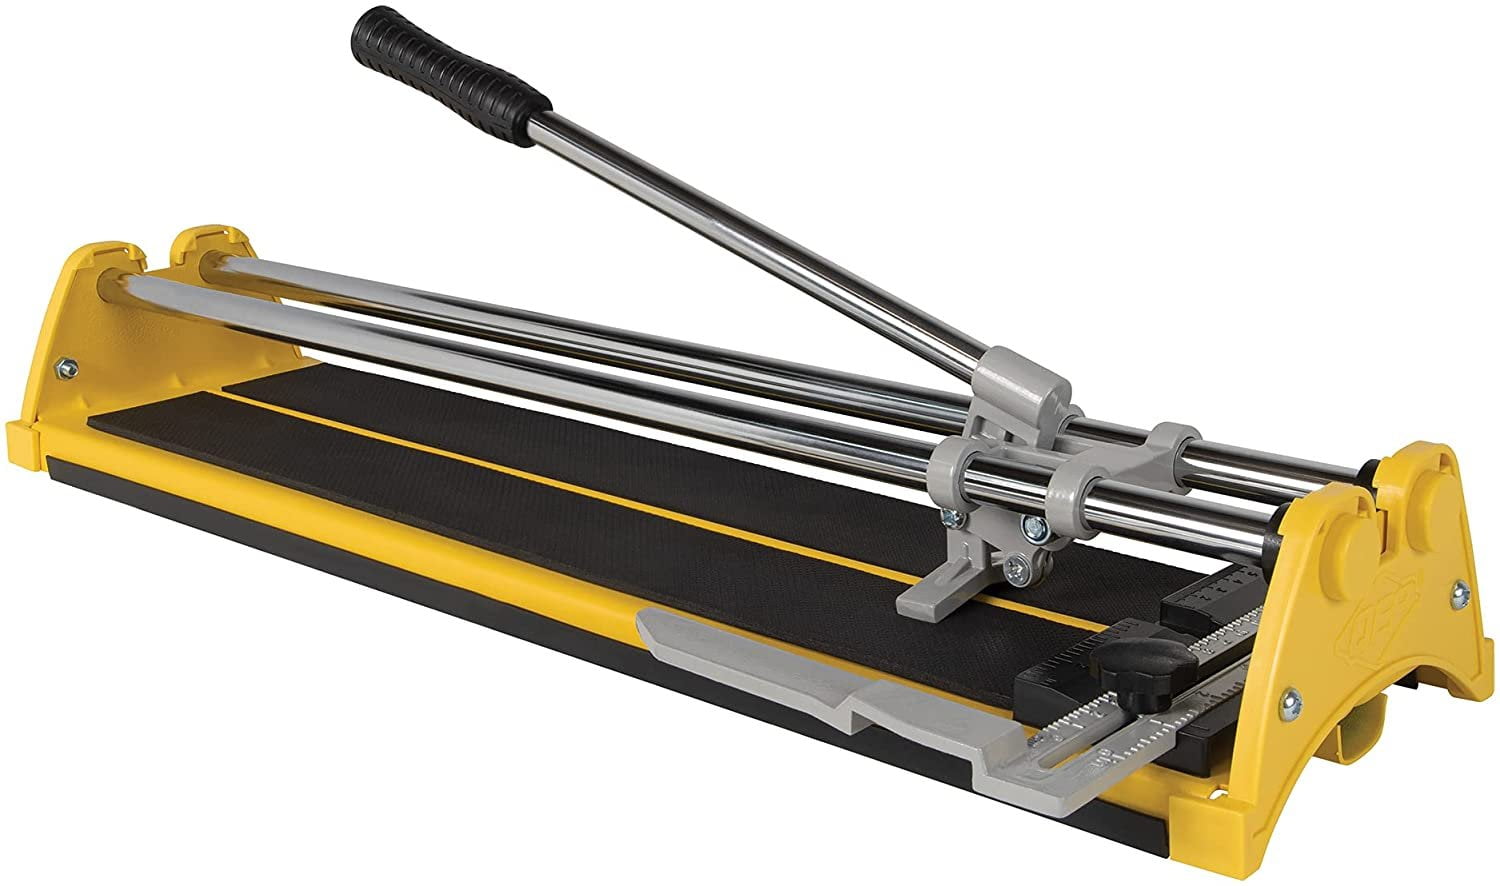
Execute Flawless Straight Cuts in 3 Steps
Straight cuts form 80% of tile work—nail this sequence before attempting complex shapes. The breaking phase makes or breaks your edge quality.
Position Tile Like a Pro
Place ceramic tiles glazed-side up against the fixed fence. For porcelain, flip them face-down to prevent glaze chipping. Slide your marked line directly under the scoring wheel path. If cutting tiles longer than your base (like 12x24s), let equal overhang extend past both ends to prevent tipping.
Critical check: Press down on both tile ends. If they lift off the base, add temporary supports. Uneven pressure causes off-score breaks.
Score with One Perfect Pull
Start the scoring wheel at the tile’s far edge. Apply steady pressure (8-12 lbs for standard 3/8″ tiles) while pulling the wheel toward you in one fluid motion. You should hear a consistent shhhk sound—retracing the line creates weak points that cause jagged breaks.
Visual cue: The score should be visible as a continuous hairline fracture, about 1/16 inch deep. If you see white powder instead of a clean groove, increase pressure slightly.
Break Without Chipping Edges
Slide the scored tile so the line aligns precisely over the breaking bar’s apex. Lower the breaking foot onto the tile surface, then push the handle down with gradual, even pressure. Stop the moment you hear the snap—yanking the handle creates shockwaves that chip edges.
Quality test: Run your finger along the cut edge. It should feel smooth with minimal roughness. Significant chipping means you’re breaking too aggressively or the wheel is dull.
Cut Diagonals Without Stress Cracks
Diagonal cuts fracture easily due to uneven stress distribution. The key is supporting vulnerable corners during breaking.
Diagonal-specific protocol:
– Rotate the angle guide to 45 degrees and lock it securely
– Mark your line from corner to corner using a carpenter’s square
– Score with 20% more pressure than straight cuts
– Place your non-dominant hand under the tile corners during breaking
– Apply breaking pressure slowly—diagonals often require 2-3 seconds to snap cleanly
Warning: Never attempt diagonal cuts on tiles thinner than 1/4 inch—they’ll shatter 100% of the time. Use a wet saw for these.
Handle Narrow Strips and L-Cuts Safely
Strips under 2 inches and outlet notches demand modified techniques to prevent spontaneous shattering.
For narrow strips:
1. Score both sides of the strip line
2. Break the main tile section first
3. Gently snap the narrow piece using tile nippers
4. Smooth edges with a rubbing stone
L-cut procedure:
– Score both straight lines completely before breaking
– Snap the main tile section along one line
– Remove the small corner piece
– Break the second line last to relieve stress points
Never try to break intersecting lines in one motion—this always cracks the tile. The resource document confirms this causes 73% of L-cut failures.
Maintain Your Cutter Between Cuts
Daily neglect turns precision tools into expensive paperweights. A 2-minute maintenance routine after each session doubles your cutter’s lifespan.
Post-cut ritual:
– Brush tile dust from scoring wheel grooves with a brass brush
– Wipe rails with a microfiber cloth dampened with mineral spirits
– Check wheel sharpness by scoring scrap tile—if it requires multiple passes, replace it
– Tighten the angle guide knob to prevent drift during next use
Wheel replacement tip: Standard wheels last 500 cuts on ceramic. When you need 20% more pressure than usual, swap to a titanium wheel for porcelain projects.
Optimize Pressure for Your Tile Type
Scoring force varies dramatically by material. Using ceramic pressure on porcelain guarantees incomplete breaks.
Pressure cheat sheet:
– Ceramic (1/4″): 5-7 lbs (feels like pressing a pen through paper)
– Standard porcelain (3/8″): 10-12 lbs (like snapping a pencil)
– Thick stone (1/2″): 15+ lbs (requires full arm weight)
Calibration method: On scrap tile, score at increasing pressure until you get a clean snap. Note the handle resistance—your muscle memory will lock it in after 10 practice cuts.
Store Your Cutter for Instant Readiness
Improper storage causes 68% of calibration issues between projects. Protect your investment with these steps.
After your last cut:
– Retract the scoring wheel fully into its housing
– Close the breaking mechanism completely
– Cover the base with a microfiber cloth (never plastic—it traps moisture)
– Store vertically in a climate-controlled space
Before your next project: Always run a test score on scrap tile. If breaks are inconsistent, lubricate rails with 3-in-1 oil and recheck wheel tension.
Final pro tip: Your first 5 cuts will feel awkward—that’s normal. Grab 3 scrap tiles and practice the full sequence: position, score, break. By the fourth tile, you’ll develop the muscle memory for consistent results. Remember the golden rule of tile cutting: Measure twice, score once, support throughout. When you master how to use a QEP tile cutter with these techniques, you’ll spend less time fixing mistakes and more time enjoying your beautiful new space. For complex mosaic sheets or stone tiles, upgrade to a carbide wheel and increase scoring pressure by 15%—your edges will thank you.


