

Ever stood in front of your bathroom mirror with clippers in hand, wondering where to start? You’re not alone. Millions of people attempt DIY haircuts each year, but without the right technique, those clippers can turn a simple trim into a months-long grow-out nightmare. The good news? Mastering how to use a hair cutter at home isn’t just possible—it’s actually straightforward once you understand the fundamentals.
Whether you’re maintaining a buzz cut between barber visits or attempting your first full haircut, this guide walks you through every step of using hair clippers effectively. From decoding guard numbers to achieving salon-worthy fades, you’ll learn the exact techniques professionals use—adapted for your home bathroom. Stop wasting money on frequent salon visits and gain the confidence to handle your own haircuts with precision.
Decode Clipper Guard Numbers for Perfect Length Control
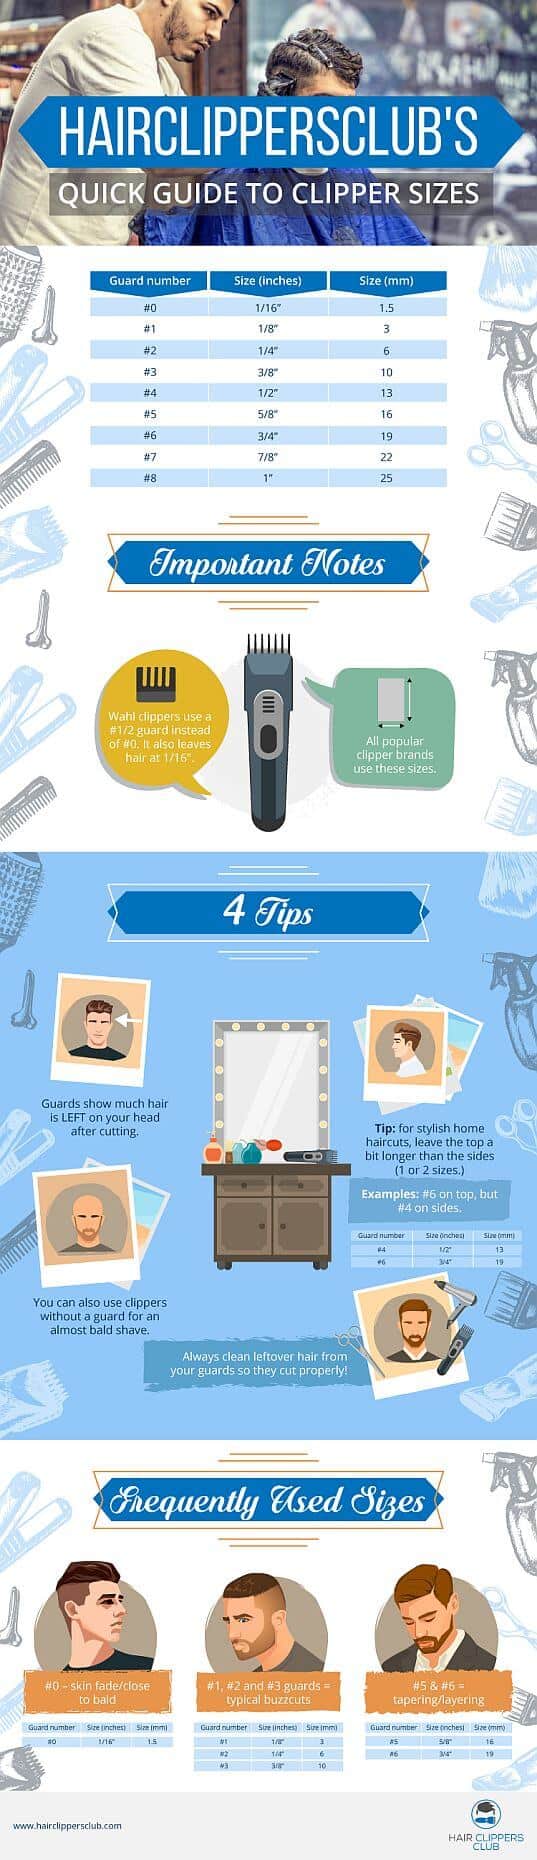
Clipper guards aren’t random—they follow a precise system where every number represents a specific hair length. Guard 0 gives you the closest cut possible (essentially stubble), while guard 8 leaves a full inch of hair. Each number increases by exactly 1/8 inch (3.2mm), making it easy to visualize your results before you start.
Guard Length Quick Reference:
– 0: Bare blade (1.5mm) – for extremely close cuts
– 1: 1/8 inch (3mm) – military regulation length
– 2: 1/4 inch (6mm) – standard short buzz cut
– 4: 1/2 inch (13mm) – ideal for textured tops
– 8: 1 inch (25mm) – maximum guard length for longer styles
This numbering system becomes your roadmap for any haircut. Want a military-style buzz? You’ll stick with guards 1-2. Dreaming of longer styles on top? Guard 4 or higher becomes your best friend. Understanding these measurements prevents the most common beginner mistake: selecting the wrong guard for your desired style.
Essential Pre-Cut Preparation for Flawless Results
Dry Hair Only Rule: Avoid the #1 Beginner Mistake
Clippers hate moisture. Wet hair clogs blades, pulls painfully, and creates uneven cuts. Always start with completely dry hair—wash it first if needed, then towel-dry or blow-dry until no dampness remains. This single step prevents 90% of beginner mistakes that lead to ragged, uneven haircuts. If you skip this step, your blades will quickly become dull and ineffective.
Create Your Professional Cutting Station at Home
Drape a slick cape or old towel around your shoulders, securing it snugly at your neck. Position yourself in front of a large mirror with bright, even lighting from multiple angles—natural light combined with overhead lighting works best. Place a hand mirror nearby—you’ll need it for checking the back of your head. Lay out your guards in numerical order, have your oil ready, and ensure your clippers are fully charged or plugged in. This professional setup transforms your bathroom into a barber-worthy environment where you can properly learn how to use a hair cutter.
Master Basic Cutting Motion for Clean, Even Cuts
Cut Against Natural Growth Direction for Professional Results
Your hair grows in specific patterns—typically downward on the sides and back, forward on top. Always cut against this growth direction for the cleanest cut. Start behind your right ear, holding clippers upside-down with the guard flat against your scalp. Move upward in smooth, confident strokes toward the crown. This technique ensures you’re cutting the full length of each hair strand rather than pushing it down.
Pro Tip: Apply steady, gentle pressure throughout each stroke. Pressing too hard creates gouges, while too-light pressure leaves patches. Think of it like painting a wall—consistent pressure creates even coverage.
Perfect the Scooping Technique for Natural Transitions
Instead of stopping abruptly at the end of each stroke, gently scoop the clippers away from your scalp. This creates soft, natural transitions rather than harsh lines. Think of it like scooping ice cream—start close, then arc away. Overlap each stroke by about 1/4 inch to ensure even coverage without visible lines between passes. This subtle technique makes the difference between a barber-quality cut and an amateur attempt.
Create Seamless Graduated Lengths Like a Professional

Blend Like a Pro: Eliminate Visible Lines Between Lengths
Professional haircuts rely on smooth transitions between different lengths. After establishing your longest length on top, work downward with progressively shorter guards. The magic happens in the blending zone—use a guard size between your two lengths to eliminate visible lines. For example, if you’re using guard 4 on top and guard 2 on the sides, run guard 3 through the transition area.
Blending Technique:
1. Establish longest length (guard 4 on top)
2. Switch to medium length (guard 2 for sides)
3. Use guard 3 in the transition zone
4. Blend with upward, scooping motions
Check Your Work Before Moving to the Next Section
After each section, run your fingers against the grain to feel for uneven spots. Any rough patches indicate areas needing another pass. Work methodically—don’t jump between sections randomly. Professional barbers work systematically from back to front or side to side, ensuring complete coverage without missing spots.
Classic Style Instructions for Immediate Results
Perfect Burr Cut in Under 10 Minutes
The military burr requires uniform short length across the entire head. Attach guard 1 or 2 based on your preference. Start at the nape of your neck, working upward in straight lines. Move to the sides, then finish with the top. Maintain consistent speed and pressure for a professional appearance. This simple style is perfect for beginners learning how to use a hair cutter.
High and Tight Technique with Clean Transition
Begin with guard 2 over the entire head. Then switch to guard 1 for the sides and back, creating a distinct line around the crown. Keep this transition line even from ear to ear—imagine a headband sitting just above your ears. Blend the edge lightly with scooping motions if the contrast looks too harsh. This style works particularly well with straight hair that grows downward.
Detail Work That Makes the Difference Between Good and Great
Clean Neckline Technique for Professional Finish
Turn your clippers to the closest setting (usually 0.4mm). Using a mirror or your fingers as a guide, run upward on the back of your neck to remove any neck hair growth. Work in sections, checking frequently to ensure even coverage without patches. A clean neckline transforms an ordinary DIY haircut into something that looks professionally done.
Sideburn Symmetry: The Most Common Mistake
Dampen your sideburns and comb them downward. Using clippers on the closest setting, hold them inverted and cut downward to your desired length. Compare both sides in the mirror—uneven sideburns are immediately noticeable. Aim for the bottom of your earlobe as a natural stopping point. This small detail elevates your entire look.
Maintain Your Clippers Properly for Long-Term Performance
Daily Cleaning Protocol After Every Use
After every use, remove all hair from guards by brushing or rinsing. Wash guards in warm water with dish soap, using a soft brush for thorough cleaning. Dry completely before storage—trapped moisture causes rust and bacterial growth. Neglecting this step is the primary reason clippers fail prematurely.
Blade Care Essentials for Smooth Cutting
Use the included brush to remove hair from blades and crevices. Add one drop of lubricating oil while clippers run for one minute to distribute oil evenly. Wipe excess oil before storing. Check your manual for interior oiling requirements—some models need oil in specific ports. Proper maintenance ensures your clippers cut smoothly rather than pulling hair.
Pro Tips for Home Success with Hair Clippers
Lighting and Visibility: Avoid Costly Mistakes
Position yourself with light coming from multiple angles to eliminate shadows. Use a second mirror to check the back of your head—hold it at an angle to see your reflection in the main mirror. Good lighting prevents uneven cuts and missed spots that require professional correction.
Build Skills Gradually for Confidence
Start with simple neckline and sideburn touch-ups between professional cuts. As confidence grows, progress to full haircuts. Most straight hair needs attention every 2 weeks during grow-out phases, while curly hair often needs less frequent maintenance. Remember, every expert was once a beginner learning how to use a hair cutter.
Choose Right Tools for Your Specific Needs
Cordless clippers offer flexibility but need charging. Corded models provide consistent power for longer sessions. For shaved heads, select clippers that cut closest (0.4mm or less). Higher-numbered guards work best for longer styles, while lower numbers excel at military cuts. The right tool makes all the difference in achieving professional results.
Final Cleanup Checklist for a Professional Experience
After removing your cape, use a lint roller on your neck and back to catch stray hairs. Check your clothes and shoulders thoroughly—hair clippings have a way of hiding. Shake out your cape outside to prevent bathroom hair storms. Store your clippers with guards attached to prevent loss. This final step ensures your DIY haircut feels as professional as one from a barber shop.
Key Takeaway: Mastering how to use a hair cutter isn’t about having steady hands—it’s about understanding the system. Once you know guard lengths, cutting direction, and blending techniques, you can achieve salon-quality results at home. Start simple, practice regularly, and remember: hair grows back, making every cut a learning opportunity. With proper preparation, technique, and maintenance, you’ll save money while gaining confidence in your DIY haircut skills.


