

That wedding band or class ring suddenly feels like a prison when your finger swells. Whether from an injury, allergic reaction, or unexpected edema, a stuck ring can quickly become a medical emergency. Knowing how to use a ring cutter properly could save you a trip to the emergency room or prevent permanent damage. This guide reveals the exact techniques medical professionals use to cut rings off safely—so you can handle this common crisis with confidence.
Most people don’t realize that rings made of gold, silver, copper, and plastic respond well to manual ring cutters when swollen fingers won’t cooperate. By following these proven steps, you’ll learn how to use a ring cutter effectively while protecting your delicate skin from injury. Let’s get you back to comfort without panic.
Recognize When Your Ring Requires Cutting
Don’t wait until your finger turns purple. Swelling that prevents a ring from moving past the knuckle signals immediate action is needed. Blue or purple discoloration, worsening pain, numbness, or inability to bend the finger means vascular compromise is occurring—your finger isn’t getting enough blood. At this point, cutting becomes the safest option to prevent permanent tissue damage.
Soft metal rings like gold and silver can usually be cut with manual tools, but harder materials like tungsten or steel require special approaches. If ice water soaks and lubrication failed to slide your ring off after three attempts, don’t risk further swelling—proceed to cutting immediately. Every minute counts when circulation is compromised.
Gather These Critical Tools Before Starting

Your success depends on having the right equipment ready. Before touching that ring, assemble:
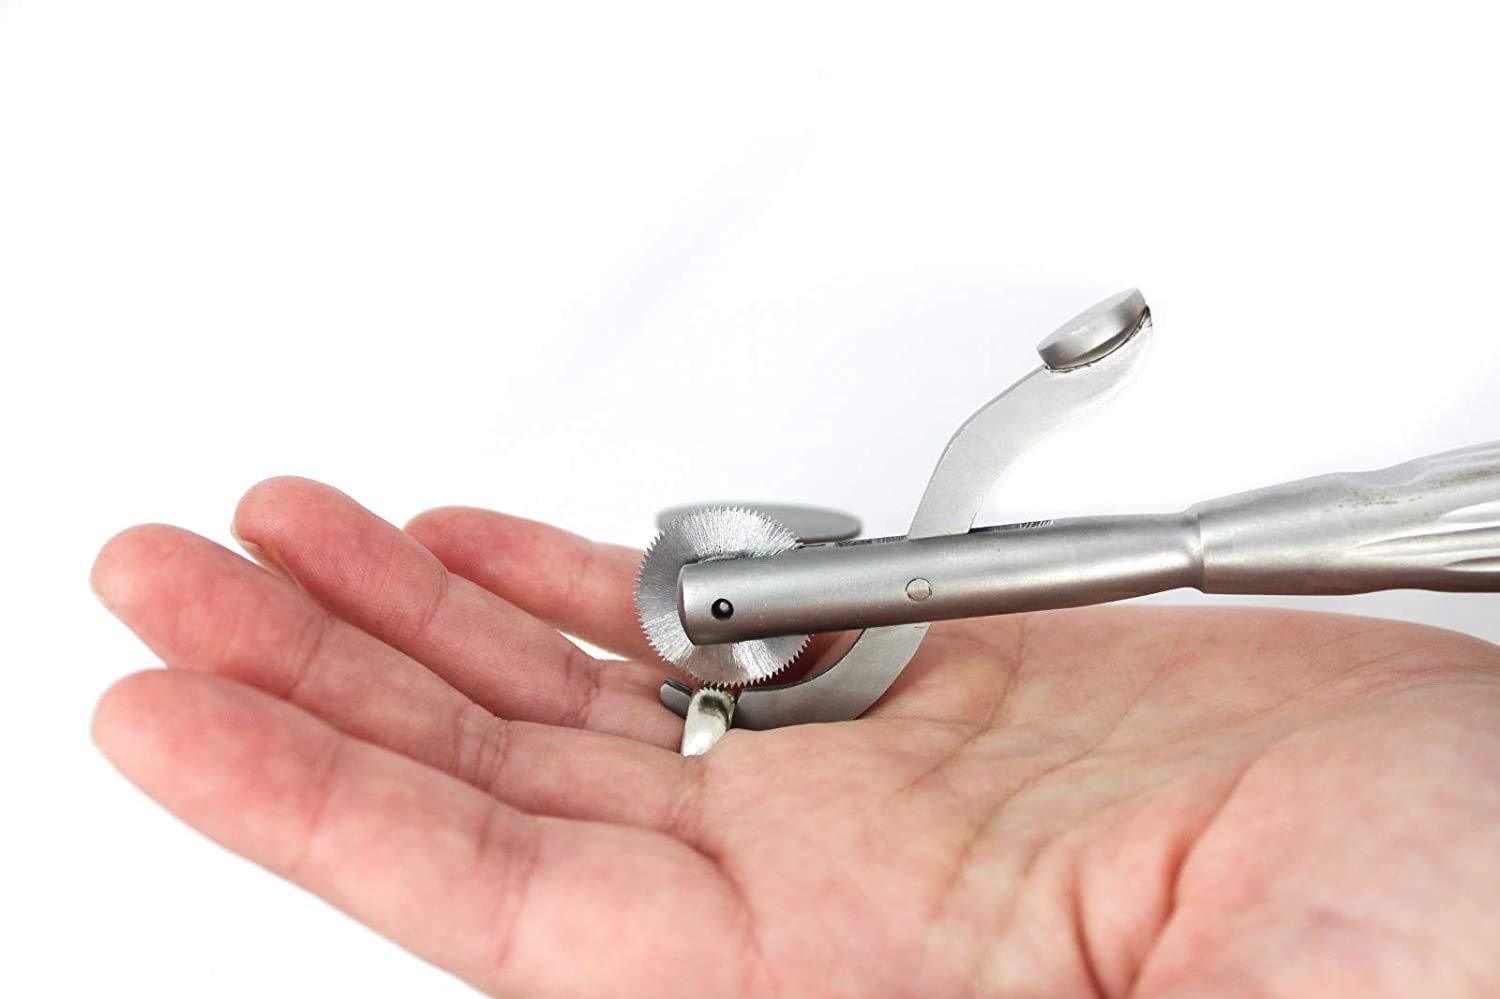
- Proper ring cutter matched to your ring material (manual for soft metals, powered for hard metals)
- Nonsterile gloves to maintain hygiene
- 2% chlorhexidine solution for thorough skin cleaning
- Large hemostat or pliers for manipulating the cut ring
- Water-soluble lubricant for final removal steps
- Eye protection (essential when cutting hard metals)
Skipping any of these items increases your risk of injury. The protective guard on your ring cutter must slide between ring and skin—never attempt cutting without proper skin protection. For hard metals like titanium, bolt cutters with safety goggles become your necessary backup.
Why Non-Cutting Methods Fail With Severe Swelling
Always attempt removal before cutting—but know when to stop. While generous lubrication, circular twisting motions, and ice water immersion work for mild swelling, they become dangerous with significant edema. Continuing to pull and twist when your ring won’t budge actually increases swelling by trapping fluid behind the constriction.
If your ring hasn’t moved after 5 minutes of these techniques, cutting becomes safer than continued manipulation. The proximal interphalangeal joint (your middle knuckle) creates the tightest point—when swelling traps the ring here, cutting provides immediate relief without risking further tissue damage.
Optimize Your Workspace Before Cutting
Your setup determines success. Position yourself or the patient comfortably at a table with:
– Bright, direct lighting focused on the ring
– Hand stabilized on a firm surface
– All tools within easy reach
– Finger extended naturally
The ring sits tightest at your middle knuckle—plan your cut location accordingly. Never attempt this in poor light or while standing. Proper positioning prevents accidental slips that could lacerate skin. If you’re cutting your own ring, prop your elbow firmly on the table for maximum stability.
Execute These Cutting Steps Without Injury
Clean and Prepare the Finger Properly
Thoroughly cleanse the area with chlorhexidine solution, then allow it to dry completely. Wet skin increases slip risk during cutting. Skip this step and you risk introducing bacteria into any accidental nicks. While nonsterile gloves protect you, they don’t replace proper skin preparation.
Position the Cutter for Maximum Safety
Slide the cutter’s protective guard completely under the ring, creating a physical barrier between cutting wheel and skin. Position the cutting wheel at the ring’s thinnest, least ornate section—typically the back of the band. Avoid stone settings or engravings where the cutter could catch and slip. For soft metals, the wheel should contact the ring at a 45-degree angle for cleanest cut.
Make the Cut With Controlled Precision
Apply steady, moderate pressure while slowly rotating the cutting wheel. Rushing causes dangerous slips—take 30-60 seconds for soft metals. You’ll feel slight resistance as the wheel bites through the metal. If cutting hard metals, increase pressure gradually but maintain control. Stop immediately if you feel the cutter slipping toward skin.
Remove the Ring Without Further Trauma
Grasp each cut end with pliers or hemostats and gently spread them apart. If resistance remains, rotate the ring 180 degrees and make a second cut directly opposite your first. Never force the ring—this causes pinching injuries. The cut ends will have sharp edges, so handle them carefully during removal.
Adapt Technique for Different Ring Materials
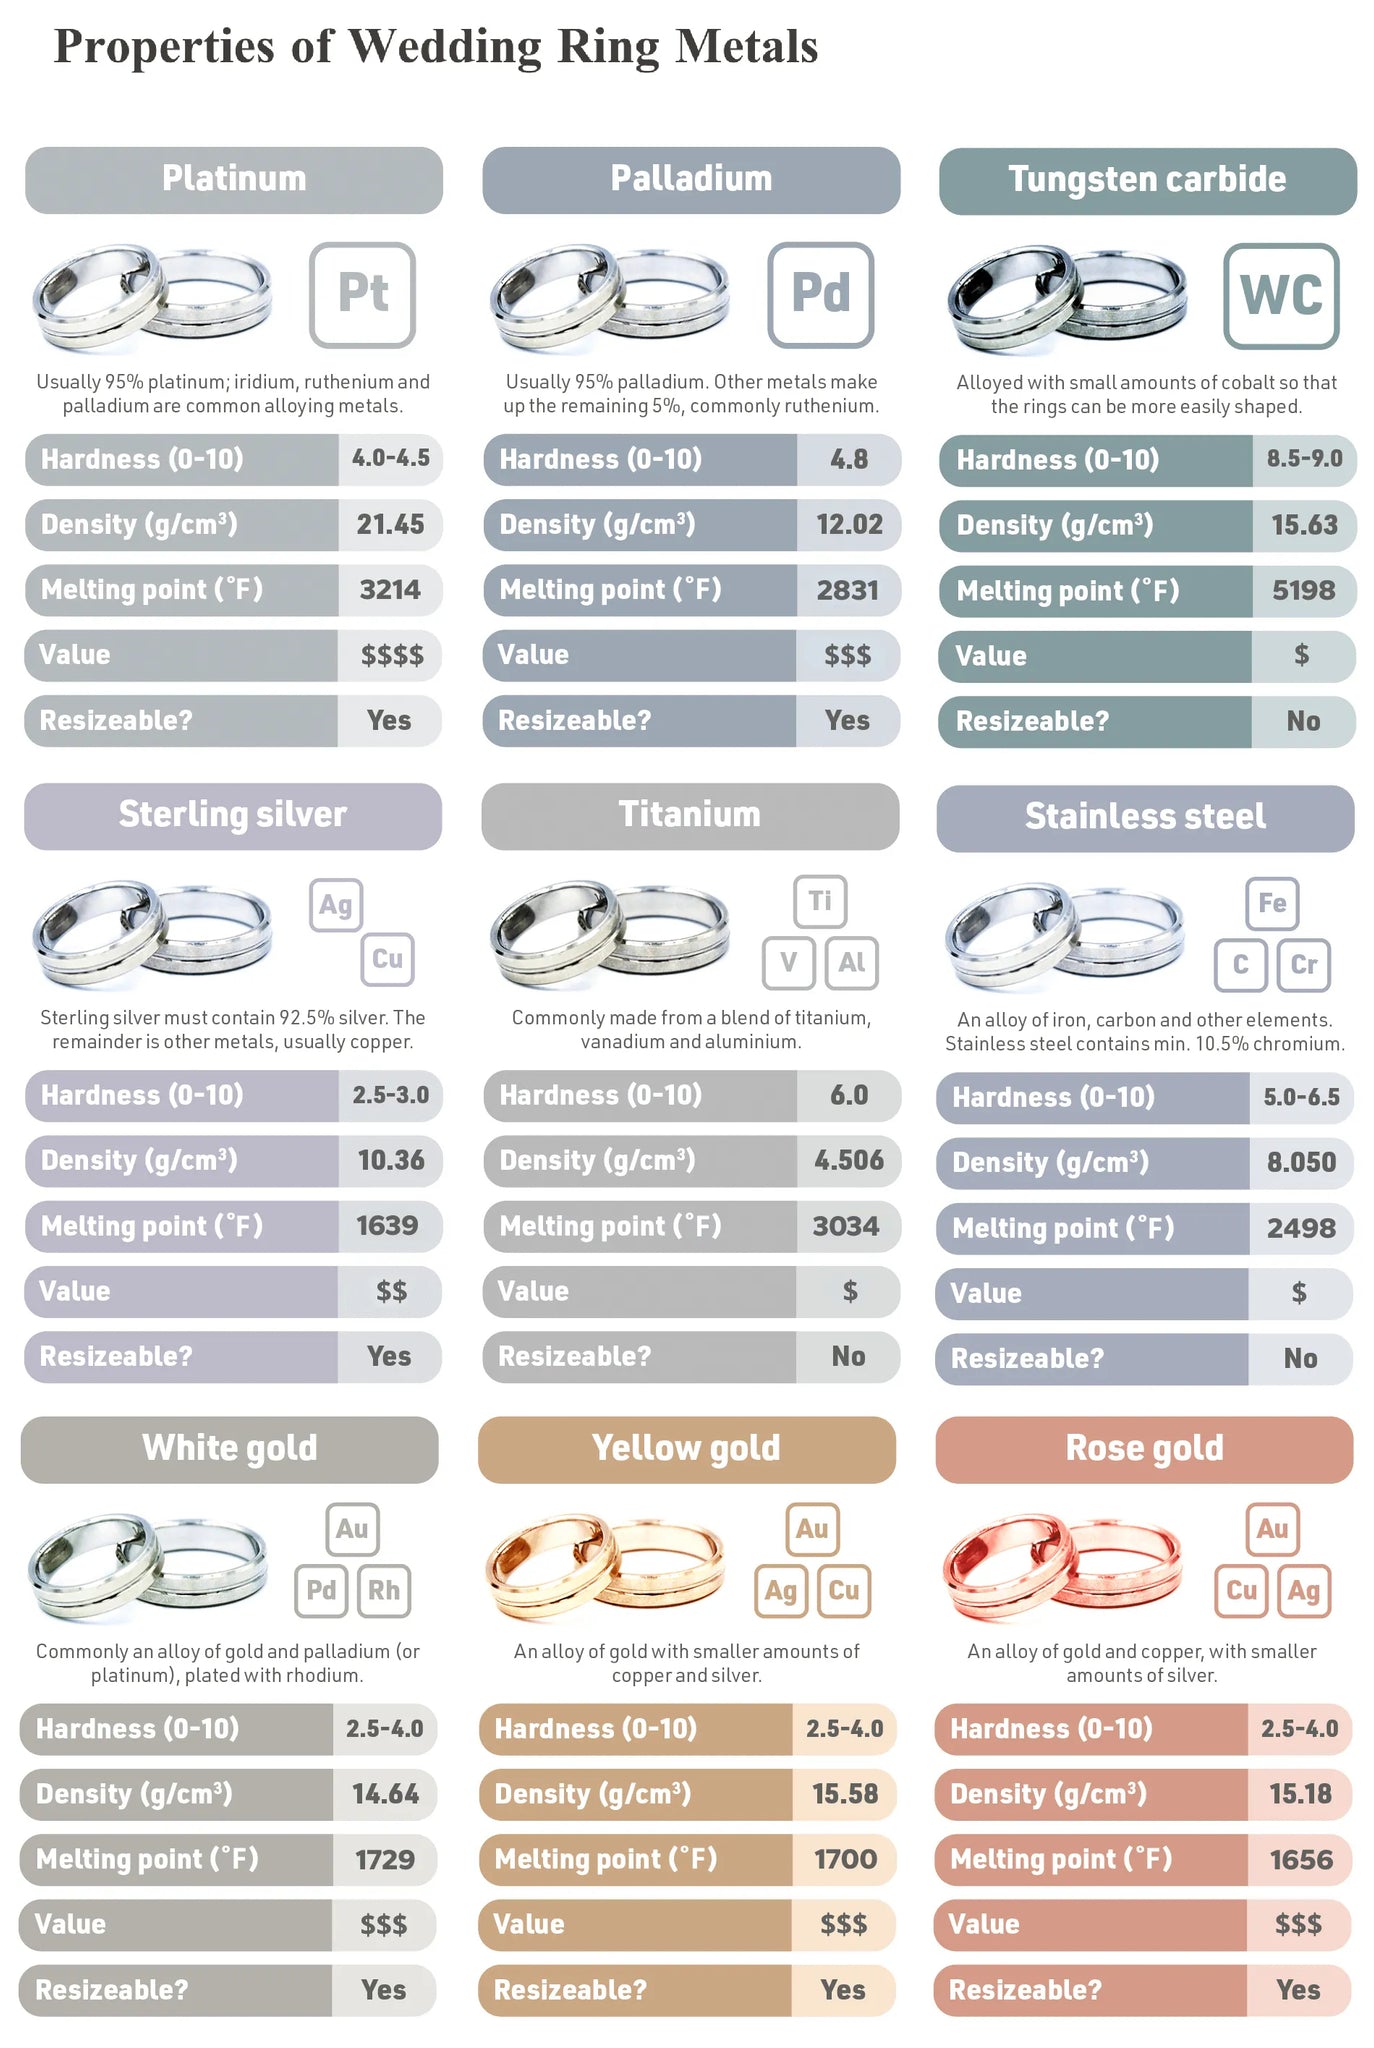
Soft Metals (Gold, Silver, Copper)
Manual ring cutters handle these easily. Follow standard procedure but expect minimal resistance. These metals cut cleanly with little force. Save all pieces—your jeweler can typically solder them back together seamlessly.
Hard Metals (Steel, Titanium)
These require powered cutters or bolt cutters. Always wear eye protection—metal fragments become dangerous projectiles. Apply steady, increased pressure with bolt cutters while controlling the break point. Expect significant resistance and potential sparking with harder alloys.
Brittle Materials (Tungsten, Ceramic)
Never use standard cutters—these materials fracture unpredictably. Instead, wrap the finger in protective padding, then slowly tighten vise grips until the ring breaks. Control the fracture direction by applying pressure opposite any weak points. Collect all fragments for potential replacement.
Address These Common Cutting Complications Immediately
Ring Won’t Cut Through
First verify your cutter matches the material—standard tools won’t cut tungsten. Check cutter sharpness and reposition at a different ring location. If resistance remains too great, stop and seek professional help—forcing it risks severe injury.
Accidental Skin Contact
If the cutter slips toward skin:
1. Stop immediately
2. Clean any abrasion with saline
3. Apply direct pressure to stop bleeding
4. Cover with sterile bandage
Seek medical attention for deep cuts or persistent bleeding.
Patient Anxiety During Procedure
Explain each step before proceeding. Offer to pause if needed. For extreme anxiety, consider having someone else perform the cut—you’ll get steadier results with calm hands. Remember, a cut ring can be repaired; permanent finger damage cannot.
Implement These Prevention Strategies Now
Remove rings before:
– Sports or physical activities (swelling starts within minutes)
– Medical procedures (IV lines cause rapid swelling)
– Pregnancy (edema begins early in gestation)
– High-altitude travel (reduced oxygen causes swelling)
– Hot weather activities (heat expands fingers significantly)
Rings should slide over your knuckle with slight resistance—if they don’t, consider professional resizing. Store your ring cutter with first aid supplies where you can find it instantly during emergencies.
Emergency Protocol for Critical Situations
When you see blue discoloration, severe pain, or numbness:
1. Elevate hand above heart level immediately
2. Proceed directly to cutting without further removal attempts
3. Make two opposing cuts if needed for fastest removal
4. Seek medical attention even after successful removal
Never wait to see if swelling goes down—permanent damage can occur within hours. Keep your ring cutter accessible in your first aid kit, not buried in a toolbox where you can’t find it during an emergency.
Final Tip: Most cut rings can be repaired by jewelers—save every fragment. The key to successful ring removal is recognizing when cutting becomes necessary and acting before swelling worsens. With proper tools and technique, you can safely remove even the tightest rings in under two minutes. Remember: when circulation is compromised, cutting isn’t your last resort—it’s your first and best option for protecting your finger. Keep this guide accessible and practice the steps mentally—you’ll move with confidence when seconds count.


