

Your bolt cutter used to slice through wire like butter, but now it pinches and leaves ragged edges. Before you buy a replacement, proper adjustment might restore that factory-fresh performance. Most cutting problems stem from tiny blade gaps that develop over time—not worn-out tools.
This guide walks you through the exact steps to realign your blades, whether you have a threaded bolt system, eccentric pins, or old-school shims. You’ll learn to diagnose issues, make precision adjustments, and maintain peak cutting performance for years.
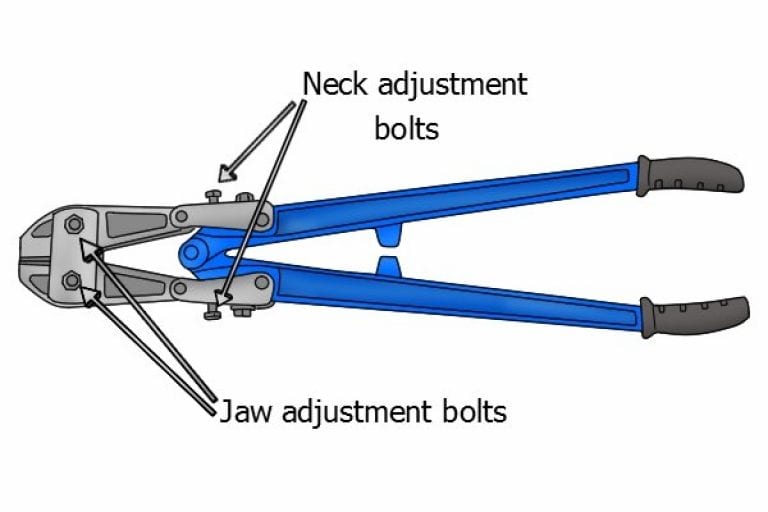
Identify Your Bolt Cutter Adjustment System
Threaded Bolt Mechanism
Look for a large bolt head at the pivot point with lock nuts on both sides. Most professional models use this system, requiring a 10-12mm wrench. The bolt threads directly control blade spacing when you loosen the locking nuts. Pro tip: Mark the original position with a paint pen before adjusting—this saves time if you overshoot your target setting.
Eccentric Pin Design
Heavy-duty cutters hide an offset pin behind a small cover plate. These systems allow micro-adjustments using just a hex key—perfect for field conditions when you don’t have wrenches handy. To access it, remove 2-3 cover screws with a 5-6mm hex key, then rotate the pin in 15-30 degree increments. You’ll notice immediate changes in blade alignment as you turn.
Shim-Based System
Economy models may use thin metal shims between blade and jaw. These require blade removal for each adjustment, making them less convenient but still effective for major corrections. Shims typically come in 0.1mm, 0.2mm, and 0.5mm thicknesses—add or remove them to achieve your target gap. Warning: This method is best for significant wear situations, not routine maintenance.
Diagnose Your Bolt Cutter’s Performance Issues

Visual Inspection Checklist
Check your blades under good lighting. Look for nicks, chips, or uneven wear patterns across the cutting edges. Damaged blades need sharpening before adjustment. Examine the pivot bolt—any looseness here means your settings won’t hold. Pay special attention to the heel area (where blades meet the pivot), as this wears fastest.
Gap Testing Method
Close the jaws slowly and observe where the blades meet. You should see even contact across the entire edge with just a paper-thin gap when fully closed. Use feeler gauges to measure: general cutting needs 0.05-0.10mm, while fine wire work requires 0.025-0.05mm. Pro tip: If you don’t have feeler gauges, a standard business card (0.25mm thick) makes a decent reference point.
Performance Test
Try cutting a piece of the material you typically work with. Note if it slips, requires excessive force, or leaves rough edges. Document these issues—they’ll guide your adjustment direction. For accurate testing, use the same material type and thickness each time you evaluate performance.
Prepare for Safe Bolt Cutter Adjustment
Essential Tools for Bolt Cutter Maintenance
- 10-14mm wrench or socket set
- 4-8mm hex keys
- Feeler gauge set (0.025-0.50mm)
- Safety glasses and cut-resistant gloves
- Paint pen for marking original positions
Safety Setup Checklist
Secure your cutter in a vise or clamp it to a stable workbench. Wear safety glasses—even tiny metal particles can cause serious eye injuries. Keep your workspace well-lit and clear of obstacles. Critical: Always position your hands away from the cutting path when testing adjustments.
Threaded Bolt Adjustment: Step-by-Step Process
Access the Adjustment Point
Position the cutter with jaws fully closed. Locate the central pivot bolt—usually 12-14mm head with lock nuts on both sides. Use a paint pen to mark the current nut positions before touching anything. This reference point lets you return to your original setting if needed.
Loosen Locking Hardware
Hold the right-side lock nut stationary with one wrench. Loosen the left-side lock nut 1-2 turns counterclockwise. This frees the adjustment bolt while maintaining the basic assembly. Common mistake: Trying to adjust without loosening both nuts causes binding and inaccurate settings.
Make Precision Adjustments
Turn the adjustment bolt clockwise to decrease blade gap—in quarter-turn increments for precision. After each small adjustment:
- Slowly close the jaws while watching blade contact
- Check for even meeting across the full blade length
- Verify proper tip overlap
- Measure gap with feeler gauge
Lock and Test Your Settings
When you’ve achieved the target gap (0.05-0.10mm for general use), hold the adjustment bolt steady and retighten the lock nut firmly. Test with actual cutting material—readjust if needed for clean, effortless cuts. Pro tip: Apply anti-seize compound to threads before final tightening to prevent future seizing.
Eccentric Pin System: Field Adjustment Method
Access the Pin Mechanism
Remove the cover plate—usually 2-3 screws with a hex key. Clean the area of debris and old grease. You’ll see an offset pin with reference marks if your manufacturer included them. If marks are missing, create your own with a paint pen for future reference.
Rotate for Micro-Adjustments
Insert your hex key into the pin. Small rotations (15-30 degrees) make micro-adjustments:
- Clockwise rotation: decreases blade gap
- Counterclockwise: increases gap
- Use reference marks to track changes
Time saver: This system lets you make quick field adjustments without removing the cutter from your tool belt—perfect for jobsite conditions.
Verify and Secure After Adjustment
Replace the cover plate with original screws. Apply medium-strength thread locker if specified. Test the full range of motion—blades should move smoothly without binding. Check your work by cutting a test piece before returning to the job.
Troubleshoot Persistent Bolt Cutter Problems
When Settings Won’t Hold
Check lock nut tightness (typically 25-30 ft-lbs). Inspect threads for damage or contamination. Verify proper washer installation. Consider medium-strength thread locker for problem bolts. Warning: Overtightening can strip threads—use a torque wrench if available.
Rapid Wear Patterns
If you need frequent adjustments, examine your cutting technique. Cutting materials harder than your tool’s rating causes accelerated wear. Check for blade overheating—blue discoloration indicates excessive heat. Pro tip: Match your cutter size to the material—using oversized cutters creates unnecessary stress.
Maintain Peak Bolt Cutter Performance
Lubrication Schedule After Adjustment
After each adjustment:
– Apply medium-weight oil (SAE 30) to the pivot
– Use anti-seize compound on adjustment threads
– Light oil on blades prevents corrosion
– Lithium grease for any handle joints
Regular Inspection Intervals
- Light use (occasional): inspect every 6 months
- Medium use (weekly): monthly checks
- Heavy use (daily): weekly inspections
- After abrasive materials: immediate check
Track Your Settings for Future Reference
Record gap measurements after each adjustment. Note what materials you’ve been cutting—this helps predict when the next adjustment will be needed. Over time, you’ll learn your tool’s optimal service intervals. Pro tip: Keep a small notebook in your toolbox specifically for tool maintenance records.
Material-Specific Bolt Cutter Settings
Optimize for Different Cutting Materials
- Soft metals (copper, aluminum): slightly tighter gap for clean shear
- Hardened steel: slightly looser gap to prevent chipping
- Chain links: moderate gap to avoid binding
- Wire rope: precise gap prevents fraying
Storage Best Practices to Preserve Adjustments
Always store with jaws closed to maintain adjustment settings. Apply light oil before long-term storage. Hang vertically or support horizontally—avoid dropping or impact that could knock your settings out of alignment. Critical: Store in a dry environment—moisture causes rust that affects adjustment precision.
Final Performance Verification
Progressive Testing Sequence
Start with easy materials and work up:
1. Soft wire (16-18 gauge) for initial verification
2. Medium hardness (10-12 gauge) for performance check
3. Maximum rated material for final validation
Quality Verification Checklist
Examine your cuts—they should show clean shear surfaces without deformation. The cutting force should feel within 10% of when the tool was new. Listen for a crisp click when blades meet properly. If cuts remain ragged after proper adjustment, your blades likely need professional sharpening.
Final Check: After your adjustment, your bolt cutter should slice through materials with minimal effort, leaving clean, professional cuts. If performance remains poor despite proper adjustment, the blades may need professional sharpening or replacement. Remember that regular maintenance extends your tool’s life significantly—spending 10 minutes on adjustment now could save you $100 on a new cutter later.


