
Your rotary cutter skips across fabric instead of slicing cleanly. You’ve been forcing it through layers, leaving jagged edges that ruin your quilt pieces. That blade needs replacing, but handling razor-sharp metal discs feels intimidating. This guide walks you through the exact steps to swap your blade safely and get back to smooth, effortless cuts without risking injury.
You’ll learn the specific process for your cutter type, avoid common safety mistakes, and discover pro tips that extend blade life. Whether you use an Olfa ergonomic model or standard cutter, these instructions prevent injuries while restoring perfect cutting performance. Most quilters replace blades every 2-3 months depending on usage intensity—knowing how to change a rotary cutter blade correctly keeps your projects precise and your fingers intact.
Identify Your Cutter Model Before Starting

Olfa Ergonomic Models (RTY-2 DX)
Look for the red locking button and automatic blade retraction. These models use a yellow plastic washer between the blade and metal components. Your blade retracts when you release the handle—no manual closing required. The right-hand configuration has the locking button positioned for right-thumb operation, but you can flip the handle for left-handed use during assembly.
Original Manual Cutters (RTY-2/G)
These feature black tab operation with no automatic retraction. Components include only the blade, metal washer, and screw—no yellow washer present. You must manually pull the black tab down to expose the blade and push it up to retract after each cut. If your blade feels stiff during operation, slightly loosening the screw often resolves the issue.
EasyChange™ Models
Magnetic blade hubs flip open without tools. These newer designs eliminate traditional screw removal. Simply press the release mechanism to open the handle, exposing the magnetic hub that holds the blade. The DuoLoop version (Model #118730) features dual handles for both 45mm and 60mm blades, allowing quick swaps between sizes without disassembly.
Gather Essential Safety Supplies First
Required items:
– Paper towels (for safe blade handling and cleaning)
– Original blade containers (for used blade storage)
– Small bowl or container (to hold small parts securely)
Critical safety rules:
– Always close blades immediately after each cut—never leave an open cutter on your work surface
– Never test blade sharpness with fingers—this causes preventable injuries
– Handle used blades only through paper towels—direct contact risks serious cuts
– Store cutters with blades fully retracted—prevents accidental deployment
Documented incidents prove why these rules matter: a student sliced her forehead while pushing hair back with an open cutter, another received a 1.5″ hand cut from a neighbor’s unattended cutter, and multiple finger nicks occur from improper handling. Treat every blade like a surgical scalpel—it is equally dangerous.
Remove the Old Blade Safely
Standard Models (Screw Type)
Step 1: Place cutter on stable surface with blade facing up. Hold the handle firmly to prevent rolling. For ergonomic models, press the red locking button to expose the blade fully.
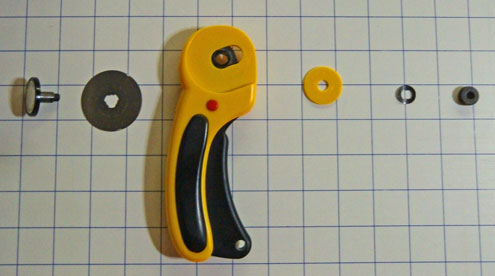
Step 2: Turn the thumb nut counterclockwise until loose. Note the component order as they separate: blade → yellow washer (if present) → metal washer → screw. This sequence is critical for correct reassembly.
Step 3: Slide components onto paper towel in removal sequence. This prevents fabric dust contamination and keeps parts organized. Wipe each piece with a fresh paper towel section to remove built-up lint.
Step 4: Wrap the dull blade in paper towel immediately. Place in original container or designated blade storage. Never leave used blades loose—store them vertically in containers to prevent accidental contact.
EasyChange™ Models (Magnetic)
Step 1: Flip open the handle using the designated release mechanism. The magnetic hub will separate automatically, exposing the blade.
Step 2: Slide the blade off the magnetic surface through paper towel. Never touch the blade edge directly—even dull blades can cut skin.
Step 3: Place the used blade in storage immediately. Check the magnetic hub for fabric fibers that could interfere with new blade seating.
Clean Components Thoroughly
Fabric dust removal:
– Wipe each component with clean paper towel sections
– Pay special attention to screw threads and washer edges where lint accumulates
– Remove built-up debris from blade housing grooves
– Clean contact points between blade and washers to ensure smooth rotation
Oil residue preparation:
– New blades ship with protective oil coating that stains fabric
– Use fresh paper towel to remove excess oil from both sides
– Wipe until no oily residue transfers to paper—this takes 2-3 wipes per side
– Skipping this step risks oil marks on your first fabric cut
Install the Sharp New Blade
Standard Model Assembly
Step 1: Position blade on cutter front. Both sides are identical—no wrong orientation exists. Place it shiny-side up for visual confirmation.
Step 2: Insert the post through blade center hole. Ensure blade sits flat against cutter body without tilting. Any gap causes uneven cutting.
Step 3: Place yellow washer (if applicable) with curved side facing up—like a “smiling” face. Align its flat/curved edges precisely with the post configuration. This washer creates proper blade tension.
Step 4: Position metal washer with edges matching post shape. This creates spacing for smooth rotation—misalignment causes wobbling.
Step 5: Install screw with flat side up, indented side down. Hand-tighten clockwise until snug—do not over-tighten. Use finger pressure only; wrenches strip threads.
Step 6: Test blade rotation before final tightening. Should spin freely without wobbling. If stiff, back off screw 1/8 turn. Recheck after tightening.
Critical Final Checks
Single blade verification:
– Ensure only one blade is installed—double blades shred fabric instantly
– Check for proper seating against washers (no visible gaps)
– Verify no paper towel fibers are trapped between components
Operational test:
– Make test cut on scrap fabric (cotton works best)
– Blade should glide smoothly without pressure—forcing indicates assembly error
– Adjust screw tightness if operation feels stiff or wobbly
Handle Multi-Pack Blades Safely
Blade separation technique:
– Grip individual blades through paper towel folds—never bare-handed
– Slide blades apart horizontally (not vertically) to avoid slipping
– Store unused blades in original packaging with oil coating intact
Oil removal process:
– Each new blade requires oil removal before installation
– Wipe both sides thoroughly with fresh paper towel sections
– Recheck for oil residue by pressing blade against clean paper—no transfer should occur
Troubleshoot Common Issues

Fabric Shredding Problems
Cause: Double blade installation or damaged washer
Solution: Disassemble completely, verify single blade installation, inspect washer for cracks. Replace damaged washers immediately—Olfa parts are inexpensive and critical for safety.
Stiff Blade Operation
Cause: Over-tightened screw or debris buildup
Solution: Loosen screw 1/8 turn while testing rotation. If persistent, disassemble and clean all contact points. Never force the blade—the cutter should operate smoothly with finger pressure alone.
Poor Cutting Performance
Cause: Dull blade or incorrect assembly
Solution: Replace with fresh blade if cleaning doesn’t help. Verify washer orientation—yellow washer must curve upward. Misplaced washers cause uneven pressure and jagged cuts.
Maintain Your New Blade
Daily care routine:
– Close blade after every single cut—no exceptions
– Store cutter in dedicated location (not loose in sewing bag)
– Wipe blade with dry paper towel after heavy cutting sessions
Extended blade life tips:
– Reserve old blades for paper/cardstock cutting
– Always use a self-healing cutting mat—hard surfaces dull blades fast
– Avoid cutting over pins or seam allowances—metal contact ruins edges
Storage best practices:
– Keep spare blades in original containers with oil coating
– Label used blade containers clearly as “SHARP DISCARD”
– Never store loose blades in drawers—vertical containers prevent accidents
Advanced Model Variations
DuoLoop EasyChange™ System
These 45mm and 60mm models feature dual-handle operation. The switching mechanism allows quick blade changes without tools—ideal for frequent size rotation. To switch sizes, flip the handle to access the alternate magnetic hub. Always retract both blades before storage.
Left-Hand Configuration
Ergonomic models can be assembled for left-handed use. During initial setup or blade replacement, detach the handle and reattach it on the opposite side. The red locking button should now position comfortably under your left thumb. Test blade retraction before cutting fabric.
Quick Reference Checklist
Before starting:
– [ ] Identify cutter model type
– [ ] Gather paper towels and storage container
– [ ] Clear stable workspace
During replacement:
– [ ] Handle blades only through paper towels
– [ ] Maintain component order during removal
– [ ] Clean all parts thoroughly
– [ ] Verify single blade installation
After completion:
– [ ] Test cut on scrap fabric
– [ ] Store used blade safely
– [ ] Retract blade fully
– [ ] Return tools to storage
Your rotary cutter now slices through multiple fabric layers like butter. That smooth, effortless cutting motion returns as the sharp blade glides cleanly through your materials. By following these safety-first procedures, you’ve replaced your blade without injury while ensuring optimal performance for your next quilting project. Keep this guide accessible—proper how to change a rotary cutter blade technique protects both your projects and your fingers every time you cut.


