
Your nail cutter sees more action than you think—clipping through thick toenails, trimming hangnails, and occasionally snagging a cuticle. Over time, this essential tool becomes a breeding ground for bacteria, collects rust spots, and even develops a grimy film from old nail polish. The good news? A thorough cleaning takes just 10 minutes and extends your cutter’s life by years. This guide walks you through every step, from basic soap scrubbing to professional-grade sterilization techniques. Whether you’re maintaining personal tools or preparing cutters for salon use, these methods ensure your nail clippers stay hygienic and sharp.
Identify Contamination Type First
Before grabbing your cleaning supplies, take a moment to assess exactly what’s dirtying your nail cutter. Different contaminants require different approaches, and using the wrong method can damage your tool or leave it improperly sanitized. Hold your cutter under bright light and open it fully to inspect all surfaces—this visual diagnosis prevents wasted effort and ensures complete cleaning.
Spot Nail Debris and Skin Oils
Examine the cutting edges closely—you’ll likely see compacted nail fragments wedged where the blades meet. These tiny pieces create a dull cutting edge and harbor bacteria that can cause infections. Skin oils appear as a shiny film on the handles from frequent handling, while dried blood shows as dark brown spots near the cutting area. If you notice blood residue, treat this as biohazard contamination and use professional sterilization methods. These organic materials break down over time, leaving behind unpleasant odors and sticky residues that attract more dirt.
Check for Rust and Product Residue
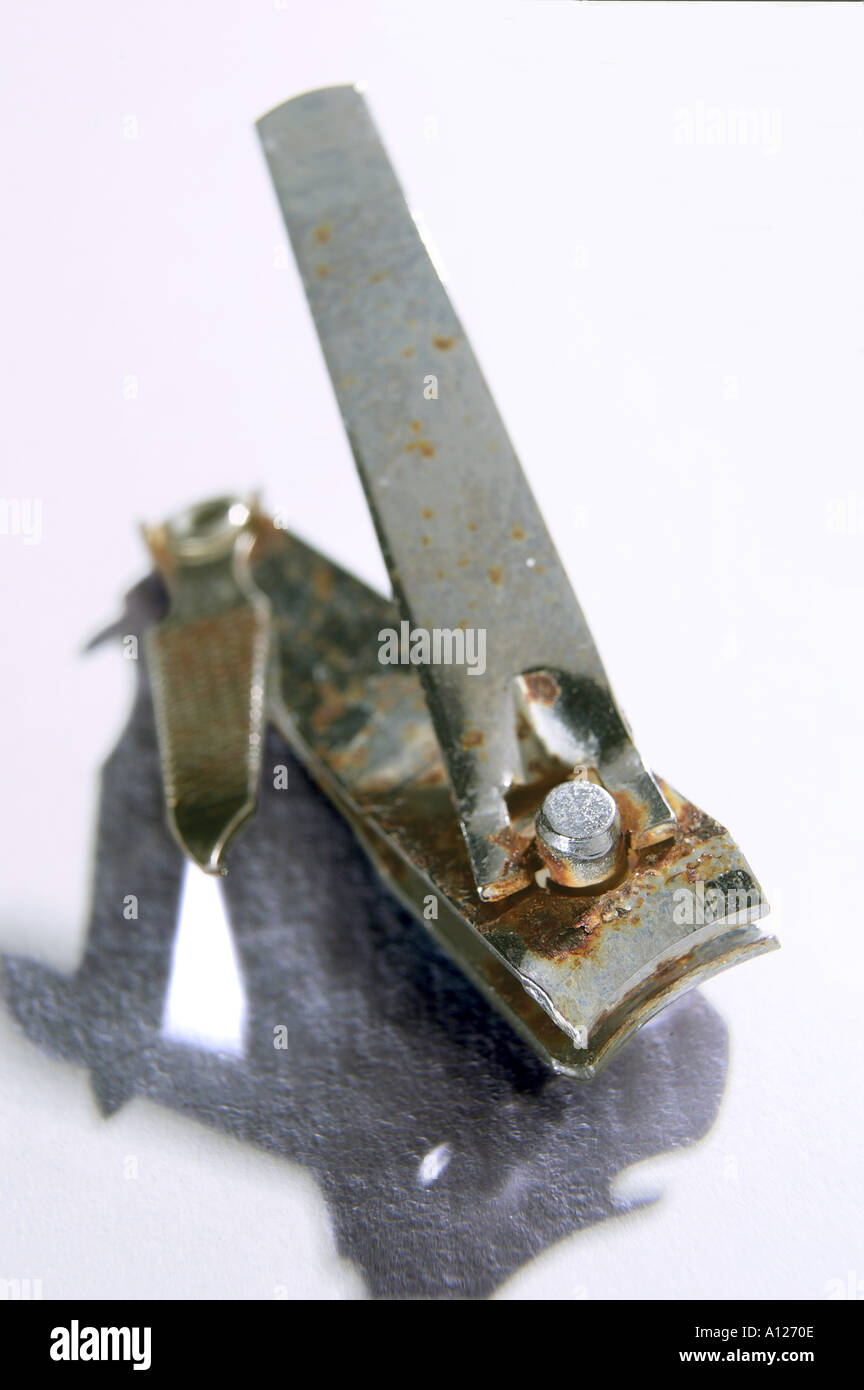
Carbon steel cutters develop orange-brown rust spots when exposed to moisture, especially around the pivot point. Stainless steel versions resist rust but may show rainbow discoloration from nail polish remover or harsh chemicals. Sticky residue from nail glue or hardener feels tacky to touch and appears as a clear film on metal surfaces. Never ignore rust spots—even tiny ones compromise the cutter’s structural integrity and create microscopic pits where bacteria hide. For salon professionals, product residue indicates cross-contamination between clients that must be addressed immediately.
Gather Essential Cleaning Supplies

Having the right tools on hand makes cleaning efficient and effective. Rushing this step leads to incomplete sanitation, so take 2 minutes to prepare properly. The supplies you need vary based on contamination level, but these basics work for most home situations and prevent damage to your cutter’s delicate mechanisms.
Required Tools for Deep Cleaning
- Small bowl with warm water (never hot, as extreme temperatures weaken metal)
- Mild dish soap or antibacterial hand soap (avoid harsh detergents)
- Soft-bristled toothbrush (designate one specifically for tool cleaning)
- 70% isopropyl alcohol for effective disinfection
- Cotton swabs for tight spaces around the hinge
- Clean microfiber cloth for drying (paper towels leave lint)
- Optional: Ultrasonic cleaner for professional results at home
Professional Add-Ons
Salon technicians should add pipe cleaners for hinge cleaning and mineral oil for rust prevention. A commercial rust remover works wonders for severe oxidation, while barbicide solution offers salon-grade sanitization that meets health department standards. For medical settings or when treating clients with fungal infections, keep bleach solution (1:10 ratio with water) on hand for deep disinfection.
Remove Initial Debris Quickly
Skipping this step guarantees a wasted cleaning effort—loose debris just gets pushed deeper into mechanisms during soaking. This quick 60-second process removes 80% of visible contamination and prevents cross-contamination during the main cleaning phase.
Shake Loose Nail Clippings
Work over a trash can and fully open your cutter. Hold it upside down and gently tap the handles against your palm. Most nail fragments fall out immediately. For stubborn pieces stuck in the cutting groove, use a wooden toothpick—not metal—to avoid scratching the blade edge. Never force debris out with sharp objects; you’ll damage the precision cutting surface. After tapping, open and close the cutter several times while inverted to dislodge hidden particles.
Clean the Hinge Mechanism
Open and close the cutter rapidly 10-15 times while inverted. This loosens debris trapped in the pivot point. You’ll see tiny particles fall out—this is normal buildup from months of use. For cutters with visible springs, use a dry cotton swab to wipe away surface dust. If your model allows partial disassembly (check manufacturer instructions), carefully remove the pivot screw to access hidden grime, but never force disassembly on tools not designed for it.
Deep Clean with Soap Solution
This isn’t just about surface cleaning—soap breaks down organic matter and lifts microscopic contaminants from metal pores. Proper technique here determines whether your cutter gets truly clean or just looks clean.
Create Effective Soaking Mix
Mix warm water with 3 drops of dish soap in a small bowl. The water should feel comfortable to touch—too hot damages metal temper. Submerge your cutter completely for 3-5 minutes. While soaking, open and close the tool slowly to work soapy water into the hinge. Don’t exceed 5 minutes soaking time; prolonged exposure to water accelerates rust formation, especially on carbon steel models.
Scrub Every Surface
Use your designated toothbrush to scrub all surfaces vigorously. Focus on the cutting edges where bacteria accumulate most—these areas need 10-15 seconds of dedicated brushing. Clean the handle grips thoroughly—they collect skin oils and lotion residue that transfer to nails during use. For the pivot area, use cotton swabs dipped in soapy water, rotating fresh swabs until they come away clean. Rinse thoroughly under warm running water while working the mechanism.
Disinfect and Sanitize Properly
Cleaning removes visible dirt, but disinfection kills pathogens that cause infections. This critical step separates basic cleaning from true sanitation—especially important if you’ve ever cut yourself during clipping.
Alcohol Soak Method
After rinsing away soap, submerge your clean cutter in 70% isopropyl alcohol for 10 minutes. This kills bacteria, viruses, and fungi effectively. Never use higher concentrations—70% works better than 99% for disinfection because the water content slows evaporation, allowing more contact time with pathogens. After soaking, air dry on a clean paper towel—don’t wipe, as this can transfer contaminants.
Professional Sterilization Options
For salon-grade sanitization, use barbicide solution following package directions (typically 10-minute immersion). If you have an ultrasonic cleaner, fill it with disinfectant and run a 3-5 minute cycle. This removes microscopic debris and reaches areas brushes can’t access. For tools used on clients with fungal infections, add a 10-minute soak in 1:10 bleach solution before alcohol disinfection.
Tackle Rust Spots Immediately

Rust doesn’t just look bad—it compromises cutting performance and creates bacterial hideouts. Address rust spots the moment you notice them to prevent tool failure and potential infection risks from contaminated metal.
Baking Soda Paste Treatment
Mix equal parts baking soda and water into a thick paste. Apply to rust spots and wait 30 minutes. Gently scrub with your soft brush—the rust lifts away without damaging the metal. Rinse thoroughly and dry immediately. For stubborn rust, repeat the process rather than scrubbing harder, which can scratch the surface.
Prevent Future Oxidation
After rust removal, apply one drop of food-grade mineral oil to a cloth and wipe all metal surfaces. This creates a protective barrier against moisture. Focus on the cutting edges and pivot point where rust typically starts. Store your cutter in a dry place with silica gel packets to absorb ambient moisture—never in the bathroom cabinet.
Master Advanced Cleaning Techniques
When standard methods don’t cut it—like after treating fungal infections or restoring vintage cutters—these professional techniques deliver hospital-grade results at home.
Ultrasonic Cleaner Protocol
Fill your ultrasonic tank with warm water and cleaning solution per manufacturer instructions. Place the cutter in the basket, ensuring complete submersion. Run for 3-5 minutes—the cavitation bubbles reach every crevice. Rinse and disinfect afterward. Ultrasonic cleaning removes 99.9% of contaminants, making it ideal for professional tools used on multiple clients.
Steam Sterilization for Pros
Use autoclave pouches for complete sterilization. Process at 121°C (250°F) for 15-30 minutes. This kills all microorganisms including spores—essential for tools used in medical settings. Never use home steamers as substitutes; improper temperature or duration creates false security while leaving pathogens alive.
Daily Maintenance Routine
The secret to long-lasting nail cutters isn’t deep cleaning frequency—it’s consistent after-use care that prevents buildup. These simple habits save you from intensive cleaning sessions and extend your tool’s life by years.
Quick After-Use Care
After each clipping session, wipe your cutter with an alcohol-soaked cotton pad. This prevents buildup and keeps blades sharp. Store in a dry drawer—not the bathroom where humidity promotes rust. For toenail cutters that handle thicker material, use a dry toothbrush to remove visible debris before sanitizing.
Weekly Deep Clean Schedule
Perform a thorough cleaning weekly if you use cutters frequently. Apply mineral oil monthly to maintain smooth operation. Check for loose pivot screws and tighten gently if needed. Set a phone reminder—consistency beats intensity when maintaining precision tools.
Fix Common Post-Cleaning Issues
Even with proper technique, problems sometimes arise after cleaning. These quick fixes save your tool from premature replacement and ensure optimal performance.
Resolve Sticky Operation
If the cutter feels stiff after cleaning, residual soap likely remains in the pivot. Rinse under warm water while opening and closing repeatedly. Dry thoroughly, then add one drop of mineral oil to the hinge. Never use household oils like olive or coconut—they turn rancid and attract more dirt.
Eliminate Persistent Odors
For cutters that smell musty or have been used on infected nails, soak in 1:10 bleach solution for 10 minutes. Rinse completely, re-disinfect with alcohol, and dry thoroughly before storage. If odor persists, repeat the process—you’ve likely missed contaminated areas.
A clean nail cutter performs better and lasts longer. Set a phone reminder for weekly deep cleaning—your future self will thank you when clipping becomes effortless again. Properly maintained cutters can last decades, saving you money while ensuring hygienic nail care. Start today: grab your tools, follow these steps, and experience the difference professional-level cleaning makes.


