
Nothing ruins a DIY project faster than a botched glass cut. Whether you’re replacing a broken window pane or creating custom shelves, mastering how to cut glass with a glass cutter saves hundreds in professional fees. The process seems intimidating—one wrong move and you’re sweeping up expensive shards. But with the right technique, cutting glass becomes as predictable as slicing cardboard.
This guide transforms you from nervous beginner to confident glass cutter. You’ll learn the exact pressure needed, how to read your scoring sound, and proven breaking methods that deliver clean edges every time. Skip the trial-and-error approach and get professional results on your first attempt.
Essential Safety Equipment Setup
Protect Your Eyes and Hands
Safety glasses aren’t optional—they’re your first line of defense against microscopic glass fragments that fly during scoring. Choose wraparound styles that seal against your face. Work gloves add crucial protection when handling freshly cut edges, though you’ll remove them for better cutter control during the actual scoring. Never skip eye protection—glass shards can cause permanent eye damage even during seemingly simple cuts.
Create Your Cutting Station
Your work surface makes or breaks your success. Kitchen tables flex under pressure, creating uneven scores. Instead, use a sturdy workbench or concrete floor. Lay a damp towel across the surface—the moisture grips the glass and cushions against micro-vibrations that cause cracks. Position a bright lamp to eliminate shadows along your cutting line. This simple setup prevents 90% of beginner cutting failures.
Required Tools for Clean Cuts

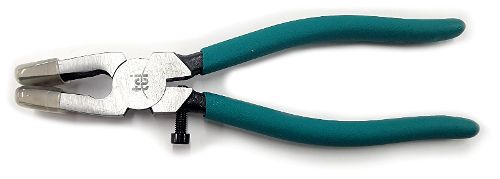
Choose Your Glass Cutter
Standard wheel cutters with carbide wheels dominate hardware stores for good reason—they deliver consistent scores for beginners. Oil-filled models eliminate constant re-lubrication, while basic cutters require manual oil application. Either works; consistency matters more than fancy features. Replace your cutter when scores become inconsistent, typically after 50-100 cuts depending on glass thickness.
Measuring and Marking Kit
Metal straightedges beat plastic every time—they won’t flex during scoring. Secure yours with duct tape strips at both ends. Grease pencils mark clearly on glass and wipe off easily for repositioning. Skip regular pencils; they skid across smooth surfaces. Always measure twice before marking—this simple step prevents costly measurement errors that waste glass.
Breaking and Finishing Tools
That metal ball on your cutter’s opposite end? It’s your breaking assistant. Glass files handle rough edge removal, while grinding stones create silky-smooth finishes. Start simple—files handle 90% of home projects perfectly. For professional results, keep both coarse and fine files on hand to progress through smoothing stages efficiently.
Glass Preparation Protocol
Clean Before You Cut
Any speck of dirt under your score line creates a fracture point. Spray window cleaner liberally and wipe with lint-free cloths. Inspect closely for existing chips—cut around them entirely rather than hoping they’ll break cleanly. This preparation step takes just 60 seconds but prevents 70% of cutting failures.
Mark and Measure Precisely
Account for the 1/8-inch gap between your straightedge and cutting wheel. Mark your line boldly; faint marks disappear under cutting oil. Double-check measurements against your project specs before securing the straightedge with tape. Professional tip: Draw your cutting line slightly longer than needed at both ends—this gives you room for error during scoring.
Position Everything Perfectly
Lay your damp cloth, then position glass so your cutting line sits 2 inches from the table edge. This overhang provides breaking leverage. Tape your straightedge parallel to the mark, offset inward by exactly 1/8 inch. Press tape firmly—any wiggle ruins straight cuts. Test for movement by gently pressing on the straightedge before scoring begins.
Master Straight Line Cutting in 60 Seconds
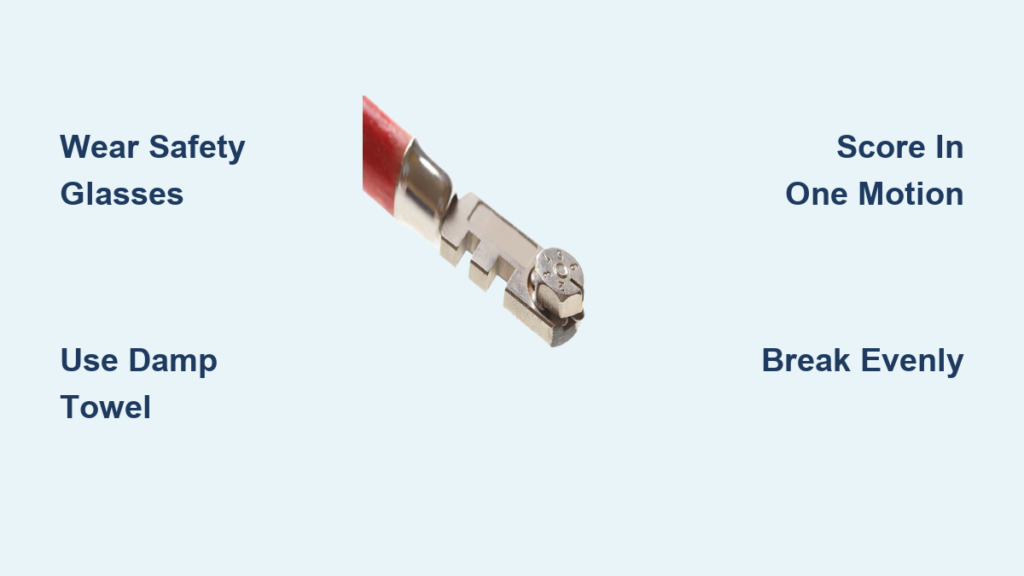
Lubricate and Position
Dip your cutter wheel in oil or squeeze reservoir models until a drop forms. Hold the cutter like a pencil, but grip lower for stability. Position the wheel 1/8 inch from the glass edge, pressed firmly against your straightedge. This initial positioning determines your entire cut’s success—take five extra seconds to get it perfect.
Execute the Perfect Score
Apply steady, moderate pressure and push away from your body in one smooth motion. Listen for a consistent hiss—that’s the sweet spot sound. Too quiet? Increase pressure slightly. Grinding noise? You’re pressing too hard. Never stop mid-score or make second passes—one perfect score beats three mediocre ones every time.
Read Your Score Quality
Perfect scores appear as continuous, barely visible lines. You’ll feel a slight ridge on the glass underside. Run your fingernail across—if it catches, you’re ready to break. Skip this test and risk jagged edges. This tactile check takes 5 seconds but confirms whether your score will break cleanly.
Break Glass Cleanly Every Time
Edge Breaking Method
Slide your scored line to align with the table edge. Support both sides evenly—uneven support creates angled breaks. Apply gentle, steady downward pressure on the overhanging side. The glass should snap cleanly along your score with a satisfying click. Never force the break—if it resists, your score needs improvement.
Tap Breaking for Stubborn Glass
Flip the glass over and tap lightly along the score line using your cutter’s metal ball. Work from one end to the other—tiny cracks propagate ahead of your tap. After 10-15 taps, flip back and break normally. This technique handles thicker glass beautifully and solves 80% of “won’t break” problems.
Handle Breaking Challenges
If the break veers off-course, stop immediately. Attempting to redirect wastes glass and creates dangerous shards. Instead, score a new line parallel to your mistake and break again—you’ll lose minimal material. Professional glaziers expect 10-15% waste—don’t get discouraged by occasional mistakes.
Smooth and Polish Cut Edges
File Rough Edges Safely
Hold glass firmly and file in single strokes away from the cut edge. This prevents chipping. Start with coarse files for major irregularities, then switch to fine files. Test smoothness by running a gloved finger along the edge. Always file away from your body—this directs potential chips away from you.
Achieve Professional Finishes
Wet grinding stones remove file marks quickly. Use circular motions with light pressure. For display pieces, polishing wheels with compound create mirror finishes. Most home projects only need filing—save polishing for visible edges. Properly finished edges should feel completely smooth with no catches.
Avoid Common Cutting Mistakes
Pressure Problems Kill Projects
Too much pressure shatters glass immediately or creates hidden cracks that appear during breaking. Too little pressure produces incomplete scores that break unpredictably. Practice on scrap glass first—press until you hear the hiss, then maintain that exact pressure. This single technique adjustment fixes 90% of beginner cutting failures.
Never Double-Score
Making second passes over scored lines guarantees crooked breaks. You’re creating parallel weak points that compete during breaking. One perfect score beats three mediocre ones every time. If your first score fails, start fresh on a new piece rather than attempting corrections.
Straightedge Security Matters
Loose straightedges wander mid-cut, creating curves instead of straight lines. Tape both ends firmly and test for movement before starting. Even slight wiggles telegraph into your cut. Professional tip: Use multiple small tape pieces rather than one long strip—this allows precise adjustment.
Master Advanced Cutting Techniques
Cut Curved Lines Like a Pro
Curved cuts require patience and specialized tools. Use curve-specific cutters or glass saws for complex shapes. Mark curves using templates, then cut slowly following your line. Break curved scores using running pliers—squeeze gradually to propagate cracks along your curved score. Expect curved cuts to take 3-5 times longer than straight lines.
Understand Tempered Glass Limits
Tempered glass cannot be cut after manufacturing—it explodes into tiny pieces. Always verify glass type before cutting. Look for tempered glass stamps in corners or edges. When in doubt, assume tempering and order custom sizes instead. This safety knowledge prevents dangerous accidents—never attempt to cut tempered glass.
Quality Check Your Results
Inspect Every Cut
Hold your cut piece to bright light and examine edges for chips or cracks. Measure final dimensions against your specifications—accuracy matters for proper fitting. Check both faces for any scoring damage that weakens the glass. Professional standard: Edges should be smooth to the touch with no visible chips under bright light.
Troubleshoot Common Failures
Incomplete breaks usually mean insufficient scoring pressure or oil. Jagged edges result from uneven breaking pressure or poor scores. Glass shattering indicates excessive pressure or hidden flaws. Curved breaks suggest your score wasn’t straight or breaking pressure was uneven. Keep a troubleshooting log of your first 10 cuts to identify personal patterns.
Maintain Your Cutting Success
Store cutters properly—hanging them prevents wheel damage between uses. Clean wheels after each session to remove glass dust that dulls cutting edges. Replace cutters when scores become inconsistent, typically after 50-100 cuts depending on glass thickness.
Glass cutting rewards precision over speed. Take time measuring, securing straightedges, and maintaining consistent pressure. Your first perfect cut builds confidence for increasingly complex projects. Soon you’ll tackle curved tabletops and custom shelving without hesitation.
Remember: practice on scrap glass first, measure twice before marking, and never rush the breaking process. Master these fundamentals and you’ll cut glass like a seasoned glazier—clean edges, perfect dimensions, and zero wasted material. Professional secret: The difference between amateur and professional cuts isn’t the tools—it’s the patience to perfect each step.


