
You’re elbows-deep in your plumbing project when disaster strikes—your PEX cutter has vanished. The water’s off, fittings are staged, and that stubborn piece of tubing refuses to cooperate without the proper tool. This frustrating scenario has derailed countless DIY projects and professional installations alike. Knowing how to cut PEX tubing without cutter becomes your secret weapon against project delays and costly callbacks.
The truth is professional-quality cuts don’t require specialized equipment. You can achieve leak-proof connections using common tools already in your garage or toolbox. These alternative methods produce clean, square cuts that won’t fail at the fittings—critical for maintaining water pressure and preventing catastrophic leaks. Whether you’re installing a new bathroom or fixing a burst pipe at midnight, mastering these techniques ensures your project stays on track.
Why Your PEX Cutter Disappeared (And What to Do Now)
Immediate Damage Control for Your Plumbing Project
Stop everything and verify your water supply is completely shut off before proceeding. Locate your main shutoff valve and confirm no water flows when you open a nearby faucet. This critical safety step prevents turning a minor tool emergency into a major flood. While searching for alternatives, wrap any exposed pipe ends with a clean rag to catch drips and protect against debris contamination.
Your first priority is assessing available tools without wasting precious time. Scan your workspace for five viable cutting options: utility knives, fine-tooth saws, PVC cutters, rotary tools, or tubing shears. Each serves specific tubing sizes and situations—choosing wrong could mean redoing your work later. Remember that 3/8″ and 1/2″ tubing behaves very differently than 3/4″ or 1″ pipes when cut with improvised tools.
Sharp Utility Knife Method for Small Tubing
How to Score and Snap 3/8″ and 1/2″ PEX Perfectly
This technique delivers surgical precision when executed correctly but requires absolute attention to blade sharpness. A dull utility knife will crush PEX tubing faster than you can say “water damage,” ruining your cut and potentially the entire pipe section.
Follow these critical steps:
– Mark precisely using a fine-tip permanent marker, wrapping your measurement completely around the tubing
– Score deeply with a brand-new utility blade, rotating the tubing while applying consistent pressure
– Snap cleanly by gently bending the tubing at the score line—never force it
– Deburr immediately using fine sandpaper or a dedicated deburring tool
Pro tip: Place a wooden dowel inside the tubing while scoring. This simple trick prevents wall collapse and maintains perfect roundness. For 1/2″ tubing, three complete scoring rotations typically yield the cleanest snap.
Fine-Tooth Saw Technique for Larger Tubing

Cutting 3/4″ and 1″ PEX Without Crushing the Walls
When working with larger diameter tubing, a fine-tooth saw becomes your most reliable option. The 24-32 teeth per inch (TPI) design cuts cleanly through plastic without grabbing or shattering the pipe. This method requires proper setup but delivers results rivaling professional PEX cutters.
Essential setup checklist:
– Secure tubing in a vise with soft jaws or wrap in a towel to prevent deformation
– Mark completely around the circumference using tape as a straight guide
– Support both sides with wooden blocks to avoid cracking during the final cut
– Maintain perpendicular angle throughout the cutting motion
Warning: Never use a coarse wood-cutting saw—its aggressive teeth will tear the PEX walls and create dangerous burrs. A PVC-specific pipe saw from your local hardware store costs less than $10 and pays for itself in perfect cuts.
Emergency PVC Cutter Hack That Actually Works
Using Your Ratcheting Cutter Without Damaging PEX
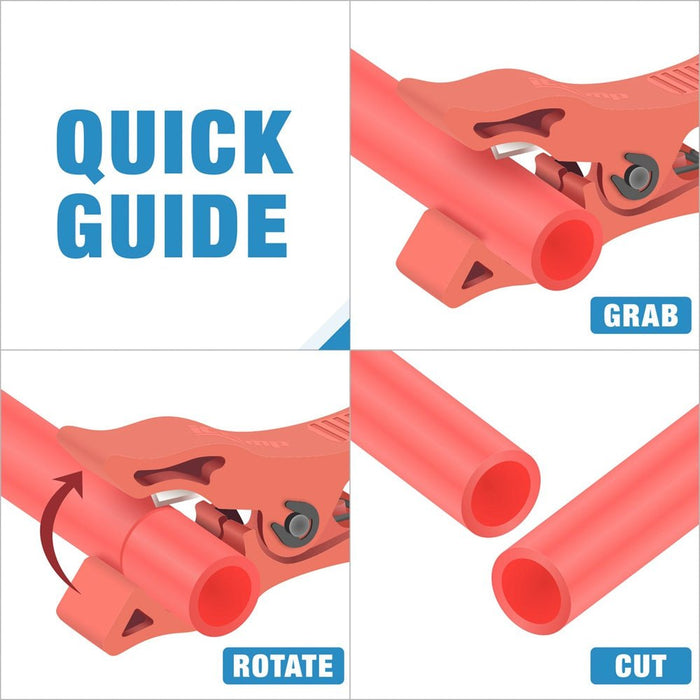
While plumbing professionals cringe at this suggestion, a sharp PVC cutter can save your project when no alternatives exist. The ratcheting mechanism provides consistent pressure that prevents the uneven crushing typical with manual cutters.
Critical execution steps:
– Inspect the blade first—dull blades will ruin PEX tubing instantly
– Position tubing perpendicular to the cutter’s blade, not at an angle
– Apply steady pressure through the full ratcheting motion
– Check squareness immediately using a square tool against the cut end
Time-saving tip: After cutting, roll the tubing between your palms while applying light pressure. This subtle technique helps restore perfect roundness to any slightly compressed sections before installing fittings.
Safety Essentials You Can’t Skip
Protecting Yourself During Improvised Cutting
Flying plastic shards from PEX tubing can cause serious eye injuries—never skip safety glasses. Cut-resistant gloves protect against razor-sharp edges that form even on seemingly smooth cuts. Work in a well-lit area where you can clearly see your cut line and any potential wall deformations.
Workspace setup must-haves:
– Stable cutting surface at waist height to maintain control
– Non-slip mat under tubing to prevent dangerous movement
– Deburring tools within immediate reach before starting
– Clear disposal container for cut tubing pieces
Fixing Common Cutting Mistakes Immediately

Salvaging Crushed or Angled Cuts Before They Leak
Crushed tubing walls are the most common disaster when cutting PEX without proper tools. If your cut shows wall deformation, don’t panic—many issues are fixable. Insert a rounded deburring tool and rotate it vigorously while applying outward pressure. This often restores the tubing’s round shape sufficiently for proper fitting insertion.
For stubborn deformations:
– Heat gently with a hair dryer to make the PEX pliable
– Insert proper-sized mandrel while warm
– Hold shape until completely cooled
– Re-cut if necessary with sharper tool
Critical reminder: Never force a deformed tube into a fitting. This creates immediate leaks or future failure points that could flood walls months later.
Size-Specific Cutting Strategies That Work
Matching Your Method to Tubing Diameter
3/8″ and 1/2″ tubing responds best to the utility knife method when you score deeply and snap correctly. Attempting saw cuts on these smaller sizes often causes crushing from improper support. The sweet spot for knife cuts is three complete scoring rotations followed by a firm, single snap motion.
For 3/4″ tubing, the fine-tooth saw becomes essential. Clamp the tubing securely with support blocks on both sides of your cut line. Make your first few strokes extremely light to establish the cut path before applying normal pressure. This prevents the blade from wandering and creating angled cuts that won’t seal properly.
Quality Control Checklist Before Installing Fittings
Verifying Your Cut Won’t Leak Later
Run through this quick inspection before proceeding:
– Check squareness by placing tubing against a known square surface
– Roll tubing on a flat surface to detect any rocking (indicates uneven cut)
– Inspect interior with a flashlight for hidden burrs or deformations
– Test fit with your actual fitting (dry fit) before making permanent connections
Pro tip: Dip the cut end in water before dry fitting. This highlights any microscopic gaps where water could eventually seep through under pressure.
Emergency Field Repairs When Tools Are Missing
Making It Work With Zero Proper Equipment
In true emergencies, use any sharp edge to create the deepest possible score line around the tubing. A pocket knife, broken glass edge, or even a sharp rock can work in survival situations. Rotate the tubing while applying consistent pressure to create an even score. Then snap the tubing at this line with a quick, firm motion.
Critical limitations:
– Expect 30-50% higher failure risk with improvised cuts
– Never use on pressurized lines without immediate replacement
– Always install an accessible shut-off valve near emergency repairs
– Replace within 72 hours with proper tools and cuts
Long-Term Prevention Strategies
Never Get Caught Without a Proper Cutter Again
Keep a $15 PEX cutter in your vehicle’s emergency kit alongside spare tubing and basic fittings. Store a second cutter with your household tools in a bright-colored pouch that’s impossible to miss. When working on major projects, purchase two identical cutters—one for active use and one as backup.
Smart investment: A quality PEX cutter costs less than one emergency plumber visit. Consider it insurance against project delays and water damage. The time saved with clean, reliable cuts pays for itself in your first major plumbing project.
Bottom line: While a dedicated PEX cutter remains the gold standard, these proven alternatives keep your project moving when tools go missing. The utility knife method excels for small tubing when you score properly, while fine-tooth saws deliver professional results for larger pipes. Always prioritize cut squareness and wall integrity over speed—your future self will thank you when there are no mysterious leaks to track down. Remember the cardinal rule: never skip deburring, regardless of your cutting method. With these techniques in your toolkit, you’ll never let a missing cutter stop your plumbing progress again.


