
Ever needed a star-shaped biscuit cutter for holiday baking but found specialty cutters too expensive? Or wanted to surprise your kids with dinosaur-shaped biscuits without cluttering your kitchen with single-use tools? Transforming empty soda cans into custom biscuit cutters solves these problems while costing virtually nothing. This guide reveals exactly how to make a biscuit cutter that delivers professional results—no special skills required. You’ll create durable, sharp-edged cutters in under 30 minutes using supplies already in your recycling bin. By the end, you’ll know how to craft any shape imaginable while avoiding common pitfalls that ruin homemade cutters.
Essential Tools for Making a Biscuit Cutter from Aluminum Cans
Before cutting your first can, gather these specific supplies. Standard beverage cans (soda, beer, or energy drink containers) work perfectly—they provide ideal aluminum thickness for clean cuts without bending. You’ll also need heavy-duty kitchen shears instead of regular scissors; the reinforced blades slice through aluminum cleanly without jagged edges. Don’t skip the needle-nose pliers—they’re crucial for creating precise bends without cracking the metal. A permanent marker and ruler ensure accurate strip measurements, while masking tape covers dangerous edges and secures joints. For templates, use thick cardboard (like cereal boxes) that holds its shape during tracing. Always work on a stable surface—this prevents slips that cause injuries from sharp aluminum.
Aluminum Can Processing Protocol
Start with a completely empty can rinsed in warm water to remove sticky residue. Drain thoroughly overnight—any moisture traps air during cutting, causing dangerous splinters. Using a can opener, remove both top and bottom circles cleanly. Stand the cylinder upright and make a single vertical cut with kitchen shears to open it into a flat rectangle. Notice the natural curl? This actually helps during shaping by providing subtle tension. Discard the top and bottom circles—they’re too thin for cutters—but save the cylindrical body. Never use the raw can edges for cutting; they’re uneven and prone to tearing.
Critical Safety Measures
Immediately apply masking tape along one long edge of every aluminum strip after cutting. This taped side becomes your safe grip area, while the untaped edge cuts dough cleanly. Aluminum edges slice skin with minimal pressure—always wear cut-resistant gloves during this stage. When measuring strip widths, double-check with your ruler: standard biscuit cutters need 2.5cm widths, but miniature shapes require 2cm. Wider strips (3cm+) prevent bending during use. Keep a first-aid kit nearby—small nicks happen even with precautions.
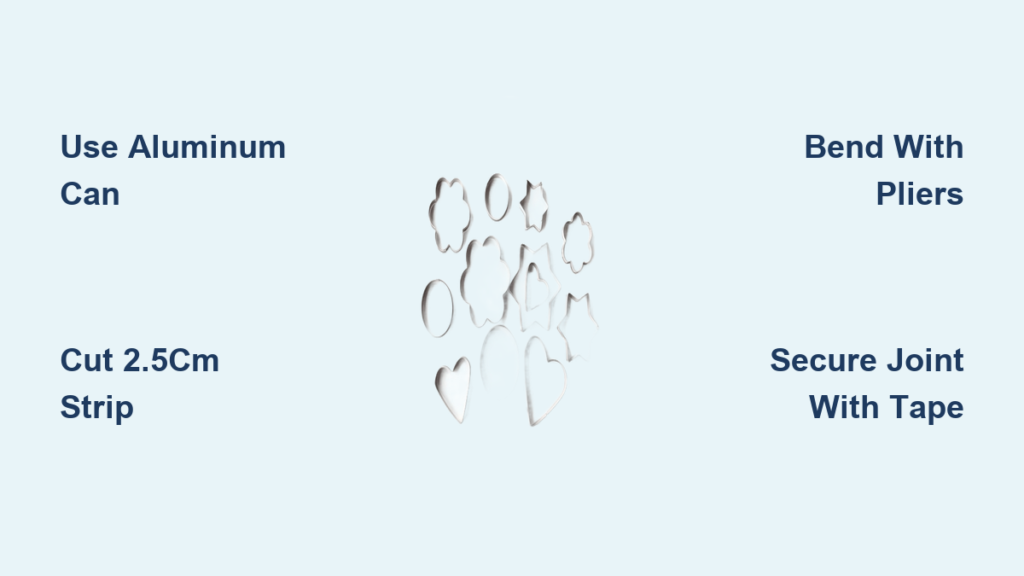
Design Custom Biscuit Cutter Shapes with Cardboard Templates

Skip complex designs for your first attempt. Draw simple shapes like hearts, squares, or circles on thick cardboard—avoid intricate details like animal eyes that break during bending. Trace your template with a pencil first, then reinforce lines with permanent marker for visibility. For consistent sizing, use a compass or plate rim as a guide. Remember: the template’s perimeter determines your aluminum strip length. Wrap string tightly around the outline, mark the overlap point, then measure the string against a ruler. Add exactly 3cm to this measurement for joint overlap—this critical step prevents gaps that snag dough.
Shape-Specific Strip Length Calculations
Your string measurement gives the template’s circumference, but aluminum needs extra length for secure closure. For a 7cm diameter heart shape (perimeter ≈ 22cm), cut a 25cm aluminum strip. Larger shapes like 10cm Christmas trees require strips over 30cm—connect multiple can sections using 1cm overlaps taped on both sides. When designing angular shapes (stars, houses), round corners slightly with sandpaper before tracing; sharp bends fracture aluminum. Test your template by pressing it into soft dough—adjust proportions if details disappear. Always make templates 10% larger than desired biscuits; aluminum cutters compress slightly during use.
Bend Aluminum Strips into Precise Shapes Without Breaking
Begin shaping at straight template sections, not curves. Hold the aluminum strip against your cardboard guide with one hand while bending slowly with the other. For corners, mark the exact bend point with your marker first—aluminum weakens after 2-3 adjustments. Use needle-nose pliers to create 90-degree angles: clamp the metal at your mark, then twist the pliers outward in one smooth motion. Never force bends—listen for faint cracking sounds indicating imminent breakage. When forming curves, wrap the strip around a pen barrel (for small arcs) or rolling pin (for large sweeps). Check alignment against your template every 2cm to catch deviations early.
Curve Formation Techniques
Create seamless curves by rotating the aluminum around cylindrical objects while applying even pressure. For gentle slopes like cookie hills, use your thumb as a mandrel; for tight loops like pretzel shapes, wrap around a chopstick. Work from the center outward—this distributes stress evenly. If the metal kinks, flatten it gently with a spoon handle before retrying. Remember: cold aluminum bends cleaner than warm metal. Never heat the can—it becomes brittle. For compound curves (like flower petals), make micro-bends every 5mm rather than one continuous arc.
Secure Your Biscuit Cutter Ends for Seamless Dough Cutting

Overlap strip ends by 5-10mm depending on cutter size—small shapes (under 5cm) need 5mm, while large scone cutters require 1cm. Position the overlap so the taped grip edges align perfectly; misaligned joints cause dough tears. Wrap masking tape around the joint 3 times, stretching it slightly with each pass for maximum adhesion. Run your fingernail along the seam to eliminate air pockets. The finished joint should feel smooth—any bumps will imprint on biscuits. Before first use, rinse the cutter under warm water to remove aluminum particles and tape residue. Test structural integrity by pressing the cutter into soft clay; wobbling indicates insufficient overlap.
Joint Reinforcement for Heavy-Duty Use
For cutters handling thick dough (like scones), reinforce joints with waterproof tape. Apply a thin strip of clear packing tape over the masking tape seam, then seal both sides with food-safe mineral oil. This creates a moisture barrier that prevents tape delamination during washing. When connecting multiple strips for giant cutters (over 12cm), stagger joints at straight sections—never at curves. Wrap each connection point with electrical tape for extra grip strength. Always inspect joints before baking; replace tape immediately if edges lift.
Select the Right Strip Width for Your Biscuit Cutter Size
Your cutter’s durability hinges on matching strip width to diameter. Use this foolproof guide: for 3-5cm mini biscuits (appetizers, tea cakes), cut 2cm-wide strips—they’re nimble enough for delicate shapes. Standard 5-7cm breakfast biscuits require 2.5cm strips for optimal balance between maneuverability and strength. Large 7-10cm scone cutters demand 3cm widths to resist dough pressure. Wider strips provide four critical advantages: they prevent bending during cutting, create cleaner dough separation, offer better hand control, and last 3x longer than narrow versions. Measure strip width before cutting—never eyeball it.
Structural Failure Prevention
Narrow strips (<2cm) buckle when cutting chilled dough, creating misshapen biscuits. If your cutter deforms after 5 uses, immediately remake it with wider aluminum. For problematic shapes like tall letters (B, D), build double-thickness walls: cut two identical strips, tape them together along the grip edge, then form as one unit. This adds rigidity without complicating assembly. Always cut strips parallel to the can’s original seam line—this follows the aluminum’s natural grain for cleaner bends.
Fix Common Homemade Biscuit Cutter Problems Fast
When biscuits tear at corners, your cutter likely has stress fractures from over-bending. Disassemble immediately—the metal won’t heal. For minor cracks, reinforce with waterproof tape wrapped spirally around the weak spot. If the entire cutter loses shape during use, increase strip width by 0.5cm for your next version. Dough sticking to the cutter? The cutting edge has burrs—smooth it with fine sandpaper, always moving away from the edge. Never force a dull cutter; replace it within 50 uses as aluminum naturally dulls.
Emergency Field Repairs
Mid-baking disasters need quick fixes. If a joint separates, wrap the area with melted candle wax—it hardens instantly into a food-safe seal. For bent cutters, submerge in hot water for 20 seconds to soften the metal, then reshape over your template. Always carry a spare mini-cutter made from a beer can (thinner aluminum bends easier for repairs). If edges become too sharp, file them with an emery board—but test on scrap dough first to ensure clean cuts.
Creating biscuit cutters from aluminum cans turns kitchen waste into precision tools that rival store-bought versions. Start with simple circles using a single soda can, then progress to custom shapes as your skills grow. Within 30 minutes, you’ll have a unique cutter ready for any baking project—no specialty tools or costs required. Always wash cutters immediately after use with warm water (no soap, which degrades tape), then store them hanging on hooks to maintain shape.
Pro tip: Make nested sets by creating three sizes of the same shape (small, medium, large). Use them to cut layered biscuits—like a heart inside a star—for stunning holiday presentations. With proper care, your aluminum cutters will deliver 50+ flawless bakes, proving that the best kitchen tools often come from your recycling bin. Ready to try? Grab that empty can and start cutting!


