
That stubborn Stihl brush cutter blade won’t budge, and you’re stuck staring at a reverse-thread bolt that defies normal loosening rules. Whether you’re swapping worn blades after clearing heavy brush or prepping for seasonal storage, improper removal risks shredding your gearbox or sending metal fragments flying. This guide delivers the precise, model-specific techniques professional landscapers use to remove any Stihl brush cutter blade safely—including the critical clockwise twist that most DIYers get dangerously wrong. You’ll avoid costly damage by learning the correct shaft-locking methods, corrosion-busting tricks, and torque specs that keep blades from becoming projectiles at 10,000 RPM.
Ignoring proper blade removal turns routine maintenance into a hazard. A seized bolt can shear internal gears during forced extraction, while incorrect reinstallation causes catastrophic blade separation. I’ve seen landscapers lose fingers to blades ripped loose by improper torque—and it always starts with skipping one safety step. By following these verified procedures, you’ll complete the job in under 15 minutes while protecting your investment in Stihl’s professional-grade equipment.
Safety Protocol: Prevent Accidental Starts
Immediately disconnect the spark plug wire before touching any hardware—this single action prevents 90% of workshop injuries. Let your machine cool for 5+ minutes if recently running; thermal expansion makes bolts seize tighter on hot metal. Position the cutter on level ground with the blade pointing skyward, creating a stable work surface while keeping sharp edges away from your body.
Non-negotiable protective gear includes heavy leather gloves (to block blade teeth and metal burrs) and ANSI-rated safety goggles (metal fragments fly unexpectedly during bolt extraction). Clear a 10-foot perimeter around your workspace—no bystanders, no flammable materials, no distractions. If working indoors, ensure adequate ventilation to disperse fuel vapors.
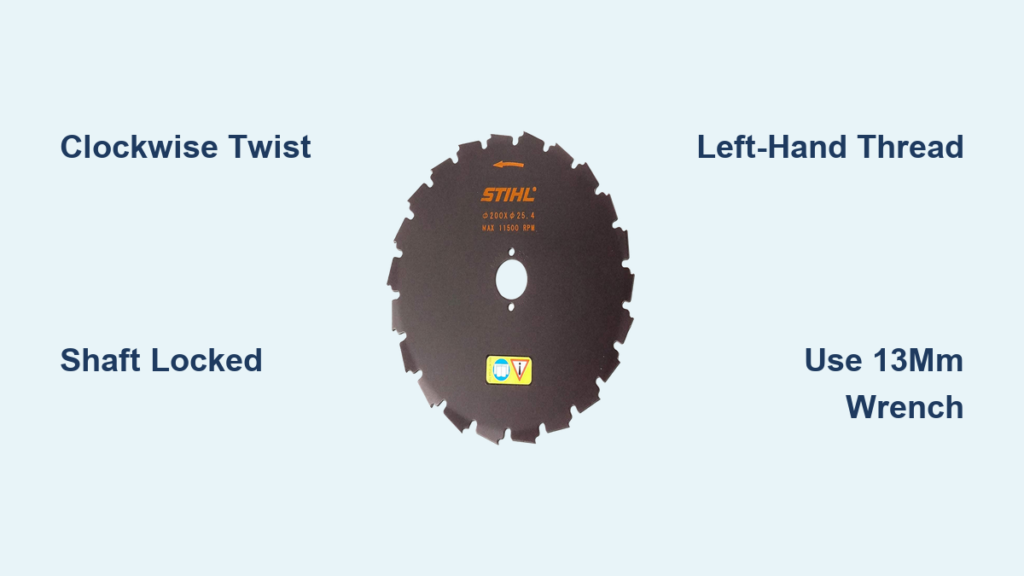
⚠️ Critical error to avoid: Never skip shaft locking. Attempting removal without securing the output shaft causes violent recoil when the bolt breaks free, potentially wrenching your wrist or flinging the cutter across the room.
Essential Tools: 13mm Wrench and Shaft Lock

Core toolkit for all models:
– 13mm socket wrench (primary tool for FS 90/130/250 series)
– Wooden block or OEM blade locking tool (wedge between blade and housing)
– Magnetic tray (prevents bolt loss in grass debris)
– Wire brush (clears thread-clogging contaminants)
For corroded or stripped bolts:
– Penetrating oil (PB Blaster penetrates faster than generic formulas)
– Manual impact driver (safer than air tools for delicate gearboxes)
– 6-point socket (grips rounded bolts better than 12-point)
Pro tip: Cut a 6-inch 2×4 scrap to wedge between blade teeth and gearbox housing—it’s sturdier than plastic locking tools and won’t slip under torque. For curved-shaft models like the FS 130, press the shaft lock button while rotating the blade until it clicks into place.
Pre-Removal Inspection: Avoid Costly Mistakes
Scan for these danger signs before touching tools:
– Cracks radiating from bolt holes (replace blade immediately—stress fractures cause in-flight separation)
– Rounded bolt heads (indicates previous improper tool use)
– Grass packed between blade and mounting flange (creates false torque readings)
Use your wire brush to aggressively clear debris from the bolt area—this 30-second step prevents grit from jamming internal threads during removal. Pay special attention to the gap between the blade and flange; trapped vegetation mimics proper torque, leading to dangerous under-tightening during reinstallation. If you spot metal shavings, inspect the gearbox seal for leaks before proceeding.
Standard Removal: Clockwise Twist Technique
Secure the Shaft and Identify Thread Direction
Wedge your wooden block firmly between the blade and housing until it won’t budge. Confirm your bolt’s thread direction: Most Stihl models (FS 90/130/250/350) use left-hand threads—meaning you turn clockwise to loosen. Only consumer models like the FS 40/50 use standard counterclockwise loosening. Check for “LH” stamped near the bolt head or consult your manual.
Break Loose Without Damaging Gearbox
Position your 13mm wrench at 45-degree angle for maximum leverage. Apply steady clockwise pressure (left-hand thread models) while maintaining downward force on the handle—this prevents slippage. Never use impact tools; the sudden force can strip output shaft splines. If resistance exceeds 25 ft-lbs, stop immediately and treat for corrosion.
Complete Removal and Washer Documentation
Once loose, unscrew the bolt by hand while noting washer sequence. Photograph all components—most failures during reinstallation come from reversed washers or missing spacers. Place parts on your magnetic tray in removal order. For FS 250/350 models, pull the blade brake lever before extraction to disengage safety locks.
Stuck Bolt Solutions: Corrosion and Stripped Heads

Penetration Oil Method for Rusty Bolts
Saturate the bolt threads with PB Blaster, focusing on the gap between blade and flange. Wait 15 minutes for capillary action to draw oil into threads. Reapply if no movement occurs, then gently tap the bolt head with a hammer to vibrate corrosion loose. After 30 minutes, attempt loosening with steady pressure—never sudden jerks.
Stripped Bolt Head Recovery
Switch to a 6-point socket for maximum metal contact. If the head is rounded, clamp vise-grip pliers onto the bolt with locking pliers while turning clockwise. For severely damaged heads, file two flat surfaces for wrench grip. As last resort, hammer a bolt extractor socket onto the bolt—use clockwise impact for left-hand threads.
Broken Bolt Extraction
Drill a 1/8-inch pilot hole into the bolt center using a left-hand drill bit. The reverse rotation often backs out broken pieces without thread damage. If fragments remain, use a left-hand easy-out extractor. Never drill deeper than the bolt’s length—hitting the shaft ruins the gearbox.
Model-Specific Removal Secrets
FS 90/100/130 Series: These professional cutters use 13mm left-hand bolts with keyed shafts. Align the output shaft’s keyway notch during reinstallation—misalignment causes immediate vibration damage. Maximum blade thickness: 3.0mm.
FS 40/50 Consumer Models: Use 10mm standard-thread bolts (loosen counterclockwise). The splined adapter requires specific orientation—note the “TOP” marking before removal. Never exceed 230mm blade diameter.
FS 250/350 Heavy-Duty: Requires disengaging the blade brake by pulling the lever before bolt removal. Uses 15mm left-hand bolts with locking washers—replace washers after every removal.
KombiSystem Attachments: Remove the attachment from the powerhead first, then secure the gearbox in a vise with soft jaws before standard removal.
Post-Removal Inspection and Storage
Critical failure points to check:
– Bolt threads for stretching (replace if diameter exceeds 13.2mm)
– Mounting flange cracks (especially near bolt holes)
– Blade adapter wear (grooves deeper than 0.5mm require replacement)
Clean all surfaces with a wire brush, then coat the output shaft and bolt threads with light grease to prevent storage corrosion. Store blades vertically in a dry area—horizontal storage causes warping. Wrap sharp edges with cardboard sleeves to prevent injury during future handling.
Reinstallation Torque Guide
| Model Series | Torque Range | Thread Direction |
|---|---|---|
| FS 40/50 | 15-20 Nm | Standard |
| FS 90-130 | 20-25 Nm | Left-hand |
| FS 250/350 | 30-35 Nm | Left-hand |
Never guess torque: Under-tightening causes blade separation; over-tightening strips threads. After installation, spin the blade by hand—it must rotate freely without wobble. Start the engine at idle and check for vibration before full throttle operation.
Maintenance Schedule Integration
Professionals: Remove blades every 25 operating hours for inspection. Track hours with a waterproof log—most blade failures occur between 40-60 hours of heavy brush cutting.
Homeowners: Inspect at 50-hour intervals or end of season. Always remove blades after cutting through wet, sandy conditions to prevent hidden corrosion.
Emergency trigger: Remove immediately if you hit rocks or metal. Micro-cracks from impact won’t be visible but cause sudden failure.
A single skipped safety step turns routine blade removal into a life-threatening situation. By following these precise Stihl-specific procedures, you protect not just your equipment but your physical safety—remember, that blade becomes a 200mph projectile if improperly installed. Always use genuine Stihl bolts (part #4002 713 2100 for most models) and never compromise on torque specs; your warranty and life depend on it. When in doubt, consult an authorized Stihl dealer—your local landscaping pro will verify your work for free to prevent liability nightmares.


