
Your string trimmer sputters to a halt mid-yard, leaving behind ragged patches where the grass cutter wire has frayed down to useless nubs. Don’t waste money on professional service—how to replace grass cutter wire is a fundamental skill every homeowner can master in under 15 minutes. Whether you’re battling stubborn weeds with a gas-powered model or maintaining flower beds with an electric trimmer, this guide delivers the exact steps for your specific head type. You’ll learn to diagnose your system, avoid common pitfalls, and achieve smooth line feeding that lasts all season.
When your trimmer stops cutting cleanly, worn-out grass cutter wire is the culprit 9 times out of 10. This flexible nylon filament—often called string trimmer line or weed eater wire—relies on centrifugal force to stiffen during rotation and slice through vegetation. Unlike blades, it requires periodic replacement as it wears down from contact with grass, rocks, and soil. Mastering this simple maintenance task saves you costly service calls and keeps your yard looking professionally groomed. By the end of this guide, you’ll confidently handle any trimmer head type with the right line and technique.
Identify Your Trimmer Head Type Before Starting

Grabbing the wrong line or following mismatched instructions guarantees frustration. Your first critical step is identifying the exact head mechanism—this determines your entire replacement approach. Most modern trimmers use one of four systems, each requiring distinct handling.
Bump feed heads dominate residential models. You’ll recognize them by the ribbed cap you tap on the ground to advance the line. Speed-feed heads feature a central loading port where you insert line without removing the spool—beloved by professionals for rapid field changes. Fixed-line heads use short pre-cut segments pushed directly through exit holes, while pre-cut line heads require snapping individual plastic cartridges into slots. Check your owner’s manual or look for manufacturer labels on the head housing itself. If uncertain, examine whether tabs, arrows, or loading ports appear on the head—this visual clue prevents wasted effort.
Gather Correct Line and Tools for Your Model
Using incorrect line diameter causes poor cutting, frequent breakage, or even trimmer damage. Match your grass cutter wire precisely to both your machine’s specifications and your yard conditions. The spool housing typically indicates the acceptable range—never exceed it.
Line Selection Guide:
– 0.065″-0.080″ round line: Ideal for light grass and residential use
– 0.085″-0.105″ twisted/serrated line: Handles mixed grass and light brush
– 0.110″-0.155″ star-shaped line: Essential for thick weeds and commercial jobs
Essential Tools Checklist:
– Correct diameter line (check spool for max length capacity)
– Sharp scissors or line cutter
– Safety glasses and cut-resistant gloves
– Small brush for debris removal
– Clean cloth for wiping components
Safety First: Power Down Completely
Never skip this critical step. For gas trimmers, disconnect the spark plug wire and let the engine cool 10-15 minutes. Battery-powered models require full battery removal. Working on hot equipment risks burns or accidental starts. Lay your trimmer on a stable garage floor or workbench in good lighting—never attempt replacement while the unit is running or connected to power. Ensure loose clothing and long hair are secured away from moving parts. This 30-second safety ritual prevents 95% of trimmer-related injuries.
Replace Single-Line Bump Feed Heads Correctly
Remove and Clean Spool Components
Press the retaining tabs while twisting the cap counterclockwise to release the spool assembly. Lift it free and inspect for grass clippings, dirt, or old line fragments clogging the eyelets. Use a small brush to clean all channels—debris here causes 70% of feeding failures. Wipe the housing interior with a dry cloth to ensure smooth spool rotation.
Measure, Cut, and Wind New Line
Cut a single line piece matching your spool’s capacity (typically 10-25 feet—consult manual). Feed the end through the spool’s eyelet and anchor it in the starting notch. Wind tightly in the direction shown by arrows on the spool—usually counterclockwise. Maintain firm tension to prevent loose coils that jam. Leave 6-8 inches unwound and secure the ends in the spool notches before reassembly.
Reinstall Spool and Test Feeding
Align the spool tabs with housing slots, press down firmly, and turn clockwise until it clicks. Pull both line ends to verify free movement. Start your trimmer and gently bump the head on soft ground—the line should advance 1-2 inches per bump. If not, check for backward winding or debris in exit holes.
Handle Dual-Line Systems Without Imbalance
Dual-line heads require precise symmetry—uneven lengths cause vibration and poor cutting. Most use two separate line pieces wound in opposite directions. Cut two identical lengths (typically 10-15 feet each) to maintain balance.
Critical Installation Steps:
1. Feed first line through left eyelet and anchor in spool
2. Wind counterclockwise while maintaining tension
3. Secure end in left spool notch
4. Repeat with second line through right eyelet, winding clockwise
5. Ensure both lines extend within 1 inch of each other
6. Verify equal tension by pulling both ends simultaneously
Warning: Never force lines into notches—they should snap in cleanly. If resistance occurs, unwind slightly and retry. Asymmetrical winding causes dangerous vibration that damages the trimmer shaft over time.
Speed-Feed Head Replacement Without Spool Removal
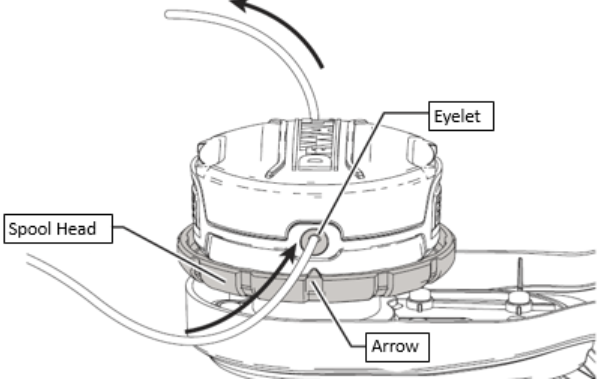
Speed-feed systems eliminate spool disassembly—a game-changer for professionals needing rapid reloads. Locate the alignment arrows on the head housing and rotate until they match. Insert new line through the center hole until equal lengths extend from both sides.
Load and Activate Line Properly
Push line through the central port until you have 8-10 inches total visible. Rotate the head in the arrow direction (typically 5-8 full turns) until you feel resistance increase. This winds the line onto internal reels. Trim excess to leave 4-5 inches extending—any longer causes premature breakage. Test by starting the trimmer; bumping the head should advance fresh line immediately. Pro tip: Soak new line in water for 10 minutes before loading—it increases flexibility and reduces initial breakage.
Fix Common Loading Problems Immediately

Line Won’t Advance After Replacement
Diagnose these frequent causes:
– Line wound backward (check spool rotation arrows)
– Spool overfilled beyond capacity (remove 20% of line)
– Debris blocking exit holes (clean with needle tool)
– Worn clutch mechanism (requires professional service)
Line Breaks Constantly During Use
Implement these solutions:
– Verify line diameter matches your vegetation type
– Inspect trimmer guard for sharp edges cutting line
– Operate at recommended RPM—too high causes breakage
– Switch to titanium-reinforced line for rocky terrain
Uneven Cutting Performance
Correct within minutes:
– Check both line ends extend equally (re-adjust if needed)
– Replace frayed or worn line segments immediately
– Inspect spool for cracks or warping (replace if damaged)
– Ensure head is fully tightened on the drive shaft
Maintain Peak Performance Season-Long
Post-Use Cleaning Routine
After every session, spend 30 seconds clearing grass and dirt from the head housing and exit holes. Use a stiff brush to dislodge packed debris—this prevents 80% of feeding issues. Store your trimmer with the head elevated off concrete to avoid line deformation from constant pressure.
Monthly Maintenance Checklist
Replace line monthly during peak growing seasons—even if not fully worn. UV exposure and friction degrade nylon over time, causing brittleness. Store spare line in an opaque container away from sunlight; exposed line loses 40% of its strength in 30 days. Before heavy use periods, inspect spools for cracks and replace worn parts.
Pro Efficiency Tips:
– Pre-wind multiple spools labeled with line diameter
– Soak stiff line in warm water overnight for flexibility
– Use color-coded line for different yard zones (blue for edges, green for beds)
– Keep a mini toolkit (scissors, gloves, line) in your garden shed
Troubleshoot Advanced Issues Like a Pro
Prevent Line Welding in Hot Conditions
High temperatures fuse nylon lines together inside the spool—a common headache in summer. Combat this by taking 5-minute cooling breaks during extended use. For commercial applications, install vented heads that dissipate heat, or switch to titanium composite lines rated for 120°F+ environments. Clean the head mechanism weekly with isopropyl alcohol to remove sticky residue.
Optimize Line for Specific Yard Tasks
Task-Specific Recommendations:
– Edging sidewalks: Use 0.080″ square line for crisp, clean cuts
– Clearing thick brush: Switch to 0.105″ twisted serrated line
– Daily commercial use: Invest in 0.155″ titanium-reinforced line
– Noise-sensitive areas: Choose octagonal line to reduce vibration
Quick Reference Troubleshooting Chart
| Problem | Likely Cause | Immediate Fix |
|---|---|---|
| Line won’t feed | Wrong winding direction | Re-wind per spool arrows |
| Frequent jams | Overfilled spool | Remove 20% of line length |
| Breaks at exit hole | Sharp guard edge | File smooth or replace guard |
| Uneven wear | Bent spool housing | Replace entire spool assembly |
Final Safety Check Before Operation
Before firing up your trimmer, perform this critical verification:
– Confirm all safety guards are properly reinstalled
– Measure line extension—must be 4-6 inches beyond guard
– Double-check battery/spark plug disconnection was reversed
– Clear work area of rocks, sticks, and debris
– Start at low RPM to test line feeding before full throttle
Mastering how to replace grass cutter wire transforms frustrating yard interruptions into quick maintenance wins. By using the correct line type, following head-specific procedures, and implementing seasonal care, you’ll achieve smooth feeding that lasts 3x longer. Remember: 90% of line problems stem from improper installation—take those extra 60 seconds to wind correctly and verify alignment. Keep this guide handy for your next replacement, and enjoy uninterrupted trimming all season long.


