

You’re standing over cracked patio concrete, saw in hand, wondering how to use a concrete cutter properly without choking on silica dust or snapping your blade. That rental receipt burning a hole in your pocket reminds you: this isn’t your dad’s circular saw. One wrong move and you’ll create jagged edges that invite tripping hazards or worse—kickback that sends shards flying toward your face. This guide cuts through the guesswork with field-tested techniques for clean, safe cuts every time, whether you’re slicing control joints in a 4-inch slab or tackling a 6-inch foundation wall. You’ll learn why blade selection makes or breaks your project and how to avoid the #1 mistake that ruins 30% of DIY concrete cuts.
Most beginners think concrete cutting is just pushing a spinning blade through stone. Reality? It’s a precision dance between feed rate, water flow, and blade chemistry. Rush it, and you’ll glaze your diamond segments or shatter the blade. Do it right, and you’ll achieve laser-straight cuts that look professionally finished. By the end of this guide, you’ll know exactly how to approach your project with confidence—saving time, money, and your health.
Concrete Cutter Safety Gear Checklist You Can’t Skip
Your protective gear isn’t optional—it’s your last line of defense against permanent lung damage from crystalline silica. OSHA estimates 2.3 million U.S. workers face silica exposure daily, and one concrete cut can release clouds of particles 100x finer than beach sand. Skip proper PPE, and you risk silicosis, a fatal lung disease with no cure.
Non-Negotiable PPE for Every Concrete Cut
- Eye protection: Full-seal safety goggles (not glasses) that block dust from all angles—concrete fragments travel at 150+ mph
- Hearing protection: Earmuffs rated NRR 25+ (concrete saws hit 100+ decibels—equivalent to a chainsaw)
- Respiratory protection: P100 respirator for cuts over 10 minutes; N95 masks fail within 20 minutes in heavy dust
- Hand protection: ANSI Cut Level 3 gloves with textured grip (wet concrete reduces grip by 40%)
- Critical extras: Steel-toed boots with slip-resistant soles and long sleeves/pants—concrete “shrapnel” penetrates denim
Work Zone Setup That Prevents Catastrophes
Clear a 12-foot radius around your cutting line. Trip on a garden hose mid-cut, and the saw can kick back toward your torso at 30+ mph. Use caution tape and a visible barrier—bystanders often don’t realize fragments travel 50+ feet. Check lighting: shadows cause wobble, so position work lights perpendicular to your cut line. For indoor jobs, set up exhaust fans to pull dust away from your breathing zone.
Blade Selection and Saw Setup Done Right
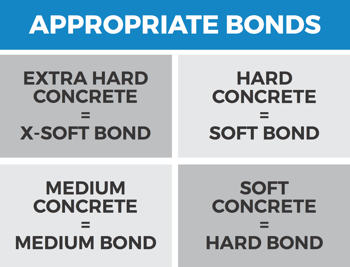
Choosing the wrong blade wastes hours and risks blade failure. Diamond blades aren’t universal—bond hardness must match concrete density. Soft-bonded blades (red label) cut hard concrete like granite but wear out 3x faster on soft concrete. Hard-bonded blades (blue label) last on soft concrete but glaze instantly on hard aggregate.
Mounting Your Blade for Maximum Safety
Verify the rotation arrow on the blade matches your saw’s direction (usually clockwise). Tighten the arbor bolt to manufacturer specs—over-torquing cracks the flange, under-torquing causes wobble. Spin the blade by hand: any vibration means misalignment or damage. For deep cuts, select a blade 1 inch deeper than your required cut depth (e.g., 7-inch blade for 6-inch concrete).
Water System Setup for Dust-Free Cutting
Wet cutting reduces silica by 90%+ versus dry methods. Test your water supply before starting: flow should create thick, paint-like slurry—not watery runoff. Elevate your water container 18+ inches above the saw for gravity-fed pressure. For gas saws, attach the hose to the water pump inlet; for electric, ensure drip irrigation covers the full blade arc. Check for leaks by running water for 30 seconds before starting the engine.
Starting Your Concrete Saw Without Accidents
Most injuries happen during startup because operators rush. Gas saws require precise priming—too little and it floods, too much and it won’t ignite. Electric models demand GFCI protection within 25 feet of water sources. Never skip the warm-up: cold blades shatter when hitting concrete.
Foolproof Startup Sequence
- Position: Place saw on level ground 3+ feet from your cut line, blade guard fully engaged
- Safety check: Verify dead-man switch engages when released and blade guard moves freely
- Ignition: For gas saws, set choke to “start,” pull cord smoothly until resistance (don’t yank). Electric saws: test GFCI button first
- Warm-up: Let blade reach full RPM (10,000+ for handhelds) for 20 seconds—listen for smooth whine
- Stance: Feet shoulder-width apart, knees bent, dominant hand on rear handle, support hand on front grip
First Contact Technique for Clean Starts
Position the blade tip at your cut line with the saw idling. Lower the blade slowly using only its weight—no downward pressure. As the blade bites, you’ll hear a pitch drop followed by a consistent high-pitched whine. Maintain light pressure for the first 3 inches; forcing it here causes chipping. If the blade smokes or grinds, you’re pushing too hard.
Feed Rate Mastery for Flawless Cuts

Your feed rate determines cut quality and blade life. Push too fast, and the blade binds—potentially causing violent kickback. Too slow, and diamonds overheat and glaze (becoming smooth and useless). The sweet spot varies by concrete age: fresh concrete (under 7 days) cuts 30% faster than fully cured.
Depth Control for Professional Results
For slabs over 4 inches thick, make multiple passes:
– Pass 1: Cut 1 inch deep to establish your line (prevents wandering)
– Pass 2: Cut to 50% depth (e.g., 2.5 inches for 5-inch concrete)
– Pass 3: Final cut to full depth
This prevents blade binding and yields straighter edges. Always cut in the direction of rebar if present—hitting steel sideways risks blade shattering. When encountering wire mesh, reduce speed by 50% and increase water flow.
Water Flow Adjustments That Prevent Disaster
Slurry consistency is your real-time diagnostic tool. Ideal slurry looks like thick paint—if it’s watery, reduce flow; if dry/dusty, increase it. In porous concrete (like old driveways), double the water flow. For hot weather (>85°F), pause every 30 seconds to let the blade cool in the cut—overheating causes diamond loss. Never let the blade emerge from concrete while spinning; it kicks up deadly dust clouds.
Emergency Mid-Cut Problem Fixes
Blade issues escalate fast—know these fixes before calling it quits. Glazing (the #1 beginner mistake) happens when diamonds get coated in melted concrete, making the blade “skate” instead of cut. Don’t force it; you’ll burn out the blade.
Critical Troubleshooting Steps
Blade suddenly stops cutting:
– ✘ Mistake: Pushing harder to “make it work”
– ✓ Fix: Immediately reduce pressure to 5 lbs, cut for 30 seconds in soft asphalt to expose fresh diamonds
Violent vibration during cut:
– ✘ Mistake: Ignoring it until blade fails
– ✓ Fix: Stop saw, inspect for missing segments or loose arbor bolt. Replace blade if cracks appear in steel core
Cut veering off line:
– ✘ Mistake: Yanking saw back on track (causes jagged edges)
– ✓ Fix: Back out of cut, restart at 1/2 depth with guide board clamped along your line
Hitting rebar:
– ✘ Mistake: Continuing with same blade (shatters teeth)
– ✓ Fix: Stop immediately, switch to metal-cutting blade, or reroute cut 2+ inches away
Post-Cut Shutdown That Extends Blade Life
Shutting down improperly wastes blade life and risks injury. Never lift the blade while spinning—it hurls slurry at face level. Concrete dust hardens in bearings within minutes, so cleanup timing is critical.
Safe Shutdown Checklist
- Complete your cut line fully before lifting the blade
- Lift spinning blade 6+ inches above concrete
- Release throttle to idle for 10 seconds
- Engage blade stop mechanism (if equipped)
- Wait 60+ seconds for full spin-down before moving saw
Slurry Cleanup Without Silica Exposure
For wet cuts: shovel slurry into heavy-duty bags while still wet—it hardens into concrete within hours. Use a HEPA vacuum for residual dust (standard shop vacs expel 99% of silica back into the air). Never hose slurry into storm drains—it clogs pipes and violates EPA regulations. Dry-cut cleanup requires wetting the area first to suppress dust before vacuuming.
Blade Longevity Secrets From Professional Cutters
Your blade’s lifespan depends entirely on post-cut care. Neglecting this turns a $150 blade into scrap after two projects. Track usage with a simple log: “6-inch slab, 30 minutes, hard concrete.”
Immediate Post-Cut Routine
- Rinse blade under running water for 2 minutes to remove slurry
- Soak blade in vinegar solution (1:4 ratio) for 10 minutes to dissolve mineral deposits
- Air-dry vertically for 24 hours before storage—never stack blades flat
- Inspect for “segment undercutting” (gaps between steel core and diamonds) indicating bond failure
Storage That Prevents Damage
Store blades in original packaging with silica gel packs to absorb moisture. Never hang blades by the center hole—this warps the steel core. For saws, drain gas tanks after 30 days of storage and replace air filters every 20 cutting hours in dusty conditions.
Mastering how to use a concrete cutter safely transforms intimidating projects into satisfying DIY wins. Remember: slow, consistent feed rates beat brute force every time, and water management is non-negotiable for health protection. Start with shallow test cuts in scrap concrete to calibrate your pressure—most beginners push 2x too hard. When you hear that clean, high-pitched whine from the blade, you’ll know you’ve hit the sweet spot. Keep your PPE checklist visible on your tool cart, and never skip the pre-cut water test. Your lungs (and your project timeline) will thank you. For complex jobs involving rebar or deep foundations, consult a professional—some cuts simply aren’t worth the risk.


