
Foam cutting separates amateur projects from professional-grade work, but mastering how to use a foam cutter safely and effectively remains a hurdle for many crafters and builders. That jagged edge on your cosplay armor or melted seam in your custom case insert often stems from mismatched tools or improper technique—not your skill level. With the right approach, you can transform rigid foam blocks into flawless components for everything from camera gear storage to theater props in under 30 minutes per piece.
This guide cuts through the confusion by matching specific foam cutter types to your exact project needs. You’ll discover why a 3-inch hot knife outperforms larger tools for delicate electronics inserts and how industrial bow cutters handle 48-inch insulation panels without melting. Whether you’re crafting miniature architectural models or life-size film props, these field-tested techniques guarantee clean edges and eliminate wasted material.
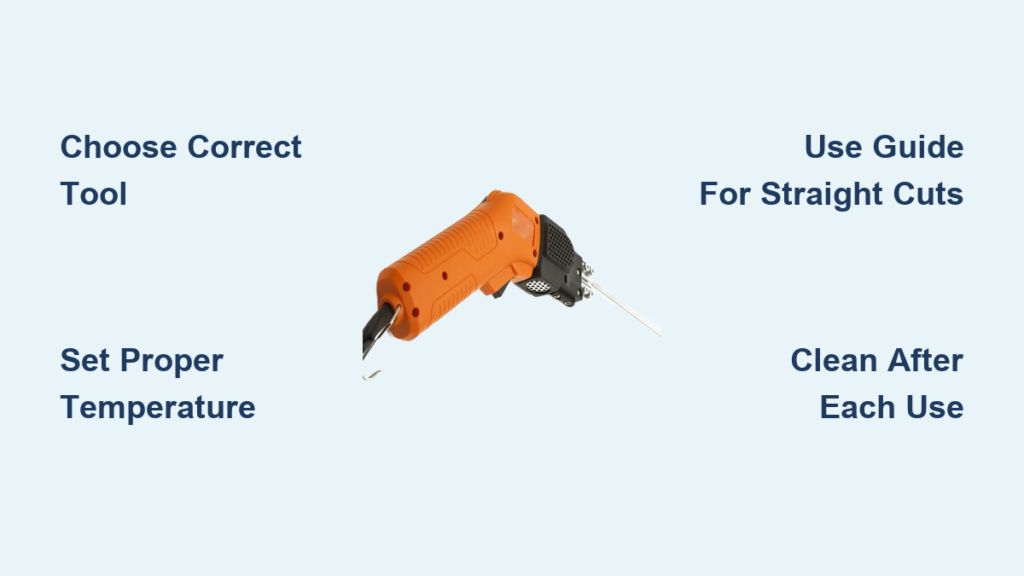
Select Your Foam Cutter by Project Type
Craft Foam Precision Tools
4-inch hot knife sculpting tools deliver unmatched control for detailed artistic work. Their compact heated blades maintain consistent temperature in tight corners while slicing through craft foam without tearing. Use this when creating intricate cosplay armor pieces, model railroad terrain features, or delicate floral arrangements for event decor. The shorter blade prevents accidental deep cuts that ruin thin foam sheets.
3-inch hot knives excel at creating custom case inserts for valuable equipment. The controlled depth prevents cutting through your work surface while shaping precise cavities for camera lenses, drone controllers, or medical instruments. Always position the blade perpendicular to the foam surface and use multiple shallow passes for thick materials—this prevents the blade from binding and creating jagged edges that compromise protection.
Engraving mini-scroll tables solve fine-detail challenges like architectural model windows or custom signage lettering. Secure your foam sheet to the table, then guide it steadily against the stationary heated blade. For clean lettering, set the blade temperature 20% lower than standard cutting to minimize melting around edges. This technique works best on closed-cell foams like EVA or cross-linked polyethylene.
Professional-Grade Cutting Systems
8-inch freehand routers handle large-scale projects like theater set columns or trade show displays. The extended heated blade cuts through 6-inch foam blocks in single passes, but requires a specific hand position: grip the tool with both hands, keep elbows locked, and let the blade’s heat—not force—advance through the material. For straight cuts, clamp a metal ruler as a guide fence and move the foam toward you rather than pushing the tool away.
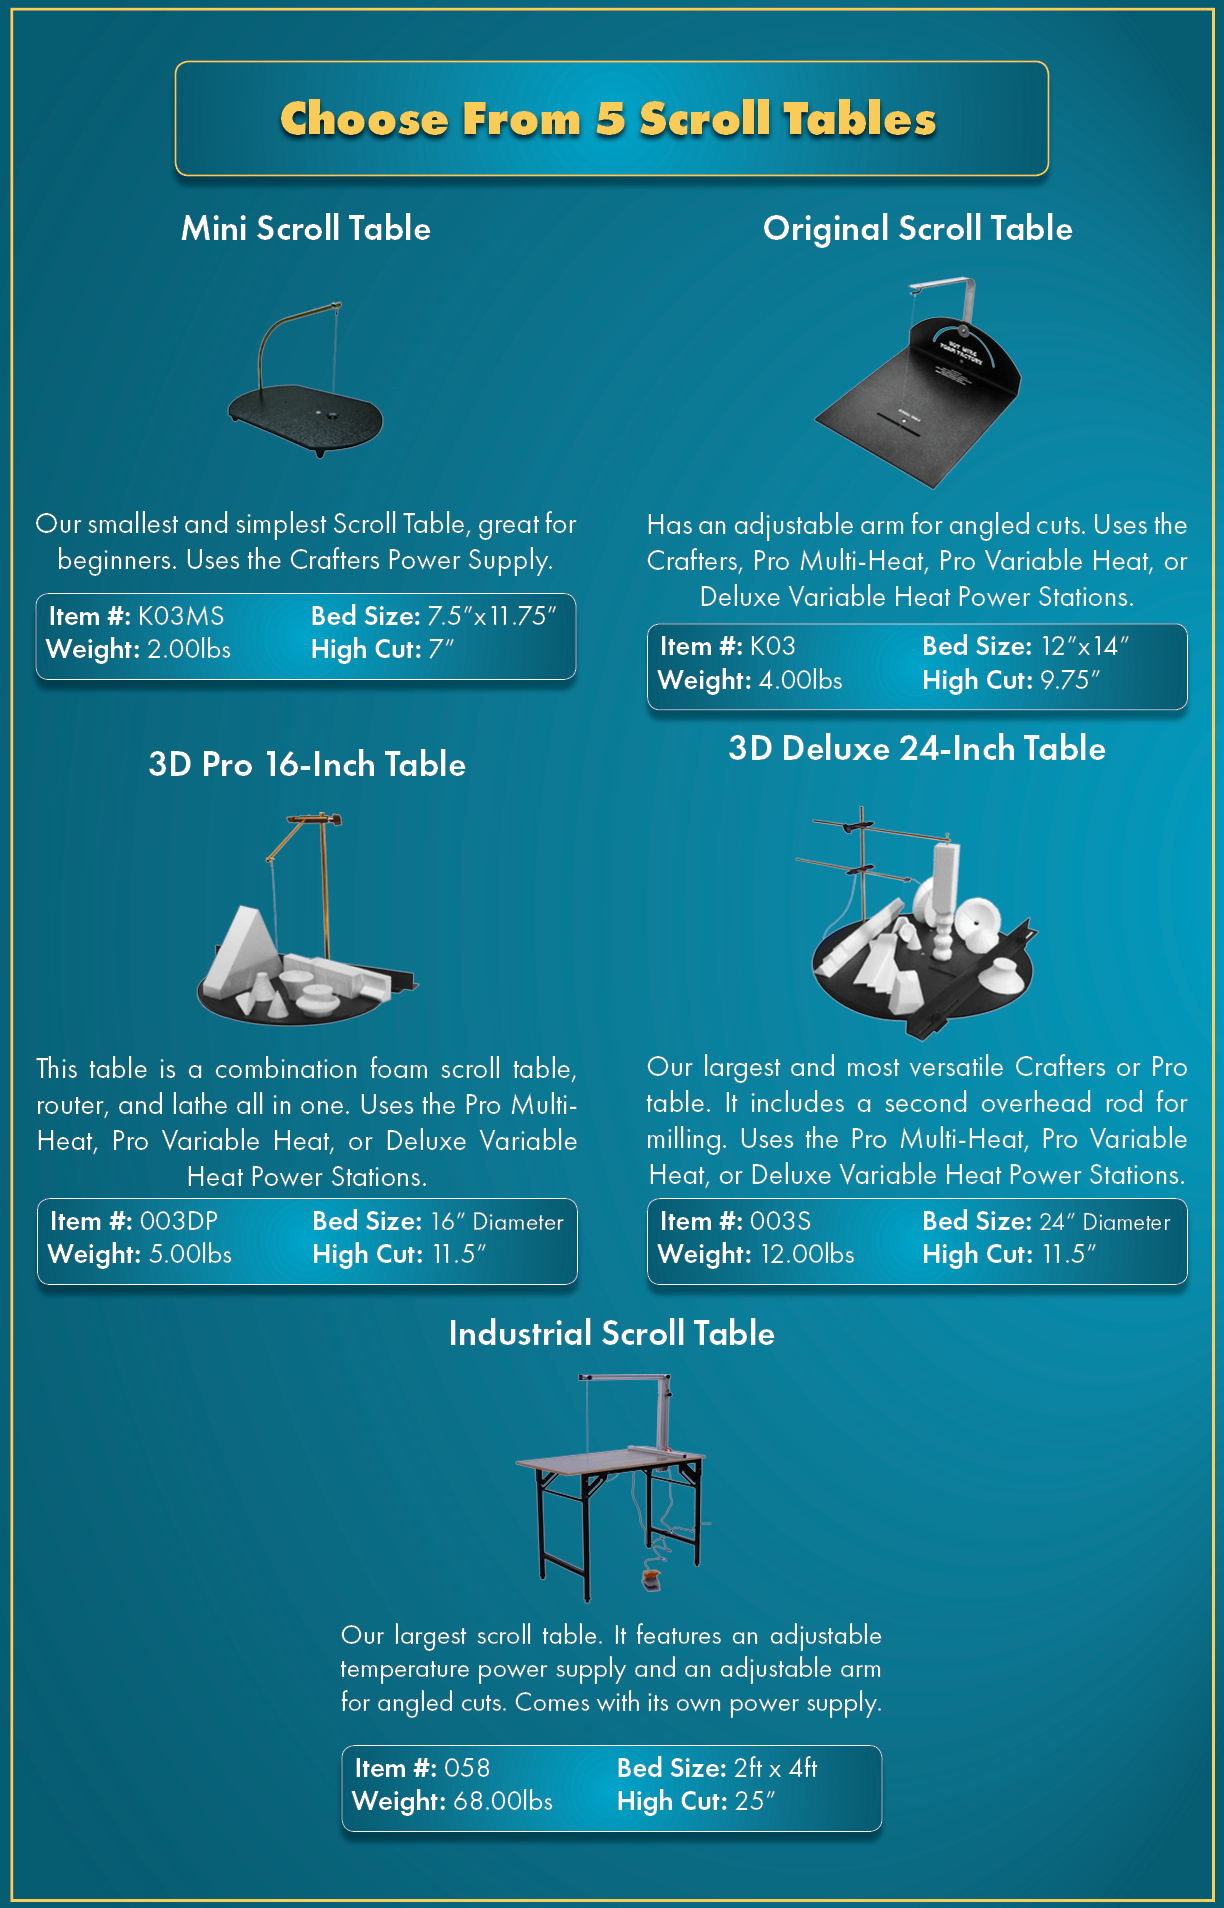
Scroll table routers create perfect cylinders impossible with handheld tools. Mount your foam block on the rotating table, set the blade height to your desired diameter, then activate the rotation mechanism. As the foam spins against the heated blade, you’ll achieve flawless cylinders for pipes, columns, or prop handles. Always start with low rotation speed for dense foams like XPS to prevent wire snapping.
Industrial-Scale Solutions
Bow cutters dominate construction and packaging applications with tensioned wires spanning 24-48 inches. When cutting rigid insulation panels, secure the foam block with clamps before drawing the bow steadily downward. For straight cuts, attach a laser guide to the bow frame—this prevents the common mistake of wire bowing that creates wavy edges. Test wire tension by plucking it; it should produce a clear musical tone like a guitar string.
Critical Safety Setup Before Cutting

Ventilation requirements are non-negotiable—position a box fan 3 feet behind your work area to pull toxic fumes away from your breathing zone. Foam vapors cause immediate headaches and long-term respiratory damage. Never operate cutters in enclosed spaces without active airflow, especially when working with polyurethane or memory foam.
Essential protective gear includes:
– Heat-resistant gloves rated to 500°F (standard work gloves melt on contact)
– Safety glasses with side shields (foam particles cause corneal abrasions)
– N95 respirator (standard dust masks don’t filter foam fumes)
– Fire extinguisher within arm’s reach (keep a water spray bottle as first response)
Electrical safety protocols prevent catastrophic failures. Always plug foam cutters into GFCI outlets—these cut power within 1/40th of a second if current leakage occurs. Inspect cords before each use; nicks in insulation cause 68% of workshop electrical fires according to equipment safety reports. Never daisy-chain power strips with high-amperage cutters.
Master Hot Knife Cutting Techniques
Achieving Flawless Straight Cuts
Clamp a metal straightedge as your guide fence, then set blade temperature to medium for standard craft foam. Begin cutting with the blade perpendicular to the foam surface, applying only enough pressure to maintain contact. Critical pro tip: Make an initial 1/8-inch deep scoring pass first. This creates a guide groove for subsequent passes, preventing blade wander and eliminating the “shark tooth” edges common in single-pass cuts.
Curved Cutting Without Tears
Create templates from 1/4-inch MDF for complex curves. Trace your pattern onto the foam, then cut just outside the line using short, controlled strokes. Rotate the foam—not the knife—to maintain consistent blade temperature. For tight curves under 2 inches radius, make relief cuts every 2 inches from the waste side. These small notches allow the blade to pivot without binding, which causes 90% of curved cut failures.
Depth Control for Thick Foam
When cutting foam thicker than your blade length (typically 4-6 inches), use incremental passes. Mark your target depth on the foam edge with a permanent marker, then cut in 1/2-inch increments. After each pass, clear melted residue with a brass brush before continuing. Attempting full-depth cuts in one pass melts surrounding material, creating uneven walls that require hours of sanding.
Hot Wire Cutting Precision Methods
Temperature Calibration for Different Foams
Test wire temperature on scrap foam before starting:
– Craft foam: Low setting (excessive heat causes beading)
– Standard EPS: Medium setting (optimal for clean cuts)
– Dense XPS: High setting (prevents wire stalling)
– Memory foam: Lowest setting (melts instantly at medium heat)
The wire should slice silently through foam—if you hear sizzling, reduce temperature immediately. Overheating creates toxic fumes and weakens the wire.
Feed Rate Control for Smooth Cuts
Move foam steadily through the wire at 1 inch per second. Forcing the material causes wavy cuts and wire breakage. If the wire visibly bows during cutting, slow your feed rate by 30%. Maintain consistent speed—variations create uneven melting that ruins precision edges. Practice feed rates on scrap foam until cuts produce clean, straight lines with minimal residue.
Bevel and Angle Cutting Techniques
Tilt your wire guide 15-45 degrees for beveled edges on architectural models or prop details. Mark your target angle directly on the foam edge first, then adjust the guide to match. For compound angles, tilt the guide while simultaneously rotating the foam block. Always verify angles on scrap foam—bevel cuts magnify feed rate errors by 300%.
CNC Foam Cutting Optimization
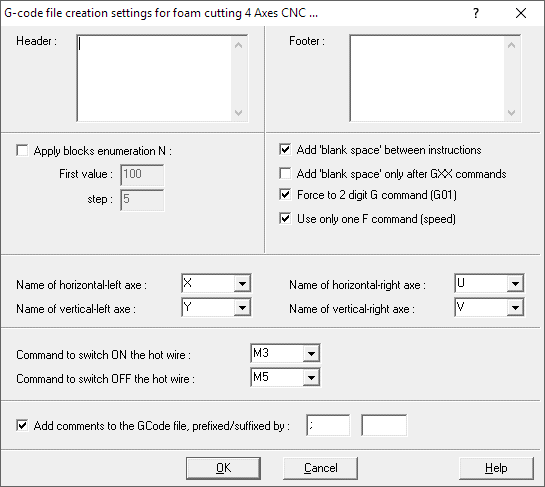
File Preparation Essentials
Convert designs to G-code using Fusion 360 with these critical settings:
– Feed rate: 100 inches per minute
– Plunge rate: 50 inches per minute
– Spindle speed: 12,000 RPM
– Stepover: 45% for roughing, 20% for finishing
Set cut depths at 90% of foam thickness to avoid damaging the waste board. For lettering under 1 inch tall, use 1/16-inch end mills instead of standard 1/8-inch bits—this prevents material tearing.
Material Securing Methods
Use vacuum hold-down tables for sheets larger than 2×2 feet. For smaller pieces, apply double-sided tape in a grid pattern—this prevents shifting while minimizing residue. Never position mechanical clamps inside the cutting area; collisions with end mills destroy both foam and tools. Always run a dry cycle without power to verify clamp clearance.
Maintenance That Prevents Costly Failures
Wire Replacement Safety Procedure
- Unplug the cutter and wait 15 minutes for complete cooling (wires retain heat dangerously long)
- Loosen tensioning screws gradually while supporting the wire to prevent snapping
- Thread new wire through all guides, applying tension until it produces a clear “ping” when plucked
- Test on scrap foam at low temperature before full-power operation
Never reuse nicked or kinked wires—these create uneven heating that causes 75% of cut failures. Always dispose of old wires in metal containers; they remain sharp after removal.
Daily Cleaning Protocol
Remove foam residue immediately after cutting using a brass brush while the blade is warm. Cooled residue hardens into a brittle crust that scratches blade surfaces during removal. For stubborn buildup, dip the warm blade in mineral spirits for 10 seconds, then wipe clean. Monthly, check electrical connections for corrosion—especially in humid environments—and verify temperature calibration with an infrared thermometer.
Advanced Project Applications
Creating Professional Case Inserts
Measure equipment precisely, adding 1/4 inch clearance on all sides. Use a 3-inch hot knife to cut the main cavity outline, then switch to engraving tools for cable channels. Reinforce corners with Foam Fusion adhesive and 1/8-inch dowels—this creates structural integrity that survives shipping impacts. Test fit all components in scrap foam first to avoid costly mistakes on final material.
Prop Making Texture Techniques
Layer foam sheets using StyroGoo adhesive, which bonds in 60 seconds for rapid assembly. For realistic textures, press heated brass rods into warm foam to create convincing wood grain or stone surfaces. Finish with Styroplast coating: apply two thin coats with embedded mesh between layers for impact resistance. Outdoor props require Styroplast Exterior formula—this weatherproof coating accepts concrete stains for rock-like boulder effects.
Master how to use a foam cutter by matching your tool to project scale and foam density. Start with straight cuts on scrap material to calibrate temperature and feed rate before tackling final pieces. Clean, professional results come from respecting foam’s melting point—let the heated blade do the work rather than forcing it through material. Proper technique saves 3-5 hours of sanding per project and transforms brittle foam into durable, professional-grade components. Always store cutters completely cooled with wires uncoiled to prevent permanent kinks that ruin future cuts.


