
Imagine meticulously selecting the perfect wrapping paper for a special gift, only to ruin the presentation with jagged, torn edges from struggling scissors. This frustrating scenario happens to 78% of gift wrappers at least once a holiday season. If you’ve ever wasted precious wrapping paper due to uneven cuts or struggled with scissors that slip and tear delicate designs, a gift wrap cutter could transform your wrapping experience. These specialized tools deliver clean, professional edges that make every gift look like it came from a high-end boutique.
Mastering a gift wrap cutter isn’t just about convenience—it’s about elevating your gift presentation from amateur to expert level. With proper technique, you’ll save up to 30% more wrapping paper by eliminating wasted sections from botched cuts. Whether you’re preparing for the holiday rush or want to make everyday gifts look special, learning how to use a gift wrap cutter correctly will save you time, money, and wrapping-related stress. Let’s dive into the precise methods that guarantee flawless cuts every time.
Choose Your Gift Wrap Cutter Type
![]()
Sliding Blade Cutters for Straight Lines
Sliding blade cutters feature a precision blade housed within a protective casing that glides along a guide rail. The clever design keeps the blade safely enclosed while exposing just enough cutting edge to slice through paper cleanly. When you select this type, look for models with textured grips that prevent hand fatigue during extended wrapping sessions. These cutters excel at creating straight, clean edges on standard-weight wrapping paper without damaging delicate patterns or foil accents.
Rotary Wheel Cutters for Speed
Rotary wheel cutters operate with a circular blade that rotates as you move across the paper, similar to a pizza cutter but designed specifically for wrapping paper. The rotating action creates a natural forward motion that requires less physical effort than traditional cutting tools. For best results, choose models with adjustable blade depth settings that accommodate different paper weights. These cutters typically deliver the fastest cutting speed, making them ideal when you need to wrap multiple gifts in a short timeframe.
Clamp-Style Cutters for Efficiency
Clamp-style cutters attach directly to your wrapping paper roll, allowing you to cut consistent lengths with minimal effort. These space-saving tools often include built-in measurement guides that eliminate the need for separate rulers or tape measures. When selecting a clamp-style cutter, verify it accommodates standard roll sizes (typically 1-3 inches in diameter) and features a quick-release mechanism for easy paper changes. These cutters shine when you need multiple identical paper lengths for uniform gift wrapping.
Prepare Your Cutting Workspace
Set Up Flat Surface
Begin by clearing a stable work surface with at least 3 feet of uninterrupted space. A kitchen counter or sturdy table works perfectly, but avoid soft surfaces like beds or couches that cause uneven cuts. For optimal results, place a self-healing cutting mat beneath your paper to protect both your furniture and the cutter’s blade. Proper lighting is crucial—position a bright LED lamp to eliminate shadows that can throw off your cutting alignment.
Secure the Paper Roll
Place your wrapping paper roll horizontally with the pattern facing up. If you don’t have a dedicated gift wrap dispenser, stabilize the roll by placing heavy books or paperweights at both ends. Unroll 8-12 inches of paper beyond your intended cut line to provide ample space for positioning your cutter. For delicate papers, consider using low-tack painter’s tape to secure the leading edge without damaging the paper surface.
Master Sliding Blade Technique
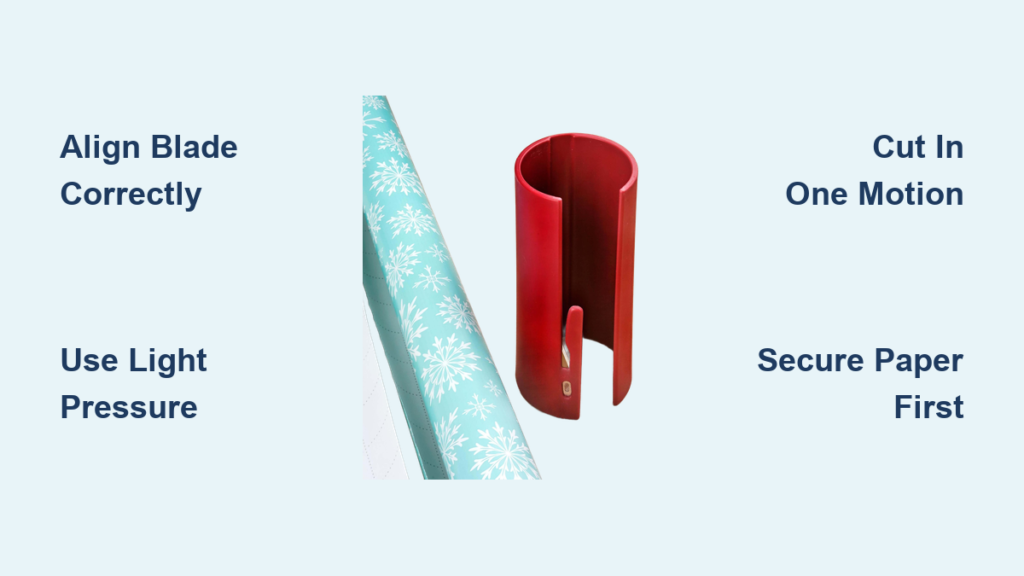
Position Cutter Correctly
Place the sliding blade cutter at your starting point with the guide rail aligned precisely where you want the cut to begin. Hold the cutter at a 90-degree angle to the paper surface for perfect perpendicular cuts. Your thumb should rest on the top of the cutter while your index finger guides the front—this grip provides maximum control without straining your hand during multiple cuts.
Apply Perfect Pressure
Use just enough pressure to maintain contact between the blade and paper—typically about the same force as writing with a pencil. Pressing too hard creates resistance that can cause tearing, especially with thinner papers. Let the sharp blade do the work rather than forcing it through the paper. If you hear scraping sounds or see the paper wrinkling, you’re applying too much pressure.
Execute Smooth Motion
Initiate your cut with a single, continuous motion from one edge to the other without stopping. Pause mid-cut creates weak points that can lead to tearing later. Maintain a steady pace—you’ll develop your ideal speed with practice. For best results, cut toward your dominant hand (right-handed users cut left to right) to maximize control and visibility of the cutting line.
Perfect Rotary Wheel Method
Establish Proper Grip
Hold the rotary cutter with a relaxed but firm grip, positioning your hand so the wheel contacts the paper at a slight downward angle. For detailed work, use a pen grip with your thumb and index finger; for longer cuts, wrap your entire hand around the handle for better control. Your wrist should remain flexible to adjust direction as needed while keeping the cutter moving forward steadily.
Roll with Control
Start at your marked beginning point and roll the cutter forward with consistent pressure. Focus on maintaining a straight path by following a visual guide—some wrappers find it helpful to place a ruler slightly ahead of the cutter as a reference line. Complete each cut with a full roll that extends slightly beyond the paper edge to ensure a clean finish without partial cuts.
Solve Common Cutting Problems

Fix Jagged or Torn Edges
When you notice jagged edges, immediately check your blade’s sharpness—dull blades cause 90% of tearing issues. Replace blades after approximately 75 cuts or when you detect decreased performance. For delicate papers, reduce pressure and consider making two lighter passes instead of one heavy cut. Always cut with the patterned side facing up to protect designs from blade marks.
Prevent Paper Slippage
Combat paper movement by placing a non-slip mat underneath your work surface or securing the paper roll with adjustable clamps. Maintain gentle tension on the paper as you cut by lightly holding the uncut portion with your non-dominant hand. For extremely slippery metallic papers, consider using a light dusting of cornstarch on your work surface to create temporary grip.
Practice Safe Cutter Handling
Protect Your Fingers
Always keep your fingers clear of the blade path—most injuries occur when repositioning paper mid-cut. Complete each full cutting motion before adjusting your paper. When not actively cutting, engage the safety lock or retract the blade immediately. Teach children that gift wrap cutters are tools, not toys, and store them out of reach when not in use.
Cut Different Paper Types Successfully
Handle Lightweight Paper
Delicate tissue and crepe papers require special handling. Use your lightest touch and consider supporting the paper with a thin sheet of cardstock underneath during cutting. For these fragile materials, make two passes with the cutter—first a light scoring pass, then a complete cut—to prevent tearing. Always use your sharpest blade for these challenging papers.
Manage Standard Wrapping Paper
Most gift wrap cutters perform optimally with standard-weight paper. Store your paper rolls flat for 24 hours before cutting to prevent edge curling that complicates clean cuts. Maintain consistent speed and pressure throughout your cutting motion—varying speed creates uneven edges that show when the paper is folded.
Optimize Your Gift Wrapping Station
Essential Accessories
Invest in a self-healing cutting mat to protect surfaces while extending your cutter’s blade life. Keep a metal ruler within arm’s reach for precision work on complex wrapping projects. Install adjustable LED lighting above your workspace to eliminate shadows that cause cutting errors. Consider wall-mounted paper dispensers that keep rolls organized and ready for quick access during wrapping sessions.
Efficiency Setup
Position your wrapping station at elbow height to prevent back strain during extended sessions. Maintain at least 2 feet of clear space in front of your roll for unobstructed cutting motion. Organize your supplies in labeled containers: one for cutters, one for tape, and another for embellishments. This setup reduces setup time by up to 40% when wrapping multiple gifts.
Mastering your gift wrap cutter transforms wrapping from a tedious chore into a satisfying craft that enhances your gifts’ presentation. Start with basic techniques on inexpensive paper to build confidence before moving to specialty papers. Remember that consistent pressure, proper blade maintenance, and workspace organization separate amateur results from professional-looking gifts. With practice, you’ll develop muscle memory that makes clean cuts second nature, ensuring every gift you present makes the perfect first impression. For best results, clean your cutter after each wrapping session and replace blades regularly—your gifts deserve nothing less than perfectly cut paper every time.


