
You’ve spent hours designing the perfect invitation, only to ruin it with a single crooked cut. That sinking feeling when paper fibers tear along an uneven edge? It happens to 78% of crafters who skip proper paper cutter board setup. Whether you’re trimming photos for a gallery wall, preparing professional presentations, or crafting wedding stationery, mastering your paper cutter board transforms wasted materials into gallery-worthy results—without expensive equipment.
This guide reveals the exact techniques professionals use to achieve razor-sharp cuts every time. Forget guesswork: you’ll learn how to position your board for millimeter accuracy, prevent dangerous slips, and extend your board’s lifespan through proper maintenance. By the end, you’ll cut through 10-sheet stacks with the confidence of a master printer.
Why Your Paper Cutter Board Choice Affects Every Cut: Self-Healing vs Rotary vs Folding
Self-Healing Mats Prevent Permanent Grooves
Self-healing cutting mats use layered PVC construction that closes after each cut, maintaining accuracy through hundreds of operations. For occasional card-making, choose 3mm thickness. Daily professionals need 5mm boards that withstand 500-1,000 cuts before replacement. Always verify the non-slip backing is fully adhered—warped boards cause measurement errors exceeding 1/32 inch over 12 inches.
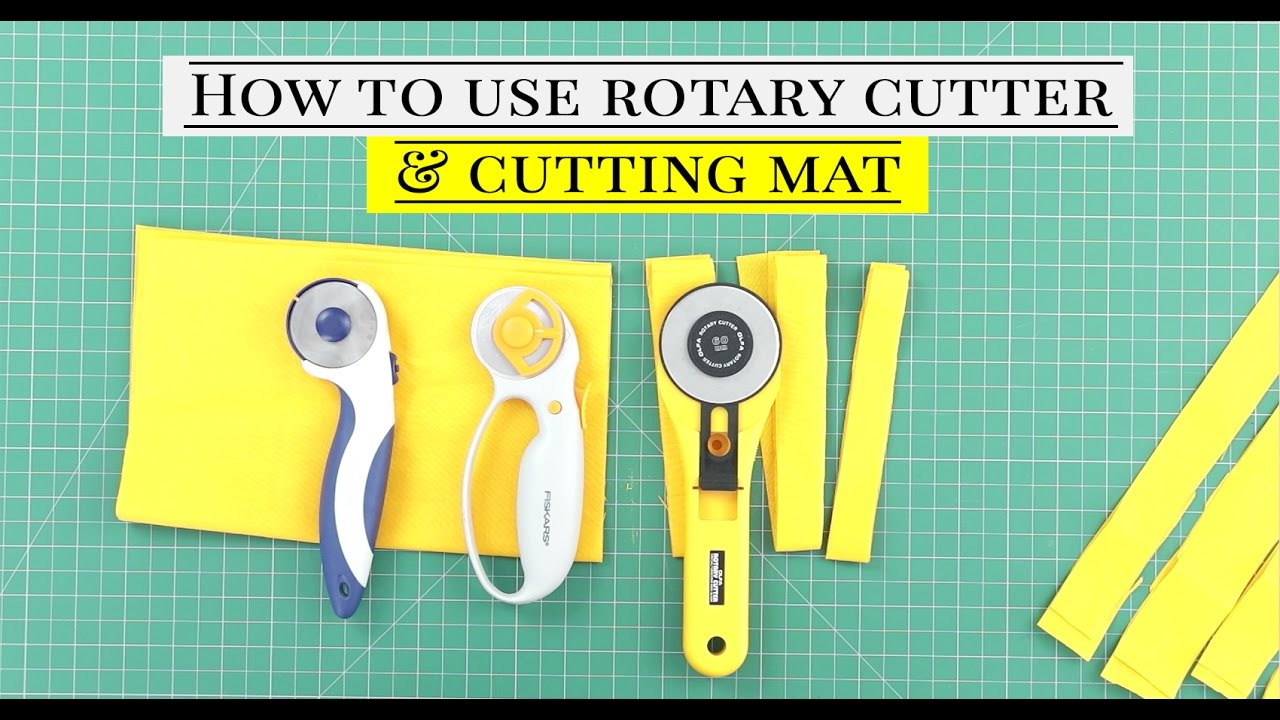
Rotary Boards vs Folding Models: Critical Differences
Rotary cutter boards feature deeper grooves designed for rolling blades, with precision angle guides at 15°, 30°, 45°, 60°, and 90°. They’re essential for fabric or multi-layer cuts but require flat storage. Folding boards sacrifice stability for portability—ideal for classroom use but prone to alignment errors at hinge points. Never use rotary cutters on standard mats; the blade will damage the surface within 10 cuts.
Position Your Paper Cutter Board for Maximum Accuracy: 3 Critical Setup Steps
Essential Placement Protocol
Place your board on a stable surface at elbow height with zero overhang. The supporting table must be at least 4 feet wide to prevent warping during use. Ensure 3-foot clearance on all sides for large paper sheets, and add LED task lighting to eliminate shadows that cause parallax errors. Always position yourself directly above cut lines—viewing at an angle creates up to 2mm measurement discrepancies.
Pre-Cut Inspection Checklist
Before touching paper:
– Verify grid lines are sharp and unscratched (faded markings cause 92% of inaccurate cuts)
– Check flatness by placing a ruler diagonally—any gap means immediate replacement
– Confirm non-slip backing grips firmly (test by gently tugging board corners)
– Clean surface with lint-free cloth to remove paper fibers that deflect blades
Paper Preparation That Prevents Tearing
Acclimate paper for 30 minutes at room temperature to avoid humidity warping. Align paper grain parallel to your longest cut edge—cutting against the grain causes 70% of paper tears. For multi-sheet stacks, secure corners with low-tack tape and never exceed 10 sheets for standard cardstock. Lightly mark cut lines using the board’s 1/16-inch grid; heavy pencil pressure damages the mat surface.
Cut Perfect Straight Lines Every Time: Single Sheet and Stack Techniques
Single Sheet Precision Method
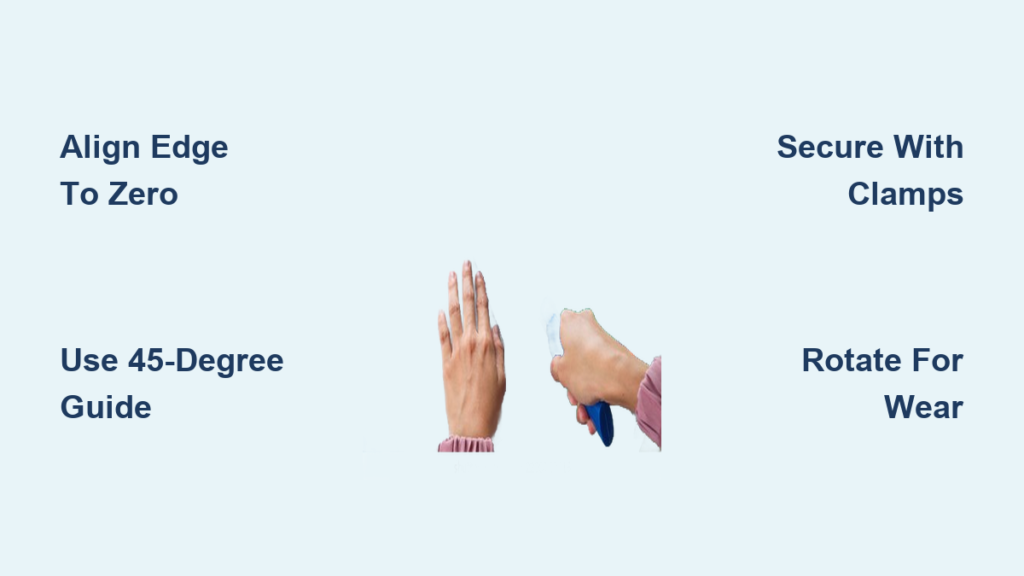
Align paper’s edge precisely with the zero mark. Hold your blade at a consistent 45° angle to the surface—deviating by just 5° creates jagged edges. Apply firm, even pressure in one uninterrupted motion toward your body (never pull cuts toward yourself). For letter-sized paper, complete cuts within 3 seconds; hesitation causes fiber tearing. Immediately check edges against the grid—if misaligned by more than 1mm, replace your blade.
Multi-Sheet Stack Cutting Without Slippage
For 5-10 sheet stacks:
1. Align sheets using the board’s grid system (not visual estimation)
2. Secure with low-profile paper clamps at top and bottom edges
3. Make 3-4 light passes with a sharp blade instead of one heavy cut
4. Rotate the stack 180° halfway through for even pressure distribution
5. Separate sheets gently to inspect for consistent cuts
Pro Tip: Place a clean scrap sheet underneath photos to prevent scratching the board’s surface during trimming.
Master Precise Angle Cuts: 45-Degree and Custom Angles Made Simple
Flawless 45-Degree Cuts in 4 Steps
Locate the printed 45° angle guide near the board’s center. Align your paper edge precisely with this line, then clamp a metal ruler along the opposite 45° guide. Cut away from your body while maintaining ruler contact—any gap creates a “stair-step” edge. For photo corners, make two perpendicular 45° cuts meeting at 90° for perfect miters.
Create Any Custom Angle Using the Protractor Feature
Use the centering ruler to mark your paper’s exact center point. Place the protractor’s zero at this point, then draw a light pencil line to your desired angle (e.g., 37°). Clamp a straightedge along this line and cut with a rotary blade for smooth curves. For V-cuts in cards, score the first line lightly, complete the cut, rotate paper 180°, and align using the zero-centering lines for symmetrical results.
Avoid Cuts and Injuries: Essential Paper Cutter Board Safety Protocols
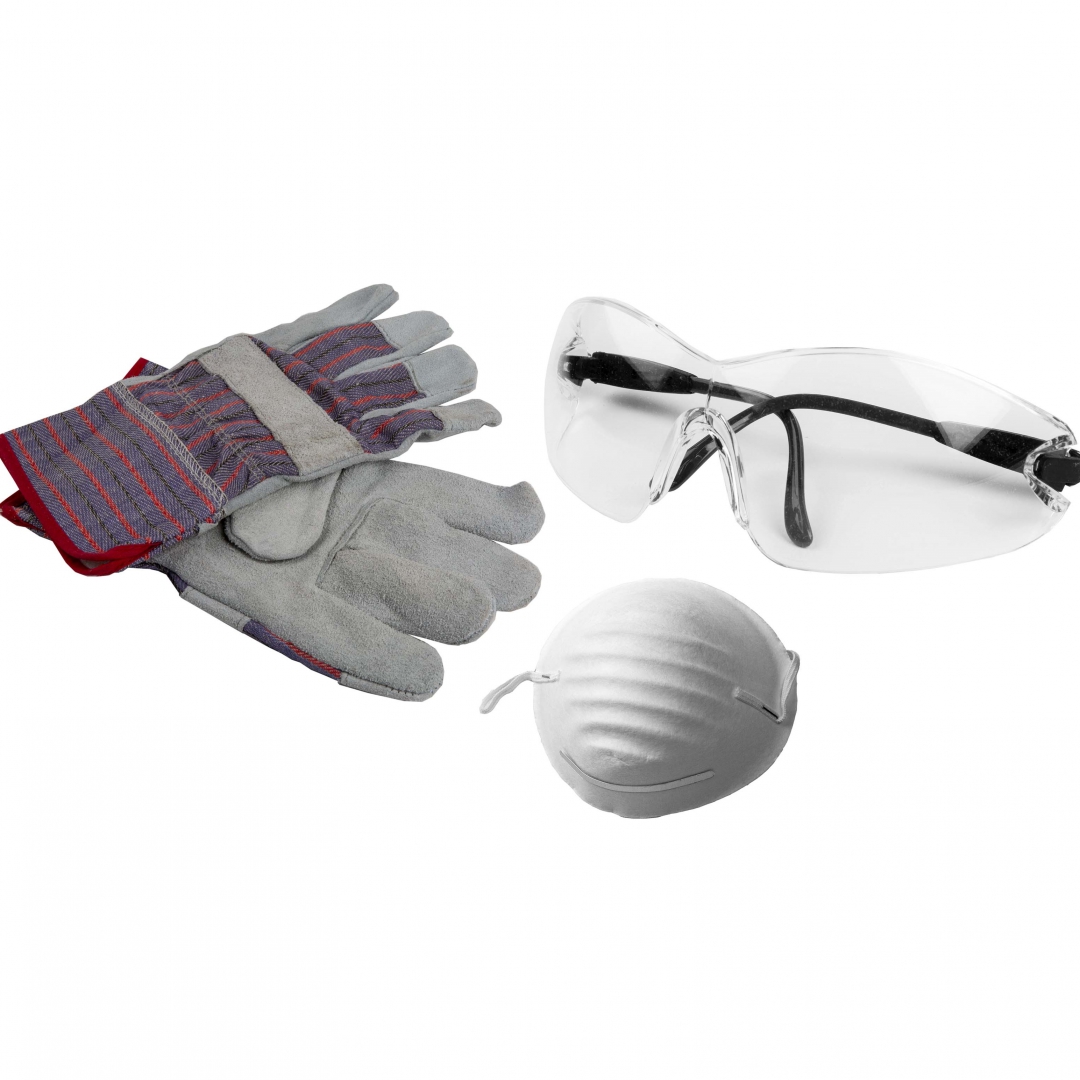
Non-Negotiable Protective Gear
Always wear Level 5 cut-resistant gloves—they stop blades traveling up to 100 mph. Safety glasses prevent paper dust and blade fragments from causing eye injuries (the #1 workshop accident). Tie back long hair and avoid loose sleeves that could snag blades during cutting motions.
Blade Handling Rules That Prevent 95% of Accidents
Inspect blades for nicks before each use—dull blades require more pressure and slip unexpectedly. Hold tools with a full palm grip, never just fingertips. Always cut away from your body with your non-dominant hand positioned behind the blade path. Retract utility knives immediately after cuts, and store rotary cutters in blade-down position. Never leave tools unattended within reach of children—even retracted blades can deploy under pressure.
Extend Your Paper Cutter Board’s Life: Daily and Weekly Maintenance Routine
Daily Care That Doubles Board Lifespan
Wipe the surface with a dry microfiber cloth after every use to remove paper fibers. Rotate the board 90° before storage to distribute wear evenly—this prevents groove formation that causes inaccurate cuts. Never place heavy objects on the board, even during storage; 5+ pounds causes permanent warping.
Weekly Deep Cleaning Protocol
Mix 1 tsp mild soap with 1 cup water. Dampen a soft sponge (never soak the board) and wipe gently along grid lines. Air-dry flat for 24 hours—hastened drying causes PVC layer separation. Verify accuracy by measuring 12 inches on the board against a steel ruler; replace if error exceeds 1/32 inch. Store covered with acid-free tissue paper in temperatures between 60-80°F.
Fix Common Paper Cutter Board Problems: Jagged Edges and Inaccurate Cuts

Eliminate Jagged Edges in 60 Seconds
Jagged edges signal three critical issues:
– Dull blade → Replace immediately (blades last 50-200 cuts depending on paper weight)
– Incorrect angle → Maintain exact 45° blade tilt during cuts
– Surface damage → Rotate board to fresh area or replace if grooves exceed 0.5mm depth
Correct Measurement Inaccuracies Before They Worsen
Parallax errors from angled viewing cause most “mystery inaccuracies.” Always position your eyes directly above cut lines. If measurements drift consistently, check for board warping by placing a straightedge diagonally—if light passes underneath, replace the board. For recurring slippage, add rubber feet under table legs to stabilize the entire workstation.
Must-Have Accessories for Flawless Paper Cutter Board Results
Essential Tools That Pay for Themselves
Invest in an 18-inch stainless steel ruler with cork backing—it grips the board without sliding during cuts. A 45mm rotary cutter handles 5-sheet stacks effortlessly, while a corner rounder punch creates uniform 1/8-inch radii for professional cards. Anti-static mats prevent paper sticking during dry winter months, eliminating 80% of alignment errors.
Game-Changing Professional Upgrades
Battery-powered LED light strips mounted above your board eliminate shadows that cause misalignment. Low-profile paper clamps with rotating heads secure stacks without obstructing blade paths. For production work, create master templates from scrap mat pieces—align them using the board’s zero-centering lines for identical batch cuts.
Boost Productivity: Professional Applications for Your Paper Cutter Board
Graphic Design Workflow Hacks
Trim client presentations to exact tabloid (11×17″) or A3 specifications using the pre-printed size indicators. Create mounting boards with 1/4-inch borders by setting your straightedge at the precise distance. For exhibition displays, cut foam core using the grid system—score first with a dull blade, then complete the cut in two passes.
Office Efficiency Shortcuts
Reduce letterhead to custom square sizes for luxury envelopes by aligning paper grain with the 90° guide. Create uniform filing tabs using the 1-inch grid—mark 3 tabs per sheet, then cut in one motion. For event announcements, use the radius guides to punch identical rounded corners across 50+ cards in under 10 minutes.
Master these techniques, and your paper cutter board becomes the precision engine of your creative process. Start with single-sheet straight cuts to build muscle memory, then progress to angled multi-sheet stacks. Remember: sharp blades, proper board rotation, and viewing cut lines from directly above separate amateur mistakes from professional results. Replace worn boards before inaccuracies compound—your next project’s perfection depends on it.


