
Ever struggled with uneven cuts or excessive dross when working with metal? Mastering how to use a plasma cutter correctly transforms frustrating projects into precision work with clean edges and minimal cleanup. This powerful tool melts through steel up to 1.5 inches thick with remarkable speed, but improper technique leads to wasted materials and ruined consumables. Whether you’re fabricating custom brackets or creating metal art, understanding plasma cutter operation unlocks professional results from your very first cut.
Most beginners make critical errors that damage equipment and compromise safety—like skipping proper grounding or using incorrect amperage settings. By following this precise guide, you’ll avoid these pitfalls while learning industry-proven techniques for flawless cuts on carbon steel, stainless, and aluminum. Let’s transform your raw metal into precision parts with confidence.
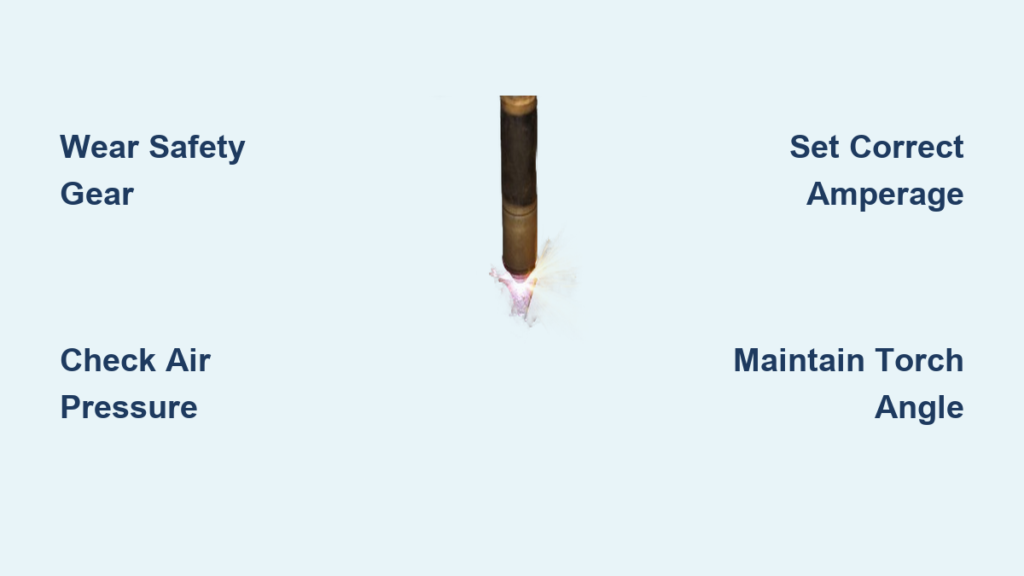
Essential Safety Gear Setup Before Cutting
Your safety depends on proper protection before striking that first arc. Plasma cutting generates UV radiation intense enough to cause “welder’s flash” within seconds and produces molten metal droplets exceeding 3,000°F. Skipping even one safety element risks severe burns or permanent eye damage.
Critical Safety Gear Checklist:
– Eye Protection: Auto-darkening helmet with #9 shade minimum (Shade #5 safety glasses only for grinding prep work)
– Hand Protection: Full-cuff leather gloves rated for 500°F+ temperatures
– Body Protection: Flame-resistant cotton or leather jacket with no synthetic fibers
– Respiratory Gear: P100 filter respirator mandatory for galvanized or painted metals
Workspace Safety Must-Dos:
– Clear 35-foot radius of all flammables including rags and paper
– Position Class C fire extinguisher within arm’s reach
– Verify ventilation provides 8+ air changes per hour
– Test ground clamp connection on bare metal before starting
Plasma Cutter Components Assembly for Optimal Performance
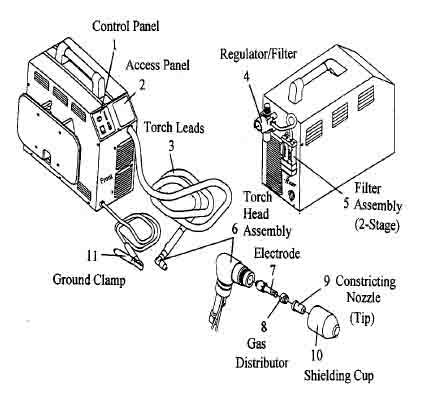
Understanding each component’s role prevents costly mistakes during operation. Your plasma cutter won’t function properly if any element fails—especially the often-overlooked air supply system.
Quick Assembly Sequence
- Match input voltage to machine specifications (110V for home use, 220V+ for shop)
- Connect air supply at 70-120 PSI through moisture filter
- Attach ground clamp within 3 feet of cut area on clean metal
- Install consumables matching your material thickness
- Test all safety interlocks before cutting production parts
Visual Inspection Points:
– Check electrode for center hole erosion (replace if diameter exceeds 1/16″)
– Verify nozzle orifice is perfectly round with no gouging
– Inspect swirl ring alignment—misalignment causes uneven cuts
– Confirm O-rings are seated properly to prevent gas leaks
Material Preparation Checklist for Clean Cuts
Proper preparation eliminates 90% of cutting problems before you even strike an arc. Rushing this stage guarantees dross buildup, incomplete penetration, or warped metal.
Surface Prep Protocol
- Identify metal type using spark test or magnet check
- Measure thickness precisely with calipers (don’t guess!)
- Remove rust/paint within 2 inches of cut line using wire wheel
- Mark cut lines with soapstone for clear visibility
- Support material on fire bricks to prevent warping
Parameter Selection Guide:
– 1/8″ steel: 25-35 amps, 60-65 PSI air pressure
– 1/4″ steel: 45-55 amps, 65-70 PSI air pressure
– 1/2″ steel: 65-85 amps, 70-80 PSI air pressure
– 3/4″ steel: 100-125 amps, 80-90 PSI air pressure
Master Basic Cutting Technique for Professional Results
Holding the torch correctly makes the difference between a clean cut and a molten mess. Most beginners instinctively angle the torch incorrectly, causing excessive dross and rough edges.
Torch Positioning Fundamentals
- Maintain perpendicular (90°) angle to work surface
- Hold 1/8″ standoff distance—use drag tip for zero clearance
- Angle torch 15° away from your body for safety
- Support torch with both hands for stability on long cuts
Speed Control Secrets:
– Too slow: Molten metal pools creating heavy dross
– Too fast: Incomplete penetration with rough edges
– Perfect speed: Steady hissing sound with minimal sparks below cut
– Pro Tip: Start with slower speed, then gradually increase until optimal cut quality
Advanced Cutting Applications Beyond Straight Lines
Once you’ve mastered basic operation, these techniques dramatically expand your capabilities. Circular cuts and bevels open doors to professional fabrication work.
Bevel Cutting Mastery
- Angle torch 15-45° while maintaining consistent pressure
- Increase travel speed 10-15% compared to straight cuts
- Use specialized bevel nozzles for precision weld prep
- Practice on scrap first—bevel angles require muscle memory
Circle Cutting Without Templates:
– Mark center point and radius clearly
– Start cut at 12 o’clock position
– Rotate material (not torch) for smooth circles
– Complete in single continuous motion for clean finish
Troubleshoot Common Problems in Under 5 Minutes
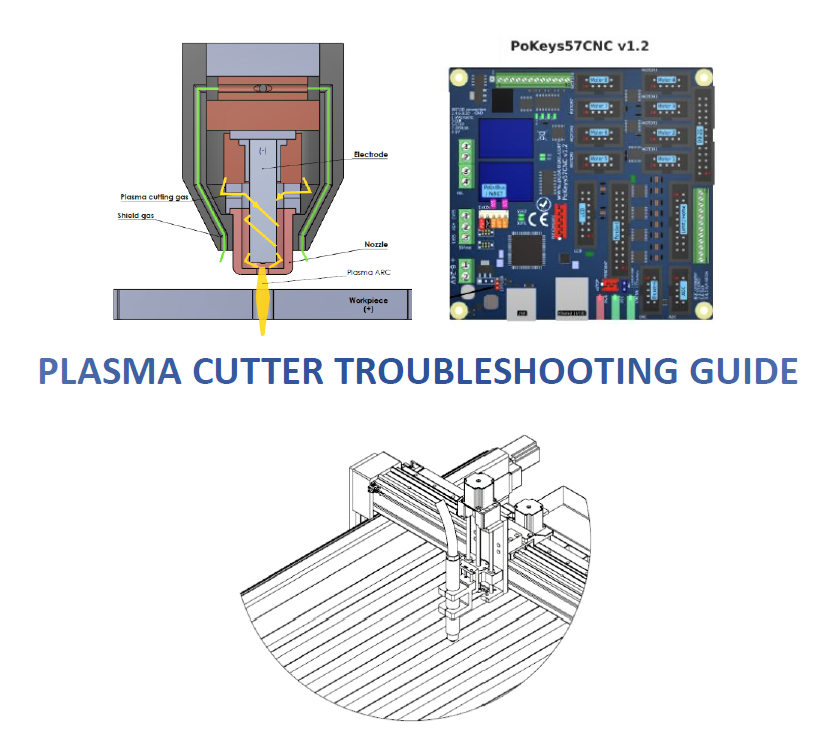
When cuts go wrong, systematic diagnosis saves time and expensive consumables. Most issues stem from just three root causes: incorrect settings, worn parts, or poor grounding.
Arc Starting Failures
- No pilot arc: Verify 70+ PSI air pressure and replace pitted electrode
- Intermittent arc: Drain air tank moisture and replace damaged O-rings
- Arc blow: Relocate ground clamp to opposite side of cut line
Cut Quality Diagnostic Chart:
– Blue sparks: Perfect operation
– Orange sparks: Increase air pressure 5-10 PSI
– Yellow sparks: Reduce travel speed 10-15%
– No sparks: Check consumable alignment and air supply
Daily Maintenance Routine for Maximum Uptime
Consistent maintenance prevents unexpected downtime that derails projects. A 5-minute daily check extends consumable life by 30% and avoids mid-job failures.
5-Minute Daily Check:
– Inspect electrode for center hole enlargement
– Check nozzle orifice for perfect roundness
– Verify ground clamp connection integrity
– Test trigger operation and safety interlocks
– Clean torch body with compressed air
Warning: Ignoring minor wear signs leads to catastrophic failure—replace consumables when quality degrades, not when they completely fail.
Optimize Operating Costs on Every Job
Smart operators track consumable usage to maximize profits. Knowing your cost per cut helps price jobs accurately and identify efficiency opportunities.
Cost Breakdown Per Hour:
– Electrodes: $3-8 each (50-100 starts typical life)
– Nozzles: $2-6 each (primary quality determinant)
– Electricity: $0.50-2.00 depending on amperage
– Compressed air: $0.10-0.30 for compressor operation
Productivity Boosters:
– Batch similar thickness materials together
– Pre-mark multiple parts before striking arc
– Replace consumables before quality drops
– Maintain cutting parameter logs for repeat jobs
Special Material Considerations for Professional Results
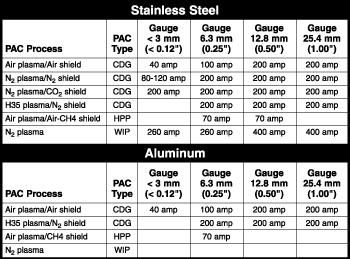
Different metals demand specific technique adjustments. Using carbon steel settings on stainless guarantees poor quality and wasted time.
Stainless Steel Protocol:
– Increase amperage 10% above carbon steel settings
– Reduce travel speed for oxide-free edges
– Apply anti-spatter compound to prevent sticking
– Use nitrogen gas for critical applications
Aluminum Cutting Secrets:
– Increase amperage 15-20% above steel settings
– Use faster travel speed to prevent heat buildup
– Consider water table cooling for thin sections
– Expect 25% shorter consumable life than steel
How to Use a Plasma Cutter for Intricate Detail Work
Fine detail requires specialized technique adjustments that many beginners miss. Standard cutting parameters destroy delicate features and cause excessive dross.
Precision Cutting Method
- Reduce amperage by 20-30% below standard settings
- Use smallest nozzle diameter available
- Maintain perfect perpendicular torch angle
- Move at slower, consistent speed (2-5 IPM)
- Cut clockwise for inside shapes, counterclockwise for outside
Pro Tip: For artwork and fine details, use a drag tip that glides directly on the metal surface—this eliminates standoff distance errors that ruin precision work.
Final Takeaway: How to use a plasma cutter effectively combines proper safety, precise setup, and consistent technique. Start each project with thorough material preparation, dial in your parameters on scrap first, and let the machine do the work—your skills will improve with every cut. Remember that maintenance isn’t optional; it’s what separates professionals from hobbyists. When you follow these steps, you’ll achieve clean, dross-free cuts that require minimal cleanup, saving you time and money on every project.


