

Your homemade ravioli should look as stunning as it tastes, but achieving those perfect, restaurant-quality pockets of pasta often comes down to one critical factor: your cutting technique. Many home cooks struggle with ravioli that leaks filling, has uneven edges, or simply falls apart during cooking—all problems that stem from improper cutter use. Whether you’re working with a simple wheel cutter or a professional mold tray, mastering these tools transforms your pasta from kitchen experiments to culinary masterpieces.
This guide reveals exactly how to use a ravioli cutter for flawless results every time. You’ll discover professional techniques that ensure consistent portion sizes, perfect seals, and beautiful presentation without the frustration that often accompanies homemade ravioli. Forget the messy failures—these proven methods work whether you’re making dinner for two or preparing a feast for family.
Choose Your Ravioli Cutter Type
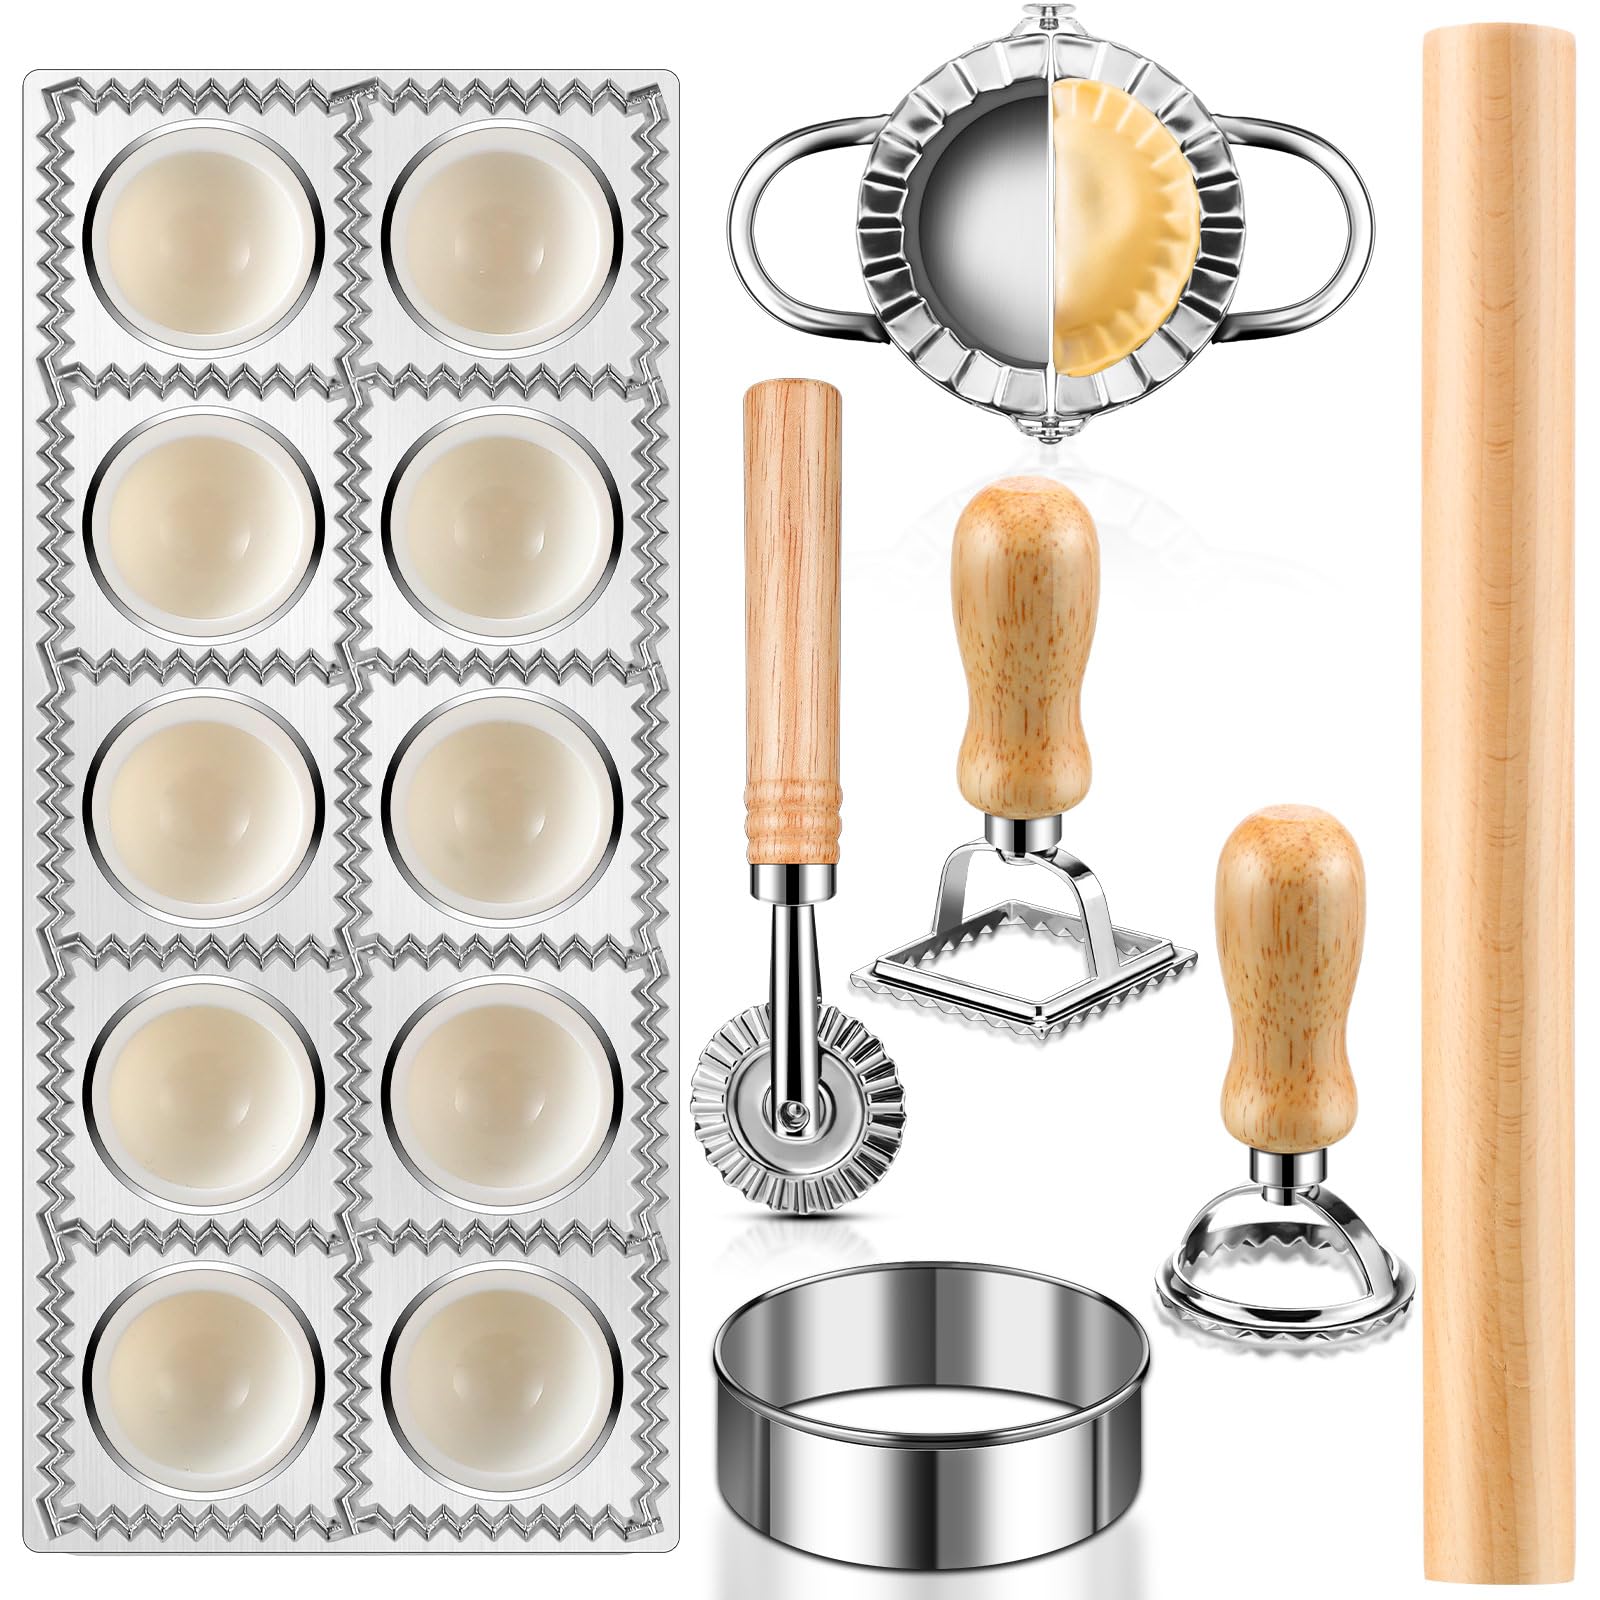
Selecting the right ravioli cutter makes or breaks your pasta-making experience. Wheel cutters with straight edges deliver clean, modern cuts perfect for contemporary presentations, while fluted-edge wheels create traditional Italian scalloped edges that grip sauces beautifully. These versatile tools let you customize ravioli size based on your filling, cutting through dough with a smooth rolling motion that reduces hand fatigue during large batches.
Stamp cutters provide foolproof consistency with predetermined shapes in squares (typically 2-3 inches) or circles (2-4 inches in diameter). The frame depth determines how much filling you can pack inside—deeper stamps accommodate generous portions while shallower ones work best for delicate fillings. Some stamps feature integrated crimping patterns that create decorative edges while ensuring proper sealing in a single press.
Mold trays revolutionize production with 12-36 uniform ravioli simultaneously. These aluminum or plastic trays feature bottom plates and top cutting frames that create consistent thickness and even filling distribution. The mold design ensures professional results every time you press down, making them essential when you’re feeding a crowd or meal prepping for the week.
Quick Selection Guide
- Small batches: Wheel cutter for flexibility in size and shape
- Consistent portions: Stamp cutter for reliability with minimal cleanup
- Large quantities: Mold tray for efficiency when making dozens at once
Prepare Pasta Dough Correctly
Your ravioli’s success begins with properly rolled dough at exactly 1/16 inch thickness—about the thickness of two stacked quarters. This precise measurement prevents tearing while ensuring complete cutting and sealing. Too thick, and your cutter won’t penetrate completely; too thin, and you’ll have leakage disasters during cooking.
Test your dough by lifting a sheet—it should be translucent enough to see your hand through, but strong enough to stretch without ripping. Dust your work surface lightly with flour, but avoid over-flouring which prevents proper sealing. Roll dough in manageable sections; sheets larger than your cutting board become unwieldy and stretch unevenly, leading to inconsistent ravioli sizes.
Pro tip: Work with dough that’s rested for at least 30 minutes after kneading. This relaxation period prevents the dough from shrinking back during rolling, ensuring consistent thickness across your entire sheet.
Ready Your Filling Station
Fillings must achieve spreadable-yet-firm consistency—think soft butter texture. Cheese fillings should hold their shape when scooped, while meat fillings need fine grinding and tight binding to eliminate air pockets that expand during cooking. Vegetable fillings require thorough draining to remove excess moisture that could compromise dough integrity.
Essential setup items:
– Small bowl of water for sealing edges
– Pastry brush for precise moisture application
– Extra flour for dusting
– Parchment paper for resting completed ravioli
– Measuring spoons for consistent portions
Critical mistake to avoid: Using fillings that are too warm. Room temperature fillings prevent dough stretching and tearing during assembly—chill your filling for 15 minutes before starting if needed.
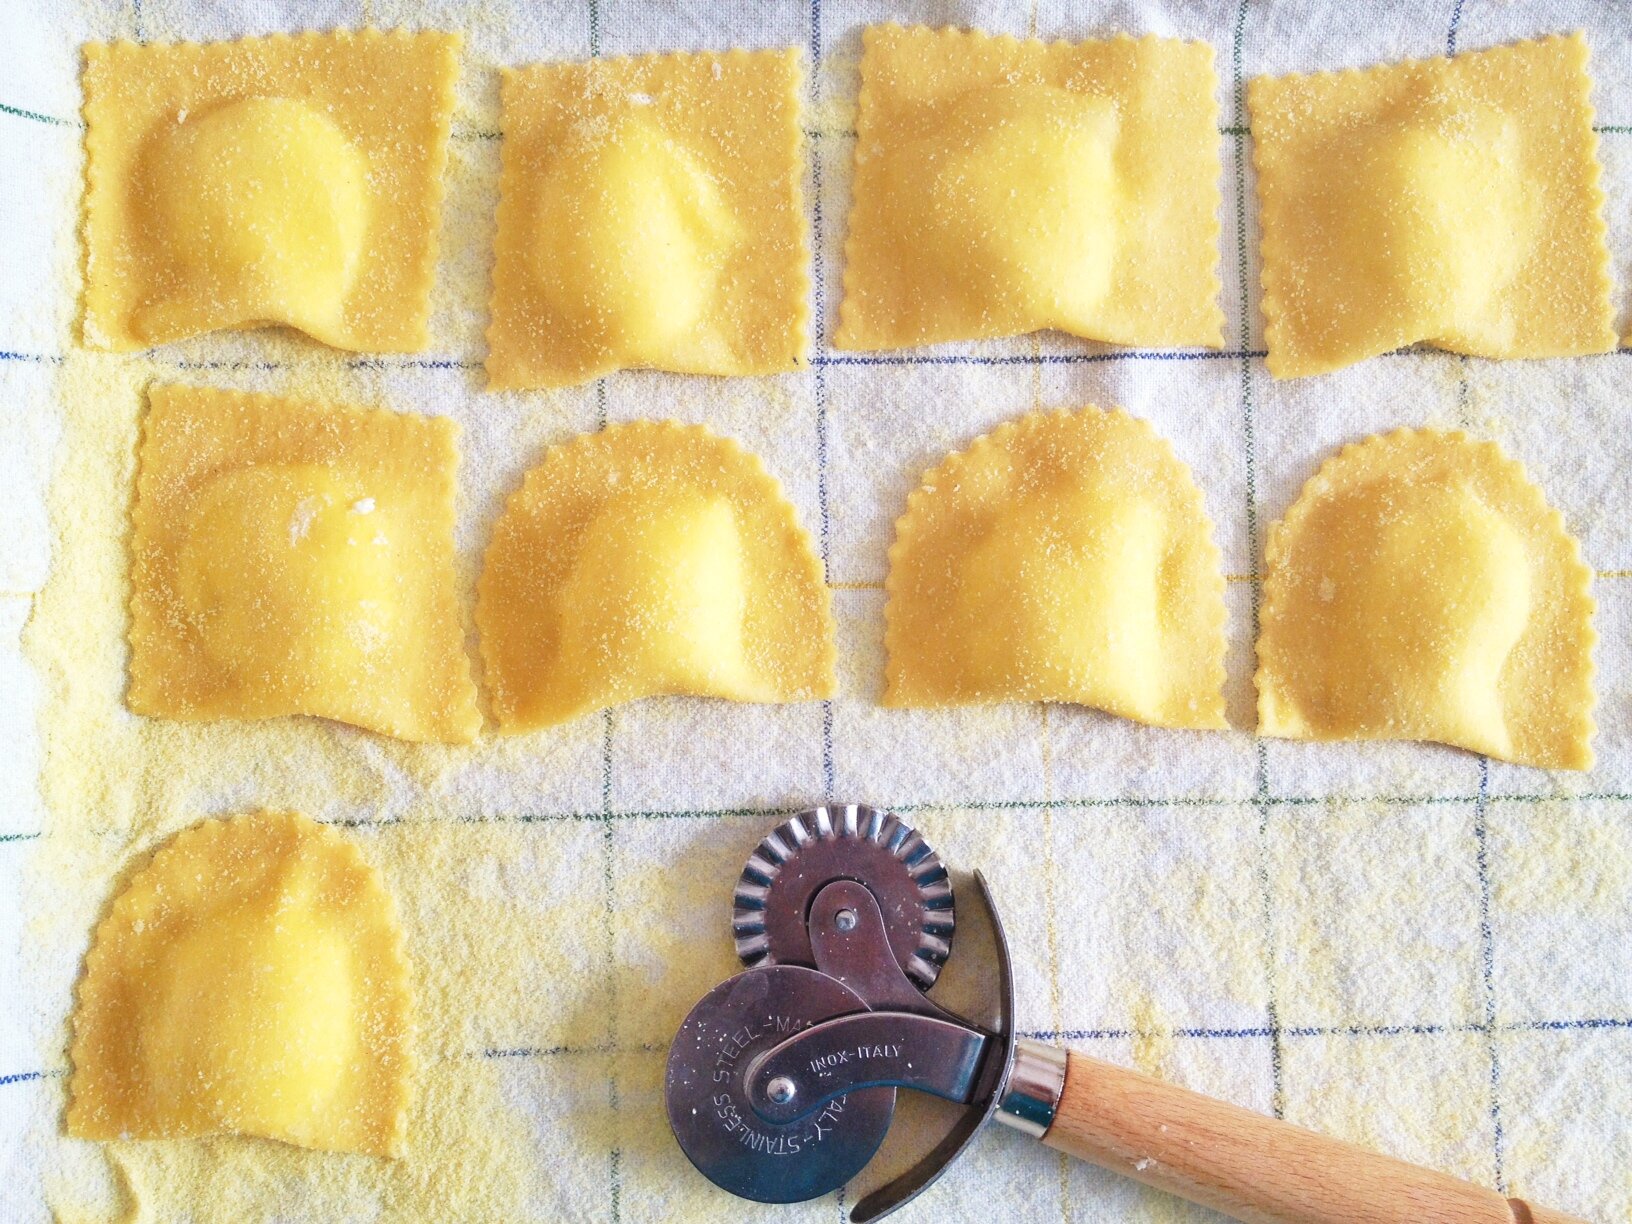
Master Wheel Cutter Technique
Place filling portions in straight rows on your bottom dough sheet with 2-inch spacing between mounds. This spacing allows room for cutting and sealing without waste. Dampen the dough between filling portions using a pastry brush—too much water creates soggy edges, too little prevents proper sealing.
Fold the top dough sheet over your filling row, pressing gently from the center outward to eliminate air pockets. Position your wheel cutter between filling portions and roll with steady, even pressure. Maintain consistent speed—rushing creates jagged edges, moving too slowly stretches the dough. For fluted wheels, press slightly harder to ensure complete separation of the decorative edge.
Wheel Cutter Troubleshooting
- Jagged edges: Increase pressure slightly while maintaining steady speed
- Tearing dough: Dust work surface with more flour but avoid over-flouring
- Incomplete cuts: Check dough thickness—likely too thick for clean cutting
Perfect Stamp Cutter Method
Center your stamp directly over each filled section, ensuring the filling sits perfectly within the cutter’s boundaries. Apply firm, even pressure straight down—no twisting or angling which distorts shapes and weakens seals. Lift the stamp straight up to reveal your perfectly cut ravioli. Check edges immediately for complete sealing, pressing any gaps closed before removing excess dough.
Waste reduction tip: Collect dough scraps immediately and re-roll only once. Overworking scraps creates tough pasta that won’t seal properly. Store scraps under a damp towel to prevent drying while you finish cutting.
Efficient Mold Tray Process
Flour the mold tray cavities lightly to prevent sticking—excess flour creates dusty ravioli that won’t seal. Lay a dough sheet over the entire tray, pressing gently into each cavity to create uniform wells. Fill each cavity with measured portions, avoiding overfilling that prevents sealing. Cover with second dough sheet, pressing firmly between cavities to ensure complete separation.
Use the cutting frame or rolling pin to press down firmly, cutting through both dough layers simultaneously. Invert the tray to release your batch of uniform ravioli. Check each piece for complete edge sealing, trimming any excess dough for clean presentation.
Production efficiency: Mold trays reduce individual ravioli time from 2-3 minutes to 15-30 seconds per piece when properly mastered. For best results, keep your mold tray chilled in the refrigerator before use—this prevents dough from sticking.
Troubleshoot Common Cutting Problems
Incomplete cutting signals dull blades or excessive dough thickness. Sharpen wheel cutters professionally when scalloped edges become ragged. Replace stamp cutters that require excessive pressure to cut completely.
Tearing issues indicate overly thin dough or inadequate flour dusting. Maintain 1/16-inch thickness and increase flour on your work surface without over-dusting, which prevents sealing.
Sticking problems stem from wet filling or insufficient flour. Ensure fillings are properly drained and dough sheets are lightly floured but not dusty.
Misaligned cuts happen when stamps aren’t centered over fillings. Create visual guides using light pencil marks on your work surface for consistent placement.
Clean Cutters Immediately
Clean your cutters immediately after use—dried dough residue ruins cutting edges and creates sanitation issues. Rinse wheel cutters under warm water while rotating the blade to remove all particles. Use a soft brush for stubborn residue, never metal implements that damage cutting edges.
Storage protocol: Dry all components thoroughly to prevent rust. Store metal cutters in dry locations with protective covers. Apply food-grade mineral oil periodically to prevent corrosion on wheel mechanisms. Never put stamped cutters in the dishwasher unless manufacturer-approved.
Store Fresh Ravioli Properly
Dust completed ravioli lightly with semolina flour to prevent sticking. Arrange in single layers on parchment-lined trays, never overlapping which causes deformation. Cover trays with damp towels (not touching ravioli) and refrigerate up to 2 days at 38-40°F.
Freezing technique: Freeze ravioli individually on trays for 1-2 hours before transferring to freezer bags. This prevents sticking and maintains shape during long-term storage. Cook directly from frozen, adding 1-2 minutes to cooking time.
Advanced Techniques for Stunning Results
Create visual impact using specialty stamp shapes—heart cutters for romantic dinners, stars for celebrations. Layer different colored doughs for striped effects, or incorporate herb-infused doughs for flavor and visual appeal.
Pro presentation tip: Use graduated cutter sizes to create appetizer and main course presentations that look professionally designed. For example, 1.5-inch heart ravioli as appetizers followed by 2.5-inch square ravioli as the main course creates visual interest on the plate.
Master these ravioli cutter techniques and transform basic pasta sheets into restaurant-quality filled pasta that impresses every time. Whether you’re making a romantic dinner for two or meal prepping for the week, proper cutter technique ensures perfect results with minimal frustration. Your next batch of homemade ravioli won’t just taste amazing—it will look like it came from a professional kitchen.


