

That first-time stare at your Honda grass cutter’s controls can make even simple lawn care feel like rocket science. Whether you’ve just unpacked a shiny new HRX model or inherited a reliable HRR from a neighbor, understanding how to use Honda grass cutter properly transforms frustrating mornings into smooth, efficient mowing sessions. You’ll discover why Honda’s reputation for reliability depends on proper operation techniques that protect both your lawn and the machine. This guide delivers exactly what you need to know to get professional results while avoiding common mistakes that shorten your mower’s lifespan.
Most beginners waste time struggling with starting procedures or end up with uneven cuts simply because they skip critical setup steps. By the time you finish this guide, you’ll confidently navigate fuel requirements, safety checks, and cutting patterns that make your neighbors wonder what your secret is. Forget confusing manuals—here’s the practical, step-by-step approach to mastering your Honda grass cutter from day one.
Pre-Start Safety Check Before Ignition

Skipping safety checks risks serious injury and equipment damage that could cost hundreds in repairs. Take two minutes to complete these vital steps before every mowing session—your future self will thank you when the season ends with a perfectly functioning machine.
Remove Debris from Cutting Area
Walk your entire mowing path and clear all objects that could become dangerous projectiles. Pay special attention to garden edges where decorative stones blend into grass and areas near play equipment where small toys hide in tall grass. Even pebbles the size of your thumbnail can fly at dangerous speeds when struck by Honda’s high-speed blades. Check for dog toys, golf balls, or fallen branches that might seem harmless but can damage your mower deck or blade assembly.
Check Oil and Fuel Levels
Your Honda grass cutter requires specific fuel and oil conditions to operate properly. Remove the oil dipstick, wipe it clean with a rag, reinsert without screwing, then check the level—it should sit between the upper and lower marks. For fuel, use only fresh unleaded gasoline with no more than 10% ethanol content. Fill to the bottom of the filler neck but never overfill, as Honda engines are sensitive to fuel overflow that can cause hard starting. Never use old fuel—gasoline degrades after 30 days and creates starting problems even in Honda’s reliable engines.
Inspect Blade Condition
Examine the blade through the mower deck opening for cracks, bends, or excessive wear. Dull blades don’t cut—they tear grass, leaving brown, ragged tips that invite disease. If you spot damage or notice poor cutting performance, replace the blade before starting. A damaged blade creates dangerous vibration that can damage your Honda’s engine mounts and crankshaft over time. Pro tip: Mark the blade with paint before removal to ensure proper reinstallation orientation.
Starting Your Honda Grass Cutter Successfully
Honda’s starting procedure seems confusing until you understand the sequence—then it becomes second nature. Proper starting technique prevents flooding and extends your engine’s life significantly compared to impatient tugging on the starter cord.
Prime the Engine Correctly
Locate the rubber primer bulb on the engine side—typically red or black. Press it firmly 3-5 times until you see fuel visible in the clear return tube. Stop immediately when fuel appears—over-priming floods the engine and prevents starting. If you’ve used the mower within the last hour, skip priming entirely as warm engines require less fuel enrichment. Honda’s advanced engines often start with minimal priming when properly maintained.
Set Controls to Starting Position
Move the throttle lever to the “rabbit” (fast) position—this provides optimal fuel-air mixture for cold starts. Engage the blade control bail firmly against the handlebar; this safety feature stops blades instantly when released. For self-propelled models, ensure the drive clutch is in neutral or disengaged to prevent unexpected movement during startup. Honda’s safety systems won’t allow starting unless these controls are correctly positioned.
Pull Starter Cord with Proper Technique
Position yourself behind the mower with feet shoulder-width apart for stability. Pull the starter grip slowly until you feel resistance, then deliver one firm, quick pull—not a yank. Let the cord rewind slowly to prevent damage to the recoil mechanism. Most Honda grass cutters start within 2-3 pulls when properly maintained. If it doesn’t start after 5 pulls, wait 2 minutes to clear excess fuel before trying again.
Adjust Cutting Height Settings for Healthy Grass
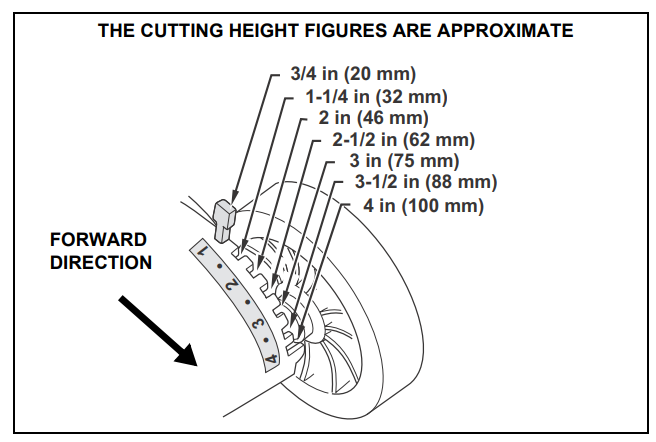
Honda’s cutting height systems vary by model but all deliver precise control that protects your lawn’s health. Proper height adjustment prevents scalping while encouraging deep root growth that makes your lawn drought-resistant.
Identify Your Model’s Adjustment System
HRX series models use a single lever near the rear wheel—push forward to raise the cutting height, pull back to lower. HRR models feature individual wheel adjustments—rotate each wheel’s height adjusters clockwise to raise, counterclockwise to lower. HRS mowers use a single front axle lever with preset height stops. Check your model’s specific system before making adjustments to avoid forcing mechanisms not designed for individual wheel adjustment.
Select Optimal Grass Height by Type
Cool-season grasses (fescue, bluegrass): Maintain 2.5-4 inches for healthy root development
Warm-season grasses (bermuda, zoysia): Keep between 1-2.5 inches for best appearance
Shaded areas: Add 0.5-1 inch to standard height to compensate for reduced sunlight
Never remove more than one-third of the grass blade length in a single mowing session—this stresses the lawn and invites weeds and disease.
Verify Height Before Cutting Begins
After adjusting, push the mower onto a hard surface and measure the distance between blade tip and ground. Check all four corners to ensure even height—uneven settings create striping effects and missed patches. Honda’s precision engineering means small adjustments make significant differences in cut quality. Make minor tweaks until you achieve consistent height across the entire cutting width.
Master Professional Cutting Patterns
The difference between amateur and professional-looking lawns comes down to cutting patterns that promote upright grass growth while preventing soil compaction and ruts.
Straight Line Technique for Clean Edges
Start along a straight reference point like your driveway, sidewalk, or fence line. Overlap each pass by 3-4 inches to eliminate uncut strips between rows. Keep your eyes 10-15 feet ahead rather than directly in front of the wheels for straighter lines. Maintain a steady walking pace—rushing creates uneven cuts and causes grass clippings to clog the deck. Honda’s superior airflow systems perform best at moderate speeds that allow complete grass discharge.
Handle Hills with Proper Safety Technique
Never mow up and down steep slopes—this risks loss of control and serious injury. Instead, mow across slopes using horizontal passes. With self-propelled Honda models, engage drive lightly and let the mower pull itself while you guide direction with minimal force. On extreme slopes exceeding 15 degrees, switch to a string trimmer for safety—Honda’s powerful engines aren’t designed for vertical slope operation.
Change Patterns Weekly for Lawn Health
Alternate mowing directions each session—north/south one week, east/west the next. This prevents grass from developing permanent lean patterns and reduces soil compaction from repeated wheel tracks. Your lawn develops that coveted “ballpark” striped appearance over time when you follow this simple pattern rotation. Honda’s superior deck design enhances this effect when combined with proper cutting height and pattern techniques.
Troubleshoot Common Honda Grass Cutter Issues
Even Honda’s famously reliable equipment occasionally needs troubleshooting. Quick diagnosis prevents minor issues from becoming major repair bills.
Engine Won’t Start: Systematic Diagnosis
Check these in order without skipping steps:
1. Fuel valve in “ON” position (if equipped on your model)
2. Fresh fuel (gas older than 30 days causes 70% of starting problems)
3. Clean air filter (clogged filters create rich mixture preventing ignition)
4. Spark plug connection secure and not corroded
5. Blade control bail fully engaged against handle
Poor Cutting Performance Solutions
Dull blades cause 90% of ragged cut issues. After 25 hours of use, sharpen or replace the blade. Test sharpness safely: Carefully run a blade of grass across the cutting edge—sharp blades slice cleanly while dull ones bend grass. Honda’s high-lift blades require precise sharpening angles to maintain optimal airflow and cutting performance.
Excessive Vibration Requires Immediate Attention
Stop mowing immediately if you feel unusual shaking. Check for:
– Loose blade bolt (tighten to manufacturer’s 36-43 ft-lbs specification)
– Bent or damaged blade (replace if any visible damage)
– Debris wrapped around blade or crankshaft
– Damaged engine mounting bolts
Maintain Peak Performance Between Mowings
Regular maintenance extends your Honda grass cutter’s lifespan and ensures consistent cutting quality season after season.
After Each Use Care Routine
- Empty the grass bag completely and clean deck underside with garden hose
- Check oil level while engine is warm (not hot) for accurate reading
- Tap air filter gently to remove loose debris
- Wipe down engine surfaces to prevent grass buildup that traps heat
Seasonal Service Schedule
Spring startup must-dos:
– Replace spark plug with Honda-specified model
– Change oil (required after first 5 hours on new mowers)
– Clean/replace air filter
– Sharpen or replace blade
Fall storage essentials:
– Run engine dry of fuel or add quality fuel stabilizer
– Change oil regardless of hours used during season
– Clean entire mower thoroughly before storage
– Store in dry location with fuel valve in OFF position
Store Your Honda Grass Cutter Properly Off-Season
Proper storage prevents carburetor issues that account for 60% of “won’t start” service calls each spring.
Fuel System Winterization
For storage over 30 days, choose one method:
– Run engine dry: Let it run until fuel exhausted (prevents carburetor varnish)
– Add stabilizer: Mix fuel stabilizer with fresh gas, run engine 5 minutes to distribute through system
Storage Environment Protection
Store in a climate-controlled garage or shed—never uncovered outdoors. Moisture causes electrical issues and rust that Honda’s quality control can’t prevent. If outdoor storage is unavoidable, use a breathable mower cover that allows ventilation—trapped moisture creates more problems than direct rain exposure.
Correct Storage Positioning
Keep mower level during storage to prevent oil migration into the carburetor. For push mowers, vertical wall storage saves space—just ensure fuel cap is tightly sealed and no leaks exist before tilting. Honda’s engineering accommodates vertical storage when done properly, but never store self-propelled models on their side.
Your Honda grass cutter delivers years of reliable service when you follow these operation fundamentals. The precision engineering Honda builds into every model rewards proper technique with effortless starting, clean cuts, and minimal maintenance needs. Master these techniques now, and you’ll develop the muscle memory that makes lawn care feel automatic rather than like a chore. Start with these basics, and you’ll join the ranks of Honda owners who consider their mower a trusted partner rather than just another yard tool.


