

That moment when your blade catches and sends your expensive walnut board flying across the shop—that’s the sound of unmastered wood-cutting technique. Whether you’re building a simple bookshelf or crafting intricate cabinetry, knowing exactly how to use wood cutter tools separates clean, professional results from costly mistakes. This guide cuts through the confusion with battle-tested methods that transform your cutting accuracy while keeping your fingers intact. You’ll learn which cutter dominates specific tasks, how to avoid the top 5 errors that ruin lumber, and pro-level safety protocols that turn anxiety into confidence at the saw.
Select Your Ideal Wood Cutting Tool
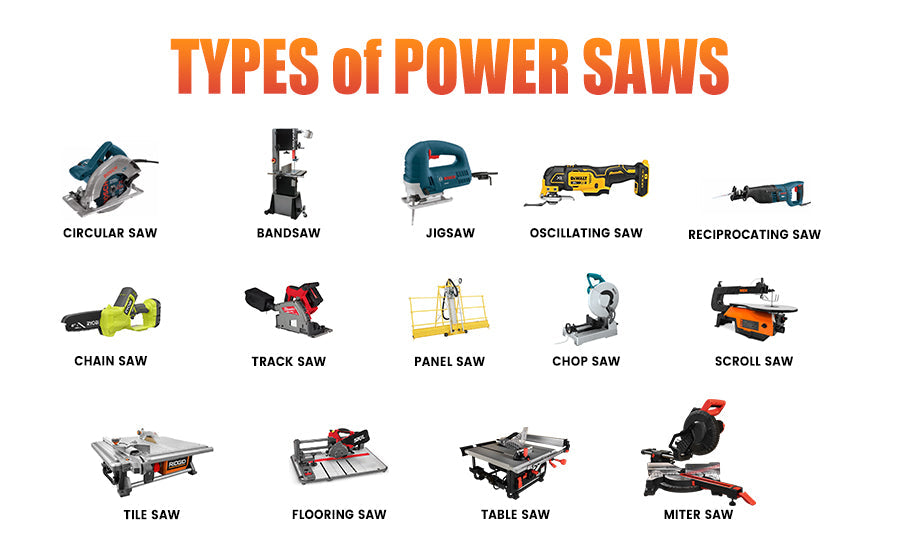
Stationary Power Tools for Professional Results
Table saws deliver unmatched precision for straight cuts when you measure blade-to-fence distance at both front and back points to ensure perfect parallel alignment. Use 24-tooth blades for ripping hardwood, 60-tooth for cross-cuts, and 80-tooth for plywood to prevent tear-out on delicate surfaces. Miter saws excel at angled cuts with positive detents at 0°, 15°, 22.5°, 31.6°, and 45°—sliding compound models handle boards up to 14 inches wide for wide shelving projects. Band saws conquer curves and resawing thick boards when you adjust blade tension to 15,000-30,000 PSI; choose 1/8″ blades for tight curves and 1″ blades for straight resaw cuts to maintain control.
Portable Cutters for On-Site Mastery
Your circular saw becomes a cabinet-grade tool when paired with track systems—set depth 1/8″ deeper than material thickness and use the track’s splinter guard for zero-tearout edges. Jigsaws handle curves and plunge cuts effectively when you set orbital action to 0 for clean cuts in hardwood or 3 for aggressive demolition work; Bosch T101BR reverse-tooth blades eliminate splintering on visible surfaces. Reciprocating saws power through demolition with stroke lengths of 1-1/8″ and variable speed (0-3,000 SPM) that adapts to material density—ideal for pruning or cutting nail-embedded lumber.
Manual Cutting for Control and Quiet
Hand saws provide surgical precision where power tools fail. 26″ rip-cut saws with 5-7 TPI cut efficiently with the grain, while cross-cut saws feature 8-12 TPI for across-grain cuts. Japanese pull saws (like Dozuki or Ryoba) cut on the pull stroke, creating thinner kerfs and smoother finishes—essential for dovetail joinery where every thousandth of an inch matters.
Optimize Your Setup for Perfect Cuts
Blade Selection Matrix
![]()
Match your blade to the job using this critical reference: Hardwood requires 24-T rip blades with 20° hook angle; Softwood needs 60-T cross-cut blades at 10°; Plywood demands 80-T Hi-ATB blades with 5° hook angle; Laminate requires PCD diamond blades at 0° hook angle. Using the wrong blade guarantees tear-out—especially on plywood where 80-tooth blades support fragile veneers right through the cut.
Machine Calibration Checklist
Before touching wood, verify four critical points: Inspect blades for cracks or missing teeth that cause vibration; Check arbor tightness with cupped washer facing outward; Confirm fence alignment within 0.010″ parallel to blade using a dial indicator; Test dust collection at 350+ CFM to prevent clogging and fire hazards. Skipping these steps risks dangerous kickback—especially when ripping hardwood where misaligned fences cause binding.
Execute Cross-Cuts Without Tear-Out
Step-by-Step Cross-Cutting Process
Mark your cut line with a sharp 0.5mm mechanical pencil and position the wood with waste side toward your dominant hand. Align the mark precisely with the blade while ensuring your miter gauge reads exactly 90°—even 1° variance creates gaps in joints. Start the motor and let it reach full RPM before contact, feeding steadily while maintaining firm pressure against the fence. Support the off-cut with your non-dominant hand to prevent splitting; never let it drop freely as it can bind the blade. For flawless results on expensive hardwood, install a zero-clearance throat plate that supports wood fibers right up to the blade cut line.
Master Rip-Cutting Without Kickback
Professional Rip Sequence
Joint one edge straight first using a jointer or hand plane—wavy edges cause binding and dangerous kickback. Set your rip fence to exact width, measuring blade-to-fence distance at both ends for perfect parallelism. Position safety gear within reach: push stick, riving knife, and anti-kickback pawls. Start the saw, then feed using a push block until 6″ remains—switch to push stick for the final push. Maintain constant downward pressure throughout the cut; let the blade work at 6-12 ft/min feed rate—forcing creates burn marks and stresses motors. For dense maple, slow your feed rate to prevent burning.
Create Perfect Angles Without Errors
Miter and Bevel Setup Secrets
For miter cuts, set your miter gauge or saw table to exact angles using positive detents—use stop blocks for identical multiple pieces in picture frames. When making bevel cuts, tilt the blade (not the fence) to your desired angle and position the fence on the correct side of blade tilt to prevent trapping the off-cut—a common kickback trigger. For crown molding, combine miter and bevel settings by cutting upside down and backwards—the molding’s bottom edge rests against the fence while the top touches the table. Always support long pieces to prevent sagging that throws off angles.
Handle Curves Like a Pro
Band Saw Curve Technique
Mark curves with flexible rulers or French curves before cutting. Adjust blade tension to manufacturer specifications—too loose causes wandering cuts while too tight risks breakage. Use relief cuts on tight curves to prevent blade binding: drill starter holes at inside corners and remove the blade, thread through the hole, then remount. Feed at the blade’s natural pace; forcing causes drift and uneven curves. Keep fingers 2″ minimum from the blade—use push sticks for small pieces under 6″ wide. For intricate fretwork, switch to 18-24 TPI scroll saw blades and remove blade tension when not cutting to prolong life.
Prevent Costly Cutting Mistakes
Burn Marks and Tear-Out Solutions
Burn marks indicate dull blades or slow feed rates—replace 24-T rip blades every 100-150 board-feet of hardwood. Increase feed speed on dense maple where burning occurs when the blade dwells too long. Prevent tear-out on cross-cuts by using backing boards clamped to the cut line and switching to 60-80 tooth blades for plywood. Install zero-clearance inserts on table saws to support wood fibers right to the cut line. Wavy rip edges signal fence misalignment—realign within 0.002″ parallel and use featherboards for consistent pressure against the fence.
Safety Protocol That Saves Fingers
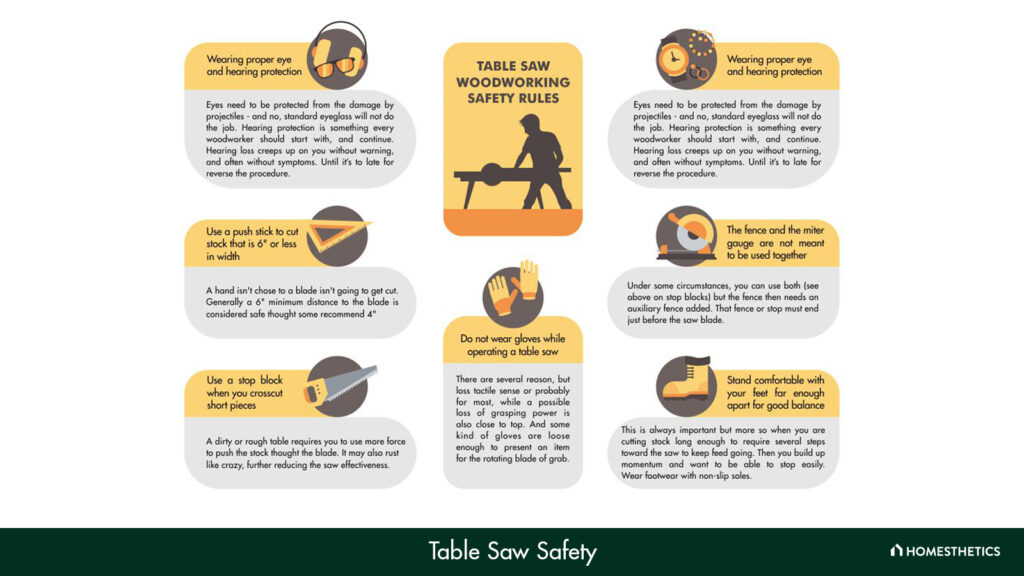
Essential PPE Checklist
Wear ANSI Z87.1 rated wrap-around safety glasses—face shields for overhead work—as table saws generate 105 dB noise requiring NRR 25+ earmuffs. Use N95 respirators for sawdust and P100 filters for MDF formaldehyde exposure. Wear closed-toe shoes with traction but never gloves while cutting—they can catch and pull hands into blades. Tie back long hair and remove jewelry completely. Position yourself to the left of the table saw blade path (for right-handers) to avoid direct kickback trajectory.
Emergency Preparedness
Locate paddle switches within 6″ reach and practice monthly shutoffs without looking. Keep a push stick in your dominant hand—never reach over spinning blades. For kickback response, stand clear of the workpiece path since kickback shoots material back at 120+ mph. Maintain 350+ CFM dust collection to prevent fire hazards from hot sawdust accumulation—clean filters weekly to sustain suction.
Maintain Peak Cutting Performance
Blade Care Schedule
Clean blades monthly by soaking in Simple Green for 10 minutes, scrubbing with nylon brushes, then drying completely before applying light oil to prevent rust. Resharpen carbide blades 3-4 times before replacement—look for rounded or chipped teeth that cause burning. Apply paste wax monthly to cast iron tables to prevent rust and reduce friction. Check belt tension by ensuring ½” deflection at midpoint—proper tension prevents slippage during hardwood ripping.
Storage Solutions
Store sheet goods vertically in racks—never lean against walls where they can fall. Use mobile bases for heavy tools to reposition quickly during projects. Label blade bins clearly: 24-T rip, 60-T cross-cut, 80-T plywood. Maintain dust collection at 350+ CFM at tool ports—clogged systems increase fire risk from hot sawdust accumulation.
Quick Reference Cutting Cheat Sheet
Blade depth at 45° bevel equals blade diameter × 0.707—never exceed RPM limits (10″ blade ≤5,500 RPM). Apply 5-15 pounds feed pressure; let the blade cut without forcing. Don PPE in order: glasses → ears → respirator → closed-toe shoes. Set blade height 1/8″–1/4″ above stock thickness for minimal kickback risk. Practice emergency stops monthly—locate paddle switches within 6″ reach.
Master these fundamentals, and you’ll progress from nervous first cuts to confident, precise woodworking. Start with straight cross-cuts on pine, then advance to hardwood rip cuts and complex angles. Your craftsmanship improves with every board—measure twice, cut once, and always respect the blade.


