Your Janome sewing machine’s thread cutter suddenly stops working mid-project, forcing you to reach for scissors like you’re back in home economics class. That satisfying snick that used to neatly sever threads has been replaced by frustrating frayed ends and constant workflow interruptions. Whether you’re quilting, garment construction, or simple mending, a malfunctioning thread cutter transforms efficient sewing into a tedious chore requiring constant manual trimming.
Don’t panic—most Janome thread cutter not working issues have straightforward fixes you can handle at home. From simple cleaning procedures taking just minutes to precise blade replacements, this guide provides every solution you need. You’ll learn to accurately diagnose the problem, implement the correct fix, and establish maintenance habits to prevent future failures—saving you unnecessary service calls and costly repairs.
Diagnose Your Thread Cutter Failure Type

Complete Blade Non-Engagement
When pressing your thread cutter lever produces zero movement, your mechanism has likely seized completely. The blade remains frozen despite repeated attempts, often indicating serious debris jamming or a broken return spring. This absolute failure prevents any cutting action, forcing you to manually trim every thread tail—a major workflow disruption during chain piecing or production sewing.
Incomplete Cuts With Frayed Threads
If your blade moves but leaves thread hanging with ragged ends, you’re dealing with a dull or misaligned cutting edge. This symptom is particularly common after sewing multiple layers of denim or upholstery projects with heavy threads. The blade makes contact but lacks the sharpness or proper positioning needed for clean separation, requiring frustrating manual finishing of every seam.
Grinding or Clicking Noises During Operation
Unusual sounds when activating your thread cutter signal mechanical distress that demands immediate attention. Clicking, grinding, or scraping noises typically indicate foreign objects trapped in the mechanism or severely worn pivot points. These warning sounds mean your cutter is working against resistance that will only worsen without intervention, potentially causing further damage to internal components.
Immediate Diagnostic Checks You Must Perform
Visual Inspection Protocol
Power down and unplug your Janome immediately before inspection. Remove the needle plate (typically held by two front screws) and shine a bright flashlight into the cutter housing. Look specifically for:
- Lint snowdrifts: Compressed lint preventing full blade travel
- Thread nests: Multiple thread pieces wrapped around the cutter assembly
- Visible blade damage: Nicks, chips, or obvious dullness on cutting edge
- Misaligned components: Parts shifted from factory positions
Manual Movement Assessment
Turn your hand wheel slowly while watching the cutter blade’s movement. It should travel smoothly through its complete range without resistance. The blade must snap back crisply to its ready position after each movement—weak return springs cause sluggish performance that results in incomplete cuts. Pay attention to any grinding sensation or inconsistent movement that indicates mechanical wear.
Execute Proper Cleaning Procedures
Basic Cleaning Method
Start with three short bursts of compressed air to dislodge loose debris from the cutter housing. Follow with a soft lint brush, working gently around the blade area without touching the cutting edge. Use precision tweezers for stubborn thread pieces wrapped around mechanisms, but avoid the blade itself. Finish with cotton swabs dipped in isopropyl alcohol for precision cleaning of pivot points.
Deep Cleaning When Basic Methods Fail
For heavily soiled cutters, remove the cutter cover (usually secured by 2-3 screws). Take photos with your phone before disassembly to ensure proper reassembly. Clean individual components with alcohol-soaked swabs, paying special attention to blade seating areas. Never use water or household cleaners—they attract more lint and can damage precision mechanisms. Reassemble carefully, verifying all parts move freely before replacing the needle plate.
Blade Sharpening Versus Replacement

When Professional Sharpening Makes Sense
Professional sharpening services can restore moderately dull blades at approximately half the cost of replacement. This works best for blades showing uniform dulling without significant nicks or corrosion. Expect 2-3 sharpenings before replacement becomes necessary, making this a cost-effective solution for occasional heavy thread users. However, severely damaged blades require replacement for reliable performance.
Correct Blade Replacement Technique
Order the exact blade specified for your Janome model—part numbers vary significantly between models. Remove the old blade using needle-nose pliers with a gentle rocking motion. Install the new blade by pressing firmly until it seats with an audible click, ensuring proper alignment. Test cutting performance with scrap fabric before resuming important projects to verify clean thread separation.
Address Spring and Lever Mechanism Problems
Return Spring Troubleshooting
Weak return springs cause blades that won’t reset properly after cutting. Replace springs showing visible deformation or those stretched beyond their original length. Spring replacement requires basic tools and takes approximately 15 minutes on most Janome models. Ensure you install the correct spring tension—too weak won’t return the blade, while too strong can damage other components.
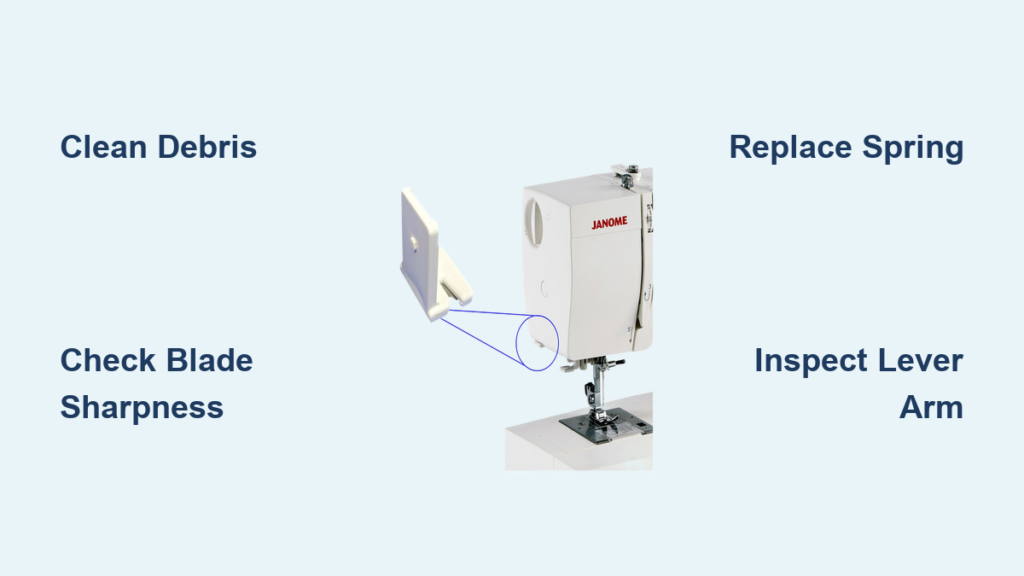
Bent Lever Arm Correction
Accidental impacts from dropped tools or vigorous sewing can bend cutter levers. Gently straighten minor bends using needle-nose pliers with controlled pressure, but replace severely damaged components. Check all pivot points for excessive play—tighten mounting screws with the appropriate screwdriver size, but avoid over-tightening which increases friction and wear.
Manage Thread-Specific Cutter Challenges
Heavy Thread Damage Prevention
Repeatedly cutting thick upholstery or topstitching thread accelerates blade wear significantly. Develop the habit of manually cutting these heavier threads to extend blade life. After sewing projects with heavy threads, perform immediate cutter cleaning to remove the excessive lint generated. Consider keeping a separate machine for heavy-duty projects if you frequently work with thick materials.
Metallic Thread Best Practices
Metallic and specialty threads create excessive metallic lint that rapidly damages cutter blades. Cut these threads manually whenever possible, or use high-quality metallic threads that produce less debris. Clean your cutter mechanism immediately after using metallic threads—don’t let residue accumulate. Some experienced sewists keep a dedicated blade just for metallic thread projects to preserve their primary blade.
Establish Preventive Maintenance Habits
Daily Maintenance Routine
Before each sewing session, perform a 30-second visual check of your thread cutter mechanism. After heavy use sessions, blow out debris with compressed air. Remove any cut thread pieces immediately—never let them accumulate in the cutter housing. This simple habit prevents the gradual buildup that leads to sudden failures during critical projects.
Weekly Deep Maintenance
Remove the needle plate weekly for thorough cleaning of the cutter area. Inspect blade condition and test cutting action with scrap fabric. Apply one drop of sewing machine oil to pivot points monthly—never more, as excess oil attracts lint and creates gummy buildup. Consistent maintenance extends cutter life significantly and prevents most common failures.
Model-Specific Repair Considerations

Mechanical Versus Computerized Models
Mechanical Janome models (like the 2212) feature accessible adjustment screws for blade positioning that you can tweak yourself. Computerized models (such as the MC6650) may require specialized software calibration—consult your manual before attempting adjustments. The diagnostic process differs slightly between model types, with computerized machines sometimes displaying error codes related to cutter function.
Critical Part Number Verification
Always use your exact model number when ordering replacement parts. Janome 3160QDC blades differ significantly from 4120QDC versions despite superficial similarities. Check the parts list in your manual or Janome’s official website for correct numbers—using incompatible parts causes further damage. When in doubt, contact Janome customer support with your machine’s serial number for precise part identification.
Emergency Workarounds During Projects
Immediate Manual Cutting Solutions
Keep sharp embroidery scissors permanently stationed near your machine for emergencies. Position thread tails to the left side of your work for easiest manual cutting access. Consider attaching a thread cutter pendant to your machine—a small, convenient tool that clips onto your machine for quick access when the automatic cutter fails.
Safe Temporary Disablement
If the cutter mechanism is damaged but you need to continue sewing immediately, safely disable it by removing the return spring. This prevents further damage from a malfunctioning cutter while allowing you to complete your project. Remember to reinstall the spring or complete proper repairs before your next sewing session to avoid long-term issues.
Final Maintenance Checklist for Long-Term Reliability
A properly functioning thread cutter transforms sewing from frustrating to fluid. Most Janome thread cutter not working problems stem from preventable issues—lint accumulation and blade wear top the list. Implement the daily visual checks and weekly deep cleaning routines outlined here, and you’ll rarely face major cutter problems. When issues do arise, use this systematic diagnostic approach to identify and fix problems quickly.
Remember that different thread types affect cutter longevity differently—reserve manual cutting for heavy and metallic threads to extend blade life. Keep replacement blades and springs on hand so you can address problems immediately without project delays. Your Janome will reward you with years of reliable thread cutting performance when you follow these simple maintenance protocols. Don’t wait for complete failure—address minor issues promptly to maintain seamless sewing workflow.