That frustrating moment when your fabric snags or paper tears mid-cut can derail even the most exciting craft project. Whether you’re a quilting newbie struggling with wobbly lines or an experienced sewer tired of replacing dull blades, mastering your Fiskars rotary cutter transforms these headaches into smooth, professional results. This guide cuts through the confusion with precise techniques you can implement immediately—no more jagged edges or material shifting. You’ll learn exactly how to position your hands for straight-as-a-ruler cuts, navigate tricky curves like a pro, and maintain your cutter for years of reliable service. By the end, you’ll wield your Fiskars cutter with the confidence to tackle any fabric, paper, or vinyl project.
Secure Your Workspace to Prevent Accidents
Before touching your cutter, create a dedicated cutting zone that eliminates common hazards. Position yourself at a sturdy table with your cutter’s blade path extending beyond the material edges—this prevents accidental table gouges and ensures clean exit cuts. Clear all distractions including coffee mugs, stray pattern pieces, and loose threads that could snag your cutting motion.
Critical safety setup steps:
– Place a self-healing mat under materials (never cut directly on wood)
– Position a bright task light to eliminate shadows along cutting lines
– Keep pets and children 6+ feet away from your cutting perimeter
– Wear closed-toe shoes—dropped cutters cause 70% of foot injuries
Identify Critical Cutter Components Before First Use

Knowing your Fiskars cutter’s anatomy prevents dangerous mistakes and ensures optimal performance. Every model shares six essential components that work together for precise cutting.
Handle and Blade Assembly Mechanics
- Ergonomic handle with contoured finger grooves reduces hand fatigue during long sessions
- Circular blade (45mm standard or 60mm for thick materials) rotates freely when properly assembled
- Metal washer sits between blade and handle for smooth rotation
- Pivot screw secures the assembly—overtightening causes blade drag
- Slide-lock guard covers blade when not cutting (engages with audible click)
- Trigger release on loop-handle models allows one-handed operation
Quick diagnostic: Gently spin the blade with your finger. It should rotate smoothly for 3+ seconds. If it sticks or wobbles, the pivot screw needs adjustment.
Perfect Your Initial Cutter Assembly
Improper assembly causes dangerous blade wobble and ragged cuts. Follow this sequence exactly for safe, precise operation:
- Unscrew the pivot screw counterclockwise using the included tool (never force it)
- Slide the washer onto the screw until it seats against the handle
- Position the blade with logo facing outward (sharp edge toward cutting direction)
- Align assembly with handle mounting point—don’t force misaligned parts
- Tighten clockwise until snug (about 1/4 turn past finger-tight)
- Test rotation—back off 1/8 turn if blade drags
- Engage blade guard until it clicks securely
Pro tip: If cutting feels “grabby,” the blade is overtightened. Loosen the pivot screw slightly—your blade should spin freely but not wobble.
Prepare Materials for Clean Single or Multi-Layer Cuts
Material prep makes the difference between professional results and frustrating do-overs. Match your technique to the material:
Material-Specific Cutting Guidelines
- Cotton fabric: Up to 8 layers with sharp 45mm blade (more causes shifting)
- Cardstock: Maximum 200gsm weight—thicker paper requires slower cuts
- Adhesive vinyl: Cut face-down on mat to prevent lifting
- Thin leather: Under 2mm thickness—use 60mm blade with firm pressure
- Craft foam: Sheets up to 3mm—reduce layers if cutter skips
Foolproof Securing Method
- Place material on self-healing mat with grain lines parallel to mat grid
- Press fabric with dry iron to eliminate wrinkles (critical for accuracy)
- Mark cutting lines with air-erasable pen for fabric or light pencil for paper
- Anchor edges with pattern weights (never use pins—they deflect blades)
- Align first cut with mat’s horizontal grid line for perfect squares
Execute Perfect Straight Cuts in One Pass
Straight lines form the foundation of quilting and pattern work. This shoulder-driven technique prevents wavy edges:
- Disengage blade guard with thumb while keeping fingers clear
- Position cutter at starting point with blade perpendicular to material
- Apply gentle downward pressure—let the sharp blade do the work
- Push from your shoulder (not wrist) in one fluid motion
- Maintain consistent speed—slowing causes jagged edges
- Extend cut 1.5 inches beyond material edge
- Re-engage guard immediately after completing cut
Critical mistake to avoid: Pushing too hard creates curved cuts and accelerates blade dulling. If you hear scraping, reduce pressure.
Master Curved Cuts Without Cutting Yourself
Tight curves challenge even experienced crafters. This two-phase method works for appliqué and garment details:
- Mark your curve with 1/4-inch dots along the line (easier to follow than solid lines)
- Start with shallow “bites” (1-2 inch cuts) following dot markers
- Pivot the material—not the cutter—for gradual curves (keep blade moving)
- Support both sides of the cut with free hand to prevent fabric bunching
- Switch to 28mm cutter for curves under 3 inches diameter
- Complete complex shapes in 2-3 passes for clean results
Expert insight: For inside corners, stop cutting, lift the cutter, reposition, and restart—never pivot while blade is down.
Troubleshoot Ragged Cuts in 60 Seconds
Jagged edges waste materials and time. Diagnose and fix these common issues immediately:
Fix Stuck Blades During Cutting
If blade stops mid-cut:
– ✦ Check pivot screw tightness (loosen 1/8 turn if overtightened)
– ✦ Clear thread or paper debris from blade assembly
– ✦ Replace bent blade (even slight bends cause skipping)
Stop Fabric Pulling Instead of Cutting
When material lifts with blade:
– ✦ Increase downward pressure slightly
– ✦ Slow cutting speed by 50%
– ✦ Secure fabric with additional pattern weights
– ✦ Replace blade if edges look fuzzy
Replace Blades Safely Without Injury

Dull blades cause 80% of cutting accidents. Recognize replacement signs and follow this safe procedure:
Blade Replacement Red Flags
- Ragged edges on previously clean-cut materials
- Increased pressure needed to cut through single layers
- Material lifting instead of slicing cleanly
- Monthly replacement for daily users (3-6 month lifespan)
Injury-Proof Replacement Steps
- Lock blade guard in place before unscrewing
- Unscrew pivot screw completely—hold blade with cloth
- Lift old blade straight up (never pry sideways)
- Dispose in metal sharps container (never regular trash)
- Clean assembly with dry cloth before installing new blade
- Test rotation before first cut—should spin freely
Optimize for Quilting Strip Cutting
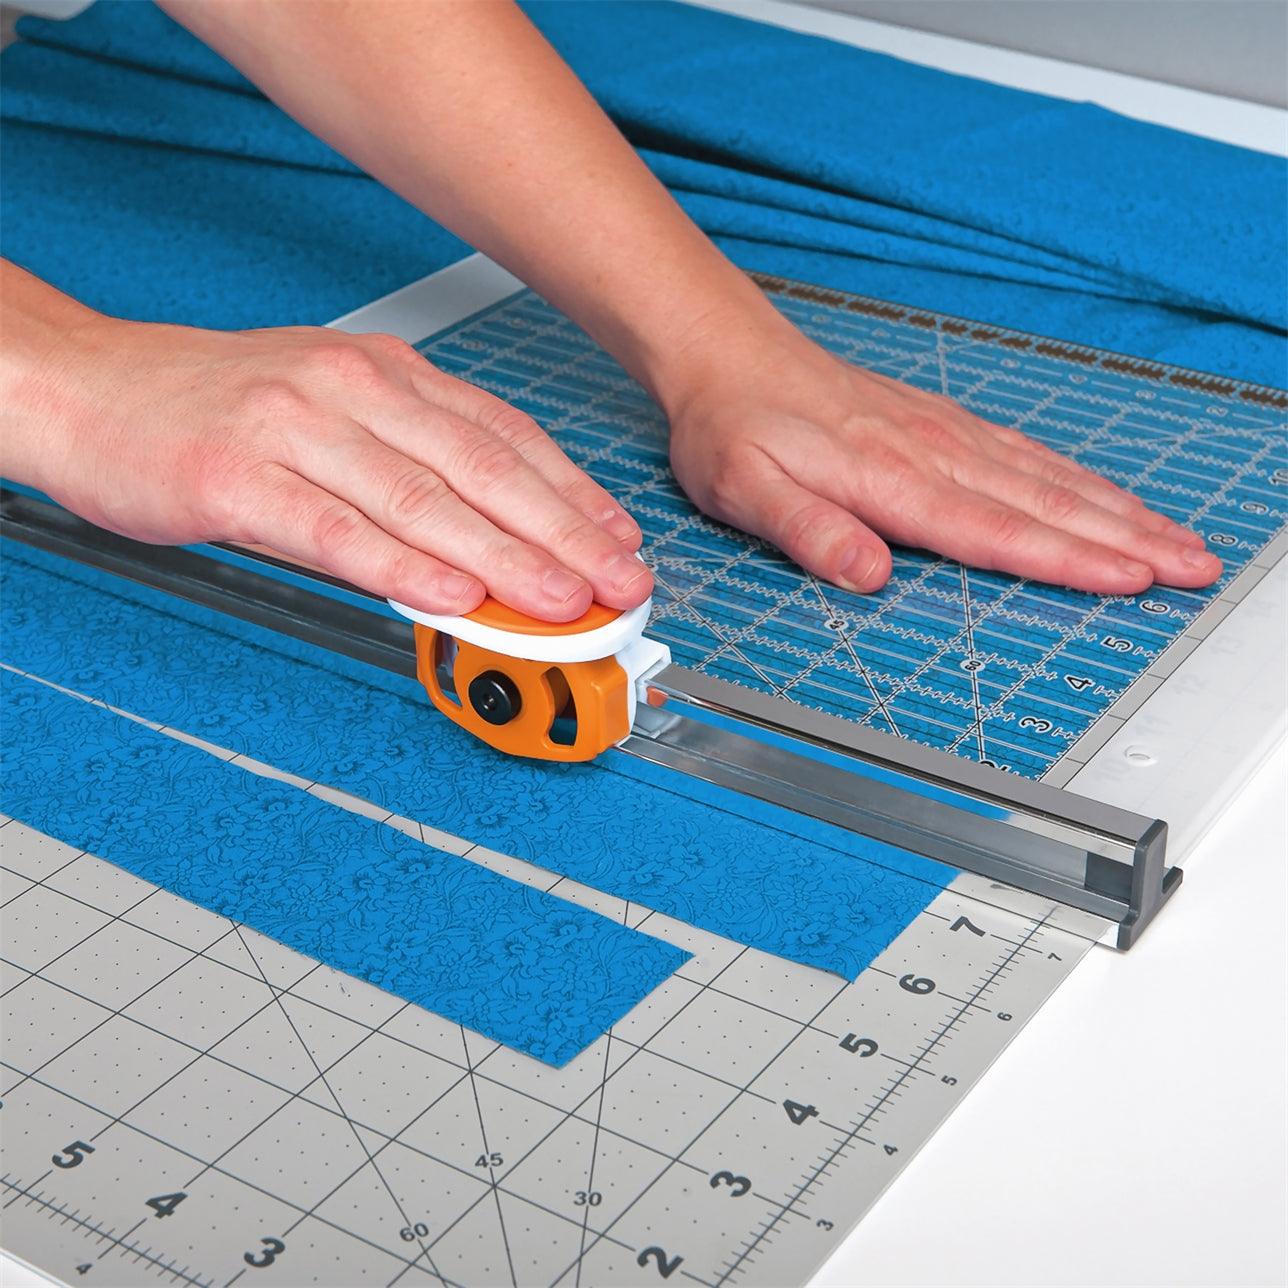
Quilters waste hours on uneven strips. This ruler-guided method ensures identical widths:
- Align quilting ruler’s edge with mat grid lines
- Press ruler firmly with non-dominant hand (fingers clear of blade path)
- Run cutter along ruler edge with consistent 30-degree angle
- Cut continuous strips without moving fabric between cuts
- Rotate fabric 90 degrees after first cut for cross-grain strips
- Use mat’s measurement lines to verify strip width
Time-saver: Stack and pin 4-6 fabric layers for batch cutting—replace blade immediately if edges fray.
Maintain Peak Performance Daily
Preventative care extends your cutter’s life by 3x. Implement this 90-second routine:
Daily Maintenance Checklist
- Wipe blade with microfiber cloth after each project
- Engage blade guard before setting cutter down
- Check pivot screw tightness (snug but not tight)
- Clear fiber debris from mat surface
Monthly Deep Clean
- Disassemble cutter completely
- Soak metal parts in isopropyl alcohol for 2 minutes
- Scrub blade teeth with soft toothbrush
- Dry thoroughly before reassembly
- Lubricate pivot screw with one drop of machine oil
Emergency Safety Protocols You Must Know
Accidents happen in seconds. These responses prevent minor incidents from becoming injuries:
If cutter slips from hand:
– ✦ Do not attempt to catch it—step back immediately
– ✦ Let it fall onto cutting mat (never carpet or hard floor)
– ✦ Retrieve only after blade guard engages
For minor cuts:
– ✦ Apply direct pressure with clean cloth for 5 minutes
– ✦ Elevate wound above heart level
– ✦ Seek medical care for cuts deeper than 1/8 inch
Critical rule: Always wear cut-resistant gloves when learning or teaching others—your fingertip is only 0.5mm from the blade during use.
Boost Precision with Pro Cutting Angles
Advanced cutters adjust blade angle for specific materials:
- 90-degree angle: Standard for most fabrics and papers (blade perpendicular to mat)
- 85-degree angle: For slippery materials like satin or vinyl (reduces lifting)
- 100-degree angle: When cutting thick leather (prevents blade deflection)
Key technique: Tilt the cutter handle slightly while keeping the blade base flat on the mat. Practice on scrap material first—too much angle causes uneven cuts.
Mastering these Fiskars cutter techniques transforms frustrating fabric prep into satisfying, precise work. Start with straight cuts on cotton scraps to build muscle memory, then progress to curves and multi-layer cutting. Replace blades monthly for heavy users—dull blades cause more accidents than sharp ones. Store your cutter in a dedicated case with blade guard engaged, and always secure materials properly before cutting. Within one project, you’ll notice cleaner edges, less hand fatigue, and faster completion times. The perfect cut isn’t magic—it’s knowing exactly how to position your hands, pressure, and blade for each material. Now grab your Fiskars cutter and make your next project look professionally finished from the very first cut.